# 铱星/RockBlock卫星通讯系统
卫星通信系统可在地面站和车辆之间提供远距离、高延迟的连接。
本专题介绍如何建立一个使用RockBlock作为运营商的铱星短报文(Short Burst Data,SBD)卫星通信系统。 在信号质量良好的情况下,用户端延迟在10至15秒左右。
# 综述
卫星通信链接需要以下组成部件:
- A RockBlock 9603 Iridium Satellite Modem (opens new window) module connected to a Pixhawk flashed with the PX4 Autopilot.
- 运行 Ubuntu 系统的消息中继服务器。
- A ground station computer running QGroundControl on Ubuntu Linux
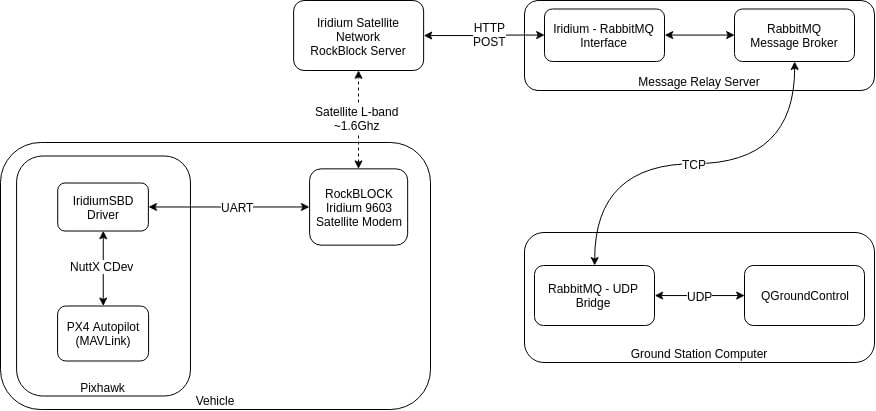
完整的系统架构如下:

注解
The setup was tested with the current release of QGroundControl running on Ubuntu 14.04 and 16.04.
- It may be possible to run the system on other ground stations and operating systems, but this has not been tested (and is not guaranteed to work).
- The RockBlock MK2 (opens new window) module can also be used. The RockBlock 9603 module is recommended because it is smaller and lighter, while providing the same functionality.
# Costs
The UK link running cost consists of a line rental and per message cost:
- Each module needs to be activated which costs £10.00 per month
- Each message transmitted over the system costs one credit per 50 bytes. Bundles of credits can be bought from RockBlock for £0.04-£0.11 per credit, depending on the bundle size.
Refer to the RockBlock Documentation (opens new window) for a detailed explanation of the modules, running costs and RockBlock in general.
# Vehicle Setup
# 布线
Connect the RockBlock module to a serial port of the Pixhawk. Due to the power requirements of the module it can only be powered over a high-power serial port as a maximum of 0.5 A at 5 V are required. If none is available/free then another power source which has the same ground level as the Pixhawk and can provide required power has to be setup. The details of the connectors (opens new window) and the power requirements (opens new window) can be found in the RockBlock documentation.
# Module
The module can either use the internal antenna or an external one connected to the SMA connector. To switch between the two antennas modes (opens new window) the position of a small RF link cable needs to changed. If an external antenna is used always make sure that the antenna is connected to the module before powering it up to avoid damage to the module.
The default baud rate of the module is 19200. However, the PX4 iridiumsbd driver requires a baud rate of 115200 so it needs to be changed using the AT commands (opens new window).
- Connect to the module with using a 19200/8-N-1 setting and check if the communication is working using the command:
AT. The response should be:OK. - Change the baud rate:
AT+IPR=9 - Reconnect to the model now with a 115200/8-N-1 setting and save the configuration using:
AT&W0
The module is now ready to be used with PX4.
# Software
Configure the serial port on which the RockBlock module will run using ISBD_CONFIG. There is no need to set the baud rate for the port, as this is configured by the driver.
注解
If the configuration parameter is not available in QGroundControl then you may need to add the driver to the firmware:
drivers/telemetry/iridiumsbd
# RockBlock Setup
When buying the first module on RockBlock an user account needs to be created in a first step.
Log in to the account (opens new window) and register the RockBlock module under the My RockBLOCKs. Activate the line rental for the module and make sure that enough credits for the expected flight duration are available on the account. When using the default settings one message per minute is sent from the vehicle to the ground station.
Set up a delivery group for the message relay server and add the module to that delivery group:
# Relay Server Setup
The relay server should be run on either Ubuntu 16.04 or 14.04 OS.
The server working as a message relay should have a static IP address and two publicly accessible, open, TCP ports:
5672for the RabbitMQ message broker (can be changed in the rabbitmq settings)45679for the HTTP POST interface (can be changed in the relay.cfg file)
Install the required python modules:
sudo pip install pika tornado futureInstall the
rabbitmqmessage broker:sudo apt install rabbitmq-serverConfigure the broker's credentials (change PWD to your preferred password):
sudo rabbitmqctl add_user iridiumsbd PWD
sudo rabbitmqctl set_permissions iridiumsbd ".*" ".*" ".*"
Clone the SatComInfrastructure (opens new window) repository:
git clone https://github.com/acfloria/SatComInfrastructure.gitGo to the location of the SatComInfrastructure repo and configure the broker's queues:
./setup_rabbit.py localhost iridiumsbd PWDVerify the setup:
sudo rabbitmqctl list_queuesThis should give you a list of 4 queues:
MO,MO_LOG,MT,MT_LOGEdit the
relay.cfgconfiguration file to reflect your settings.Start the relay script in the detached mode:
screen -dm bash -c 'cd SatcomInfrastructure/; ./relay.py
Other instructions include:
- Detach from the screen:
ctrl+a d - Kill execution of the script:
ctrl+a :quit - Reattach to the screen::
screen -dr
# Ground Station Computer
To setup the ground station:
Install the required python modules:
sudo pip install pika tornado futureClone the SatComInfrastructure repository:
git clone https://github.com/acfloria/SatComInfrastructure.gitEdit the udp2rabbit.cfg configuration file to reflect your settings.
Install QGroundControl (opens new window) (daily build).
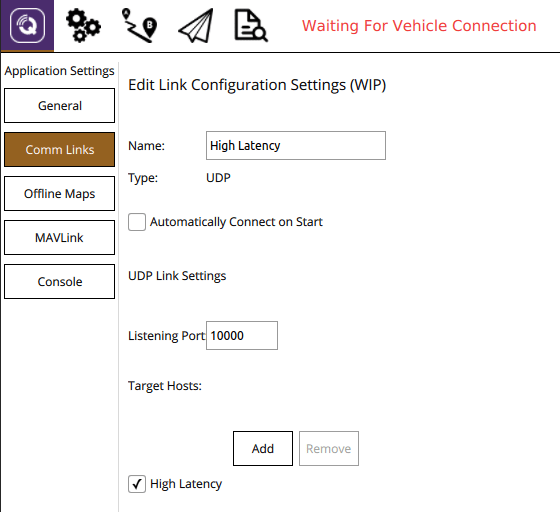
Add a UDP connection in QGC with the parameters:
- Listening port: 10000
- Target hosts: 127.0.0.1:10001
- High Latency: checked

# 验证
Open a terminal on the ground station computer and change to the location of the SatComInfrastructure repository. Then start the udp2rabbit.py script:
./udp2rabbit.pySend a test message from RockBlock Account (opens new window) to the created delivery group in the
Test Delivery Groupstab.
If in the terminal where the udp2rabbit.py script is running within a couple of seconds the acknowledge for a message can be observed, then the RockBlock delivery group, the relay server and the udp2rabbit script are set up correctly:

# Running the System
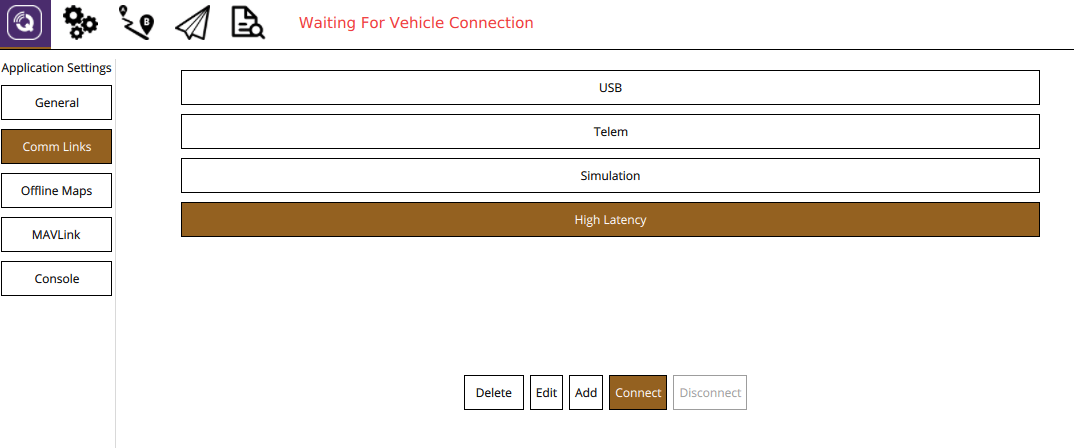
Start QGroundControl. Manually connect the high latency link first, then the regular telemetry link:

Open a terminal on the ground station computer and change to the location of the SatComInfrastructure repository. Then start the udp2rabbit.py script:
./udp2rabbit.pyPower up the vehicle.
Wait until the first
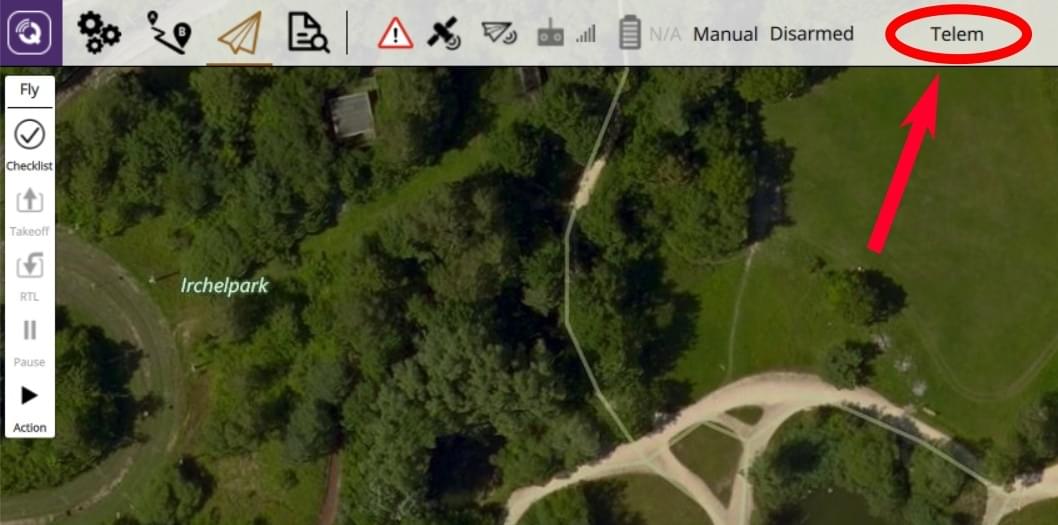
HIGH_LATENCY2message is received on QGC. This can be checked either using the MAVLink Inspector widget or on the toolbar with the LinkIndicator. If more than one link is connected to the active vehicle the LinkIndicator shows all of them by clicking on the name of the shown link:
The link indicator always shows the name of the priority link.
The satellite communication system is now ready to use. The priority link, which is the link over which commands are send, is determined the following ways:
If no link is commanded by the user a regular radio telemetry link is preferred over the high latency link.
The autopilot and QGC will fall back from the regular radio telemetry to the high latency link if the vehicle is armed and the radio telemetry link is lost (no MAVLink messages received for a certain time). As soon as the radio telemetry link is regained QGC and the autopilot will switch back to it.
The user can select a priority link over the
LinkIndicatoron the toolbar. This link is kept as the priority link as long as this link is active or the user selects another priority link:
# 故障处理
Satellite communication messages from the airplane are received but no commands can be transmitted (the vehicle does not react)
- Check the settings of the relay server and make sure that they are correct, especially the IMEI.
No satellite communication messages from the airplane arrive on the ground station:
- Check using the system console if the iridiumsbd driver started and if it did that a signal from any satellite is received by the module:
iridiumsbd status - Make sure using the verification steps from above that the relay server, the delivery group and the
udp2rabbit.pyscript are set up correctly. - Check if the link is connected and that its settings are correct.
- Check using the system console if the iridiumsbd driver started and if it did that a signal from any satellite is received by the module:
The IridiumSBD driver does not start:
- Reboot the vehicle. If that helps increase the sleep time in the
extras.txtbefore the driver is started. If that does not help make sure that the Pixhawk and the module have the same ground level. Confirm also that the baudrate of the module is set to 115200.
- Reboot the vehicle. If that helps increase the sleep time in the
A first message is received on the ground but as soon as the vehicle is flying no message can be transmitted or the latency is significantly larger (in the order of minutes)
- Check the signal quality after the flight. If it is decreasing during the flight and you are using the internal antenna consider using an external antenna. If you are already using the external antenna try moving the antenna as far away as possible from any electronics or anything which might disturb the signal. Also make sure that the antenna is not damaged.