# ROS (1) via ROS 2 Bridge (User Guide)
This topic explains how use ROS (1) with PX4, by bridging via ROS 2.
It provides an overview of the ROS-ROS2-PX4 architecture, along with instructions on how to install all the needed software and build ROS (1) applications. It also covers how to run/setup ROS 2 and ROS 1 workspaces at the same time.
Note
Generally you might use this setup rather than bridging ROS (1) with MAVROS if you want deeper access to PX4 than granted by MAVLink, or if you want to use both ROS2 and ROS (1) applications.
Note
This setup, and these instructions depend on ROS 2. We highly recommend you read up on ROS 2 first.
Note
The PX4 development team recommend that all users upgrade to ROS 2.
# Overview
The application pipeline for ROS (1) bridged over ROS 2 is shown below.
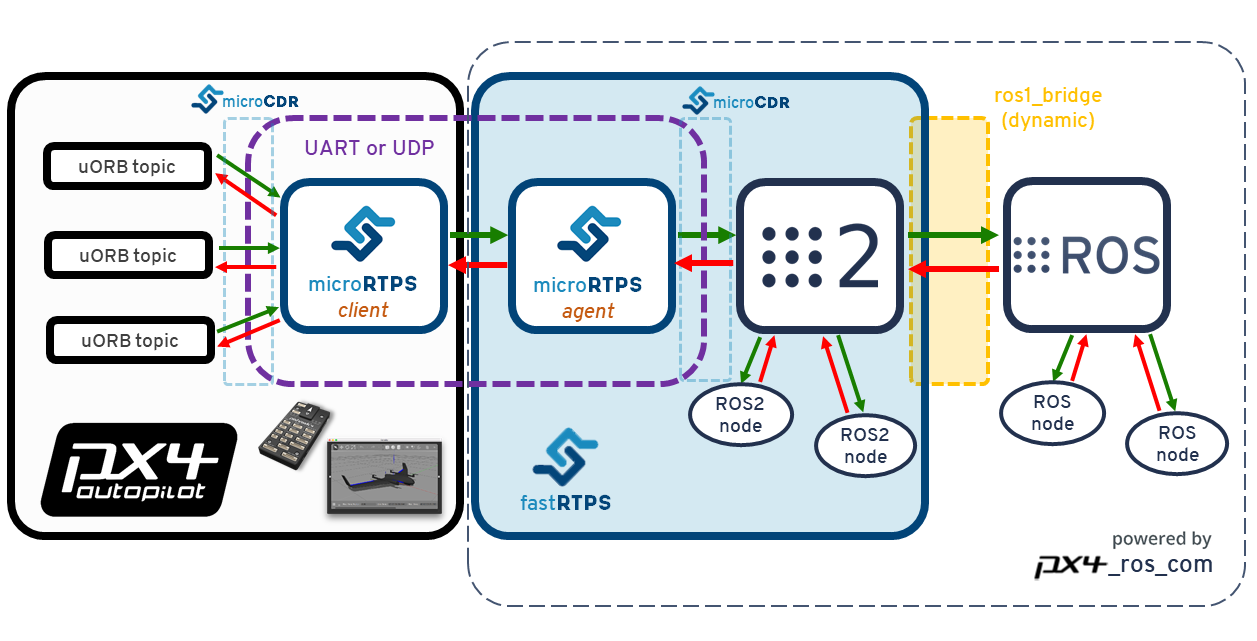
Essentially it is the same as for ROS 2, except that there is an additional ros1_bridge (opens new window) package (by Open Robotics) that translates messages between the two versions.
This is needed because the original version of ROS does not support RTPS.
The other main difference is that the px4_ros_com and px4_msgs packages a separate ros1 branch that generates the ROS message headers and source files for using with the ros1_bridge.
This branch also includes example listener and advertiser nodes.
# Installation & Setup
Follow the instructions in ROS 2 User Guide > Installation & Setup to install ROS 2.
# Build ROS (1) Workspace
Since the ROS requires a different environments from ROS to you will need to create a separate workspace.
This will include the ros branch of px4_ros_com and px4_msgs, along with the ros1_bridge.
To create and build the workspace:
- Create the ROS 1 workspace directory using:
$ mkdir -p ~/px4_ros_com_ros1/src - Clone the ROS 1 bridge packages
px4_ros_comandpx4_msgsto the/srcdirectory (theros1branch):$ git clone https://github.com/PX4/px4_ros_com.git ~/px4_ros_com_ros1/src/px4_ros_com -b ros1 # clones the 'ros1' branch $ git clone https://github.com/PX4/px4_msgs.git ~/px4_ros_com_ros1/src/px4_msgs -b ros1 - Use the
build_ros1_bridge.bashscript to build the ROS workspace (includingpx4_ros_com,px4_msgs, andros1_bridge).$ git checkout ros1 $ cd scripts $ source build_ros1_bridge.bashTIP
You can also build both ROS (1) and ROS 2 workspaces with a single script:
build_all.bash. The most common way of using it, is by passing the ROS(1) workspace directory path and PX4 Autopilot directory path:$ source build_all.bash --ros1_ws_dir <path/to/px4_ros_com_ros1/ws>
# Sanity Check the Installation
As discussed in ROS 2 User Guide > Sanity Check the Installation a good way to verify the installation is to test that the bridge can communicate with PX4 by running it against the PX4 simulator.
To use ROS (1) and ROS 2 (you need both for this!):
Setup your PX4 Ubuntu Linux development environment - the default instructions get the latest version of PX4 source and install all the needed tools.
Open a new terminal in the root of the PX4 Autopilot project, and then start a PX4 Gazebo simulation using:
make px4_sitl_rtps gazeboOnce PX4 has fully started the terminal will display the NuttShell/System Console.
On another terminal, source the ROS 2 environment and workspace and launch the
ros1_bridge(this allows ROS 2 and ROS nodes to communicate with each other). Also set theROS_MASTER_URIwhere theroscoreis/will be running:$ source /opt/ros/dashing/setup.bash $ source ~/px4_ros_com_ros2/install/local_setup.bash $ export ROS_MASTER_URI=http://localhost:11311 $ ros2 run ros1_bridge dynamic_bridgeOn another terminal, source the ROS workspace and launch the
sensor_combinedlistener node. Since you are launching throughroslaunch, this will also automatically start theroscore:$ source ~/px4_ros_com_ros1/install/setup.bash $ roslaunch px4_ros_com sensor_combined_listener.launchOn another terminal, source the ROS 2 workspace and then start the
micrortps_agentdaemon with UDP as the transport protocol:$ source ~/px4_ros_com_ros2/install/setup.bash $ micrortps_agent -t UDPOn the NuttShell/System Console, start the
micrortps_clientdaemon also in UDP:> micrortps_client start -t UDPIf the bridge is working correctly you will be able to see the data being printed on the terminal/console where you launched the ROS listener.
RECEIVED DATA FROM SENSOR COMBINED
================================
ts: 870938190
gyro_rad[0]: 0.00341645
gyro_rad[1]: 0.00626475
gyro_rad[2]: -0.000515705
gyro_integral_dt: 4739
accelerometer_timestamp_relative: 0
accelerometer_m_s2[0]: -0.273381
accelerometer_m_s2[1]: 0.0949186
accelerometer_m_s2[2]: -9.76044
accelerometer_integral_dt: 4739
Note
When using the build_all.bash script, it automatically opens and sources all the required terminals, so you just have to run the respective apps in each terminal.
# Creating a ROS (1) listener
Since the creation of ROS nodes is a well known and documented process, we are going to leave this section out from this guide, and you can find an example of a ROS listener for sensor_combined messages the ros1 branch of the px4_ros_com repository, under the following path src/listeners/.