# ROS 2 User Guide (PX4-ROS 2 Bridge)
This topic explains how to setup and use ROS 2 with PX4.
It provides an overview of the ROS2-PX4 bridge architecture and application pipeline, along with instructions on how to install all the needed software and build ROS 2 applications.
Note
The Fast DDS interface in the PX4 Autopilot can be leveraged by any applications running and linked in DDS domains (including ROS nodes).
For information about using the microRTPS bridge without ROS 2, see the RTPS/DDS Interface section.
Note
For a more detailed and visual explanation on how to use PX4 with ROS 2 see these presentations from the PX4 maintainers:
# Overview
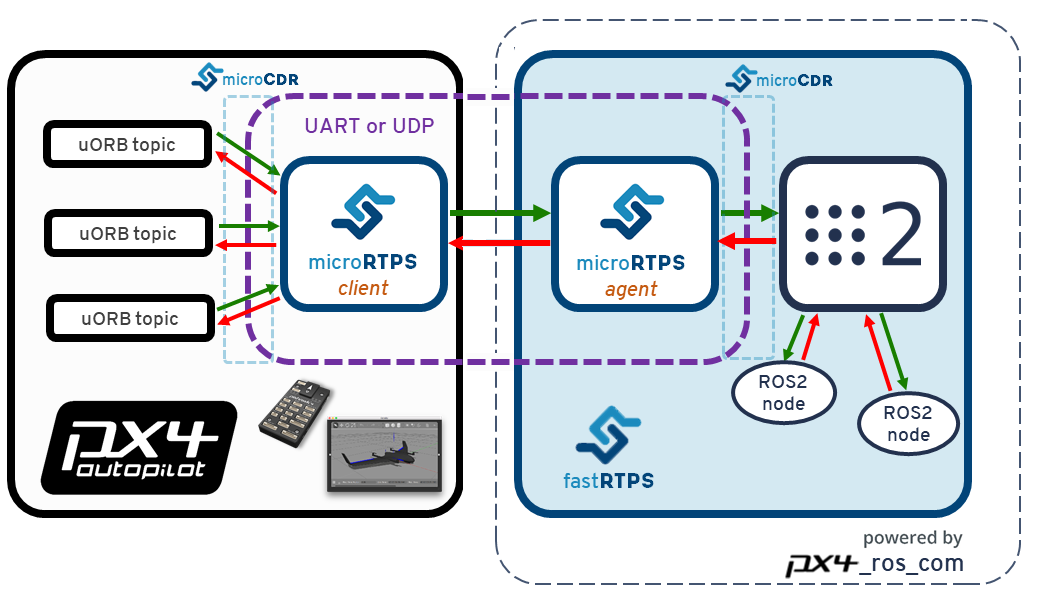
The application pipeline for ROS 2 is very straightforward, thanks to the native communications middleware (DDS/RTPS). The microRTPS Bridge consists of a client running on PX4 and an agent running on the ROS computer, which communicate to provide bi-direction message translation between UORB and ROS 2 message formats. This allows you to create ROS 2 listener or advertiser nodes that publish and subscribe directly to and from PX4 UORB data! This is shown in the diagram below.
ROS 2 uses the px4_msgs (opens new window) and px4_ros_com (opens new window) packages to ensure that matching message definitions are used for creating both the client and the agent code (this is important), and also to remove the requirement for PX4 to be present when building ROS code.
px4_msgscontains PX4 client message definitions. When this project is built it generates the corresponding ROS 2-compatible IDL files.px4_ros_combuilds thepx4_msgsproject, and then uses the generated IDL files to create (and build) the ROS 2 agent.
The PX4 Autopilot project automatically updates px4_msgs (opens new window) with new message definitions whenever they are changed (in the master branch).
Note
The subset of uORB topics that will be accessible to ROS applications can be found in px4_msgs/msg (opens new window).
PX4 firmware contains a microRTPS client based on its build-time message definitions. Astute readers will note that since the generated agent might not have been built to that same set of definitions (unless they were both built of the same 'master' commit). Right now this is not a problem because the PX4 message set/definitions are relatively stable. In the near future the intention is that branches will be created to match with specific PX4 releases.
WARNING
You cannot use an agent generated as part of a "normal" PX4 build with ROS 2. While microRTPS client is the same, the IDL files used by ROS 2 are slightly different than used by normal DDS. We use the px4_msg to generate appropriate IDL files.
# Installation & Setup
To setup ROS 2 for use with PX4 you will need to:
# Install Fast DDS
Follow the Fast DDS Installation Guide to install Fast RTPS(DDS) 2.0.0 (or later) and Fast-RTPS-Gen 1.0.4 (not later!) and their dependencies.
Note
Check the guide to confirm the latest dependencies! You won't be able to continue with this guide until the correct versions of Fast RTPS(DDS) and **Fast-RTPS-Gen have been installed.
# Install ROS 2
Note
This install and build guide covers ROS 2 Foxy in Ubuntu 20.04.
To install ROS 2 and its dependencies:
The install process should also install the
colconbuild tools, but in case that doesn't happen, you can install the tools manually:sudo apt install python3-colcon-common-extensionseigen3_cmake_moduleis also required, since Eigen3 is used on the transforms library:sudo apt install ros-foxy-eigen3-cmake-moduleSome Python dependencies must also be installed (using
piporapt):sudo pip3 install -U empy pyros-genmsg setuptools
# Build ROS 2 Workspace
This section shows how create a ROS 2 workspace hosted in your home directory (modify the commands as needed to put the source code elsewhere). The px4_ros_com and px4_msg packages are cloned to a workspace folder, and then a script is used to build the workspace.
Note
The build process will open new tabs on the console, corresponding to different stages of the build process that need to have different environment configurations sourced.
To create and build the workspace:
- Create a workspace directory using:
$ mkdir -p ~/px4_ros_com_ros2/src - Clone the ROS 2 bridge packages
px4_ros_comandpx4_msgsto the/srcdirectory (themasterbranch is cloned by default):$ git clone https://github.com/PX4/px4_ros_com.git ~/px4_ros_com_ros2/src/px4_ros_com $ git clone https://github.com/PX4/px4_msgs.git ~/px4_ros_com_ros2/src/px4_msgs - Use the
build_ros2_workspace.bashscript to build the ROS 2 workspace (includingpx4_ros_comandpx4_msgs).$ cd ~/px4_ros_com_ros2/src/px4_ros_com/scripts $ source build_ros2_workspace.bash
TIP
All script options can be listed by calling it with the --help argument. In particular the --verbose argument shows the full colcon build output.
Note
The px4_ros_com/scripts directory contains multiple scripts for building different kinds of workspaces.
# Sanity Check the Installation
One way to check that the installation/setup succeeded is to test that the bridge can communicate with PX4. We can do this by running the bridge against PX4 running in the simulator.
Setup your PX4 Ubuntu Linux development environment - the default instructions get the latest version of PX4 source and install all the needed tools.
Open a new terminal in the root of the PX4 Autopilot project, and then start a PX4 Gazebo simulation using:
make px4_sitl_rtps gazeboOnce PX4 has fully started the terminal will display the NuttShell/System Console.
On a new terminal,
sourcethe ROS 2 workspace and then start themicrortps_agentdaemon with UDP as the transport protocol:$ source ~/px4_ros_com_ros2/install/setup.bash $ micrortps_agent -t UDPOn the original terminal (System console) start the
micrortps_clientdaemon with UDP:pxh> micrortps_client start -t UDPOpen a new terminal and start a "listener" using the provided launch file:
$ source ~/px4_ros_com_ros2/install/setup.bash
$ ros2 launch px4_ros_com sensor_combined_listener.launch.py
If the bridge is working correctly you will be able to see the data being printed on the terminal/console where you launched the ROS listener:
RECEIVED DATA FROM SENSOR COMBINED
================================
ts: 870938190
gyro_rad[0]: 0.00341645
gyro_rad[1]: 0.00626475
gyro_rad[2]: -0.000515705
gyro_integral_dt: 4739
accelerometer_timestamp_relative: 0
accelerometer_m_s2[0]: -0.273381
accelerometer_m_s2[1]: 0.0949186
accelerometer_m_s2[2]: -9.76044
accelerometer_integral_dt: 4739
You can also verify the rate of the message using ros2 topic hz. E.g. in the case of sensor_combined use ros2 topic hz /SensorCombined_PubSubTopic:
average rate: 248.187
 min: 0.000s max: 0.012s std dev: 0.00147s window: 2724
average rate: 248.006
 min: 0.000s max: 0.012s std dev: 0.00147s window: 2972
average rate: 247.330
 min: 0.000s max: 0.012s std dev: 0.00148s window: 3212
average rate: 247.497
 min: 0.000s max: 0.012s std dev: 0.00149s window: 3464
average rate: 247.458
 min: 0.000s max: 0.012s std dev: 0.00149s window: 3712
average rate: 247.485
 min: 0.000s max: 0.012s std dev: 0.00148s window: 3960
# ROS 2 Example Applications
# Creating a ROS 2 listener
With the px4_ros_com built successfully, one can now take advantage of the generated microRTPS agent app and also from the generated sources and headers of the ROS 2 msgs from px4_msgs, which represent a one-to-one matching with the uORB counterparts.
To create a listener node on ROS 2, lets take as an example the sensor_combined_listener.cpp node under px4_ros_com/src/examples/listeners.
The code first imports the C++ libraries needed to interface with the ROS 2 middleware and the required message header file:
#include <rclcpp/rclcpp.hpp>
#include <px4_msgs/msg/sensor_combined.hpp>
Then it creates a SensorCombinedListener class that subclasses the generic rclcpp::Node base class.
/**
 * @brief Sensor Combined uORB topic data callback
 */
class SensorCombinedListener : public rclcpp::Node
{
This creates a callback function for when the sensor_combined uORB messages are received (now as RTPS/DDS messages), and outputs the content of the message fields each time the message is received.
public:
    explicit SensorCombinedListener() : Node("sensor_combined_listener") {
        subscription_ = this->create_subscription<px4_msgs::msg::SensorCombined>(
            "SensorCombined_PubSubTopic",
            10,
            [this](const px4_msgs::msg::SensorCombined::UniquePtr msg) {
            std::cout << "\n\n\n\n\n\n\n\n\n\n\n\n\n\n\n\n\n\n\n\n\n\n\n\n";
            std::cout << "RECEIVED SENSOR COMBINED DATA"   << std::endl;
            std::cout << "============================="   << std::endl;
            std::cout << "ts: "          << msg->timestamp    << std::endl;
            std::cout << "gyro_rad[0]: " << msg->gyro_rad[0]  << std::endl;
            std::cout << "gyro_rad[1]: " << msg->gyro_rad[1]  << std::endl;
            std::cout << "gyro_rad[2]: " << msg->gyro_rad[2]  << std::endl;
            std::cout << "gyro_integral_dt: " << msg->gyro_integral_dt << std::endl;
            std::cout << "accelerometer_timestamp_relative: " << msg->accelerometer_timestamp_relative << std::endl;
            std::cout << "accelerometer_m_s2[0]: " << msg->accelerometer_m_s2[0] << std::endl;
            std::cout << "accelerometer_m_s2[1]: " << msg->accelerometer_m_s2[1] << std::endl;
            std::cout << "accelerometer_m_s2[2]: " << msg->accelerometer_m_s2[2] << std::endl;
            std::cout << "accelerometer_integral_dt: " << msg->accelerometer_integral_dt << std::endl;
        });
    }
The lines below create a subscription to the sensor_combined_topic which can be matched with one or more compatible ROS publishers.
private:
    rclcpp::Subscription<px4_msgs::msg::SensorCombined>::SharedPtr subscription_;
};
The instantiation of the SensorCombinedListener class as a ROS node is done on the main function.
int main(int argc, char *argv[])
{
    std::cout << "Starting sensor_combined listener node..." << std::endl;
    setvbuf(stdout, NULL, _IONBF, BUFSIZ);
    rclcpp::init(argc, argv);
    rclcpp::spin(std::make_shared<SensorCombinedListener>());
    rclcpp::shutdown();
    return 0;
}
# Creating a ROS 2 advertiser
A ROS 2 advertiser node publishes data into the DDS/RTPS network (and hence to the PX4 Autopilot).
Taking as an example the debug_vect_advertiser.cpp under px4_ros_com/src/advertisers, first we import required headers, including the debug_vect msg header.
#include <chrono>
#include <rclcpp/rclcpp.hpp>
#include <px4_msgs/msg/debug_vect.hpp>
using namespace std::chrono_literals;
Then the code creates a DebugVectAdvertiser class that subclasses the generic rclcpp::Node base class.
class DebugVectAdvertiser : public rclcpp::Node
{
The code below creates a function for when messages are to be sent. The messages are sent based on a timed callback, which sends two messages per second based on a timer.
public:
    DebugVectAdvertiser() : Node("debug_vect_advertiser") {
        publisher_ = this->create_publisher<px4_msgs::msg::DebugVect>("DebugVect_PubSubTopic", 10);
        auto timer_callback =
        [this]()->void {
            auto debug_vect = px4_msgs::msg::DebugVect();
            debug_vect.timestamp = std::chrono::time_point_cast<std::chrono::microseconds>(std::chrono::steady_clock::now()).time_since_epoch().count();
            std::string name = "test";
            std::copy(name.begin(), name.end(), debug_vect.name.begin());
            debug_vect.x = 1.0;
            debug_vect.y = 2.0;
            debug_vect.z = 3.0;
            RCLCPP_INFO(this->get_logger(), "\033[97m Publishing debug_vect: time: %llu x: %f y: %f z: %f \033[0m",
                                debug_vect.timestamp, debug_vect.x, debug_vect.y, debug_vect.z);
            this->publisher_->publish(debug_vect);
        };
        timer_ = this->create_wall_timer(500ms, timer_callback);
    }
private:
    rclcpp::TimerBase::SharedPtr timer_;
    rclcpp::Publisher<px4_msgs::msg::DebugVect>::SharedPtr publisher_;
};
The instantiation of the DebugVectAdvertiser class as a ROS node is done on the main function.
int main(int argc, char *argv[])
{
    std::cout << "Starting debug_vect advertiser node..." << std::endl;
    setvbuf(stdout, NULL, _IONBF, BUFSIZ);
    rclcpp::init(argc, argv);
    rclcpp::spin(std::make_shared<DebugVectAdvertiser>());
    rclcpp::shutdown();
    return 0;
}
# Offboard Control
For a complete reference example on how to use Offboard control with PX4, see: ROS 2 Offboard control example.
# Manual Workspace Setup (FYI Only)
Note
This is provided to help you better understand the build process. It is not needed to build or use ROS 2. It additionally includes instructions for building the ros1_bridge package, which is used in ROS (1) via ROS 2 Bridge.
This section describes the process to manually setup your workspace and build the px4_ros_com, px4_msgs, and ros1_bridge package. The topic effectively explains the operation of the build_ros2_workspace.bash script in the installation instructions).
To build the ROS 2 workspace only:
cdintopx4_ros_com_ros2dir and source the ROS 2 environment. Don't mind if it tells you that a previous workspace was set before:cd ~/px4_ros_com_ros2 source /opt/ros/foxy/setup.bashBuild the workspace:
colcon build --symlink-install --event-handlers console_direct+
To build both ROS 2 and ROS (1) workspaces (replacing the previous steps):
cdintopx4_ros_com_ros2dir and source the ROS 2 environment. Don't mind if it tells you that a previous workspace was set before:source /opt/ros/foxy/setup.bashClone the
ros1_bridgepackage so it can be built on the ROS 2 workspace:git clone https://github.com/ros2/ros1_bridge.git -b dashing ~/px4_ros_com_ros2/src/ros1_bridgeBuild the
px4_ros_comandpx4_msgspackages, excluding theros1_bridgepackage:colcon build --symlink-install --packages-skip ros1_bridge --event-handlers console_direct+
Note
--event-handlers console_direct+ only serve the purpose of adding verbosity to the colcon build process, and can be removed if one wants a more "quiet" build.
Then build the ROS(1) packages side. First open a new terminal window and source the ROS(1) environment that was installed on the system:
source /opt/ros/melodic/setup.bashBuild the
px4_ros_comandpx4_msgspackages on the ROS end (using the terminal opened in the previous step):cd ~/px4_ros_com_ros1 && colcon build --symlink-install --event-handlers console_direct+Open another new terminal and then source the environments and workspaces in the order listed below:
source ~/px4_ros_com_ros1/install/setup.bash
source ~/px4_ros_com_ros2/install/setup.bash
Finally, build the
ros1_bridge:cd ~/px4_ros_com_ros2 && colcon build --symlink-install --packages-select ros1_bridge --cmake-force-configure --event-handlers console_direct+
Note
The build process may consume a lot of memory resources. On a resource limited machine, reduce the number of jobs being processed in parallel (e.g. set environment variable MAKEFLAGS=-j1). For more details on the build process, see the build instructions on the ros1_bridge (opens new window) package page.
# Cleaning the workspaces
After building the workspaces there are many files that must be deleted before you can do a clean/fresh build (for example, after you have changed some code and want to rebuild).
Unfortunately colcon does not currently have a way of cleaning the generated build, install and log directories, so these directories must be deleted manually.
The clean_all.bash script (in px4_ros_com/scripts) is provided to ease this cleaning process, this script can be used to clean all of the workspace options listed above (ROS 2, ROS 1, and Both)
The most common way of using it is by passing it the ROS (1) workspace directory path (since it's usually not on the default path):
$ source clean_all.bash --ros1_ws_dir <path/to/px4_ros_com_ros1/ws>
TIP
Like the build scripts, the clean_all.bash script also has a --help guide.