# 가제보 모의 시험 환경의 ROS
ROS (로봇 운영체제)는 PX4와 가제보 모의 시험 환경을 함께 쓸 수 있습니다. ROS는 PX4와 통신하는 MAVROS MAVLink 노드를 활용합니다.
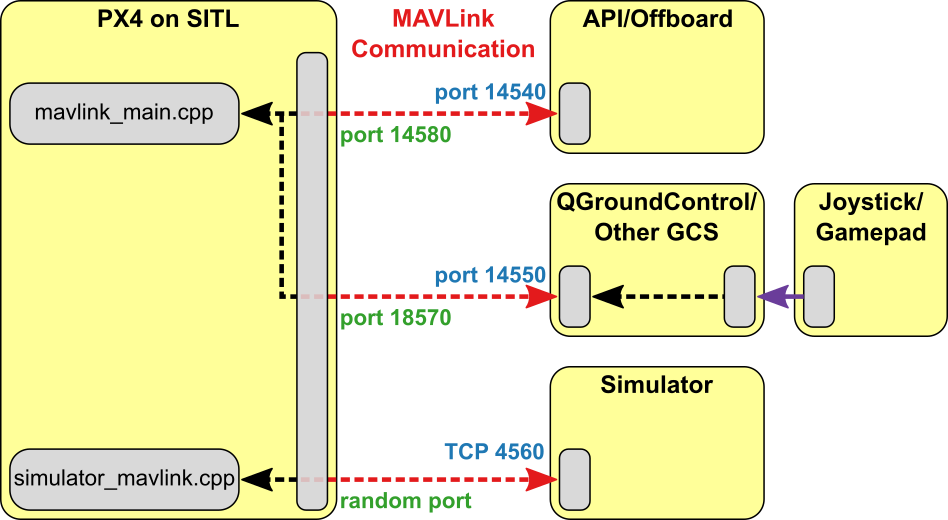
ROS/가제보의 PX4와의 통합시 다음 다이어그램 패턴을 따릅니다(일반 PX4 모의 시험 환경을 보여줍니다). PX4는 모의 시험 환경(예: 가제보)과 통신하여 모의 환경으로부터 오는 센서 데이터를 받고 모터와 액츄에이터 값을 내보냅니다. 지상 통제 장치와 모의 환경과 수신 명령으로부터 텔레메트리 전송을 시행하는 보드 외부 장치 API(예: ROS)와 통신을 수행합니다.
우분투 리눅스에서 ROS로 PX4 모의 시험 환경을 구성하는 가장 쉬운 방법은 리눅스 개발 환경 > ROS와 가제보에서 찾을 수 있는 표준 설치 스크립트의 활용입니다. 스크립트는 필요한 모든 구성 항목, PX4, ROS "키네틱", 가제보 7 모의 시험 환경, MAVROS를 설치합니다.
# ROS와 가제보 설치
Note
ROS is only supported on Linux (not macOS or Windows).
The easiest way to setup PX4 simulation with ROS on Ubuntu Linux is to use the standard installation script that can be found at Development Environment on Linux > Gazebo with ROS. The script installs everything you need: PX4, ROS "Melodic", the Gazebo 9 simulator, and MAVROS.
가제보 모의 시험 환경은 ROS 토픽에 데이터를 직접 내보내는 센서를 붙일 용도로 수정할 수 있습니다. 예를 들면 가제보 ROS 레이저 플러그인이 있습니다. 이 기능을 지원하려면, 가제보를 적당한 ROS 래퍼와 함께 실행해야합니다.
# ROS/모의 시험 환경 실행
ROS에 래핑한 모의 시험 환경을 실행할 수 있는 ROS 실행 스크립트가 있습니다:
roslaunch mavros px4.launch fcu_url:="udp://:14540@192.168.1.36:14557"
ROS에 래핑한 SITL을 실행하려면 ROS 환경을 업데이트한 후 늘상 하던 방식대로 실행하십시오:
roslaunch mavros px4.launch fcu_url:="udp://:14540@127.0.0.1:14557"
Note
It can be useful to call roslaunch with the -w (warn) and/or -v (verbose) in order to get warnings about missing dependencies in your setup. For example:
cd <PX4-Autopilot_clone>
DONT_RUN=1 make px4_sitl_default gazebo
source ~/catkin_ws/devel/setup.bash    # (optional)
source Tools/setup_gazebo.bash $(pwd) $(pwd)/build/px4_sitl_default
export ROS_PACKAGE_PATH=$ROS_PACKAGE_PATH:$(pwd)
export ROS_PACKAGE_PATH=$ROS_PACKAGE_PATH:$(pwd)/Tools/sitl_gazebo
roslaunch px4 posix_sitl.launch
위에서 언급한 실행 파일 중 하를 여러분의 실행 파일 목록에 넣어 ROS 프로그램을 모의 시험 환경에서 실행할 수 있게 하십시오.
# ROS 래퍼로 가제보 실행
The Gazebo simulation can be modified to integrate sensors publishing directly to ROS topics e.g. the Gazebo ROS laser plugin. To support this feature, Gazebo must be launched with the appropriate ROS wrappers.
우선 아래 명령으로 모의 시험 환경을 시작하십시오:
- posix_sitl.launch (opens new window): 생짜 SITL 실행
- mavros_posix_sitl.launch (opens new window): SITL과 MAVROS
콘솔 화면은 다음과 같이 나타납니다:
이제 새 터미널에서 가제보 메뉴를 통해 아이리스 모델을 넣을 수 있는지 확인하십시오. 이 과정을 수행하려면 적당한 sitl_gazebo 폴더를 환경 변수에 설정하십시오.
no_sim=1 make px4_sitl_default gazebo
Include one of the above mentioned launch files in your own launch file to run your ROS application in the simulation.
# 움직임 뒤에서 일어나는 일
This section shows how the roslaunch instructions provided previously actually work (you can follow them to manually launch the simulation and ROS).
First start the simulator using the command below:
no_sim=1 make px4_sitl_default gazebo
The console will look like this:
[init] shell id: 46979166467136
[init] task name: px4
______  __   __    ___
| ___ \ \ \ / /   /   |
| |_/ /  \ V /   / /| |
|  __/   /   \  / /_| |
| |     / /^\ \ \___  |
\_|     \/   \/     |_/
Ready to fly.
INFO  LED::init
729 DevObj::init led
736 Added driver 0x2aba34001080 /dev/led0
INFO  LED::init
742 DevObj::init led
INFO  Not using /dev/ttyACM0 for radio control input. Assuming joystick input via MAVLink.
INFO  Waiting for initial data on UDP. Please start the flight simulator to proceed..
Now in a new terminal make sure you will be able to insert the Iris model through the Gazebo menus, to do this set your environment variables to include the appropriate sitl_gazebo folders.
roslaunch gazebo_ros empty_world.launch world_name:=$(pwd)/Tools/sitl_gazebo/worlds/iris.world
Now start Gazebo like you would when working with ROS and insert the Iris quadcopter model. Once the Iris is loaded it will automatically connect to the px4 app.
roslaunch gazebo_ros empty_world.launch world_name:=$(pwd)/Tools/sitl_gazebo/worlds/iris.world