# RTK GPS
RTK GPS devices can be accurate to centimeter-level, allowing PX4 to be used in applications like precision surveying (where pinpoint accuracy is essential).
Note
GPS can also be used as a source of yaw/heading information:
- RTK GPS Heading with Dual u-blox F9P.
- Some GPS output yaw (see table below).
# Supported RTK Devices
PX4 supports the u-blox M8P (opens new window), u-blox F9P (opens new window) and the Trimble MB-Two (opens new window) GPS, and products that incorporate them.
The RTK compatible devices below that are expected to work with PX4 (it omits discontined devices). The table indicates devices that also output yaw, and that can provide yaw when two on-vehicle units are used.
Note
Some RTK modules can only be used in a particular role (base or rover), while others can be used interchangeably.
# Positioning Setup/Configuration
RTK positioning requires a pair of RTK GPS devices: a "base" for the ground station and a "rover" for the vehicle.
In addition you will need:
- A laptop/PC with QGroundControl (QGroundControl for Android/iOS do not support RTK)
- A vehicle with a WiFi or Telemetry radio link to the laptop.
Note
QGroundControl with a base module can theoretically enable RTK GPS for multiple vehicles/rover modules. At time of writing this use case has not been tested.
# Hardware Setup
# Rover RTK Module (Vehicle)
The connection method and cables/connectors required depends on the selected RTK module (and on the flight controller).
Most are connected via the flight controller's GPS port, in the same way as any other GPS module. Some are connected to the UAVCAN bus.
See documentation for the selected device and UAVCAN for more information on wiring and configuration.
# Base RTK Module (Ground)
Connect the base module to QGroundControl via USB. The base module must not be moved while it is being used.
TIP
Choose a position where the base module won't need to be moved, has a clear view of the sky, and is well separated from any buildings. Often it is helpful to elevate the base GPS, by using a tripod or mounting it on a roof.
# Telemetry Radio/WiFi
The vehicle and ground control laptop must be connected via wifi or a radio telemetry link.
The link must use the MAVLink 2 protocol as it makes more efficient use of the channel. This should be set by default, but if not, follow the MAVLink2 configuration instructions below.
# RTK Connection Process
The RTK GPS connection is essentially plug and play:
Start QGroundControl and attach the base RTK GPS via USB to the ground station. The device is recognized automatically.
Start the vehicle and make sure it is connected to QGroundControl.
TIP
QGroundControl displays an RTK GPS status icon in the top icon bar while an RTK GPS device is connected (in addition to the normal GPS status icon). The icon is red while RTK is being set up, and then changes to white once RTK GPS is active. You can click the icon to see the current state and RTK accuracy.
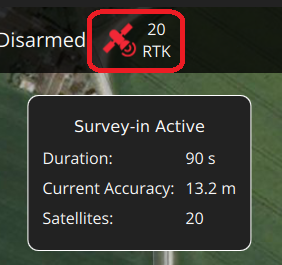
QGroundControl then starts the RTK setup process (known as "Survey-In").
Survey-In is a startup procedure to get an accurate position estimate of the base station. The process typically takes several minutes (it ends after reaching the minimum time and accuracy specified in the RTK settings).
You can track the progress by clicking the RTK GPS status icon.
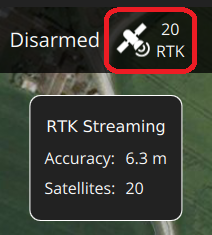
Once Survey-in completes:
The RTK GPS icon changes to white and QGroundControl starts to stream position data to the vehicle:
Vehicle GPS switches to RTK mode. The new mode is displayed in the normal GPS status icon (
3D RTK GPS Lock):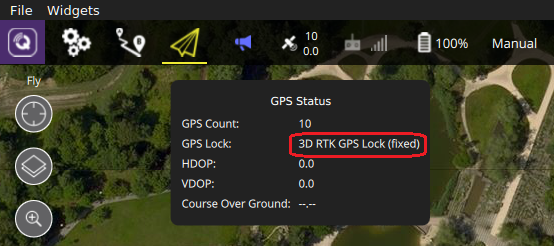
# Optional PX4 Configuration
The following settings may need to be changed (using QGroundControl).
# RTK GPS settings
The RTK GPS settings are specified in the QGroundControl General Settings (opens new window) (SettingsView > General Settings > RTK GPS).
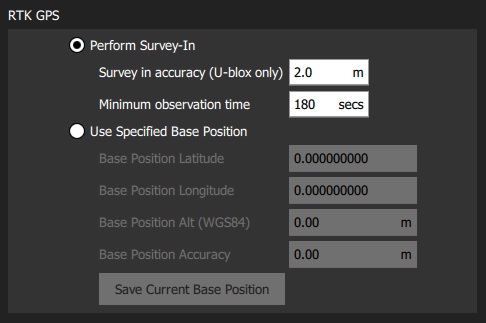
These settings define the minimum duration and minimum accuracy for completing the RTK GPS setup process (known as "Survey-In).
TIP
You can save and reuse a base position in order to save time: perform Survey-In once, select Use Specified Base Position and press Save Current Base Position to copy in the values for the last survey. The values will then persist across QGC reboots until they are changed.
# MAVLink2
The MAVLink2 protocol must be used because it makes more efficient use of lower-bandwidth channels. This should be enabled by default on recent builds.
To ensure MAVLink2 is used:
- Update the telemetry module firmware to the latest version (see QGroundControl > Setup > Firmware (opens new window)).
- Set MAV_PROTO_VER to 2 (see QGroundControl Setup > Parameters (opens new window))
# Tuning
You may also need to tune some parameters as the default parameters are tuned assuming a GPS accuracy in the order of meters, not centimeters. For example, you can decrease EKF2_GPS_V_NOISE and EKF2_GPS_P_NOISE to 0.2.
# Dual Receivers
A second GPS receiver can be used as a backup (either RTK or non RTK). See the EKF2 GPS Configuration section.
# Vehicle Setup Example
The airframe build topic DJI Flamewheel 450 with distance sensor and RTK GPS describes an airframe setup with the Here+ RTK GPS and a Pixhawk 3 Pro.
# Further Information
- RTK-GPS (PX4-Integration): Developer information about integrating RTK-GPS support into PX4.
- Real Time Kinematic (opens new window) (Wikipedia)