# FrSky Telemetry
FrSky telemetry allows you to access vehicle telemetry/status information on a compatible RC transmitter.
Available telemetry is listed here, and includes: flight mode, battery level, RC signal strength, speed, altitude etc. Some transmitters can additionally provide audible and vibration feedback, which is particularly useful for low battery and other failsafe warnings.
PX4 supports both S.Port (new) and D (old) FrSky telemetry ports.
# Hardware Setup
FrSky telemetry requires:
- An FrSky-compatible RC transmitter like the FrSky Taranis X9D Plus.
- An FrSky telemetry-capable receiver like the XSR and X8R.
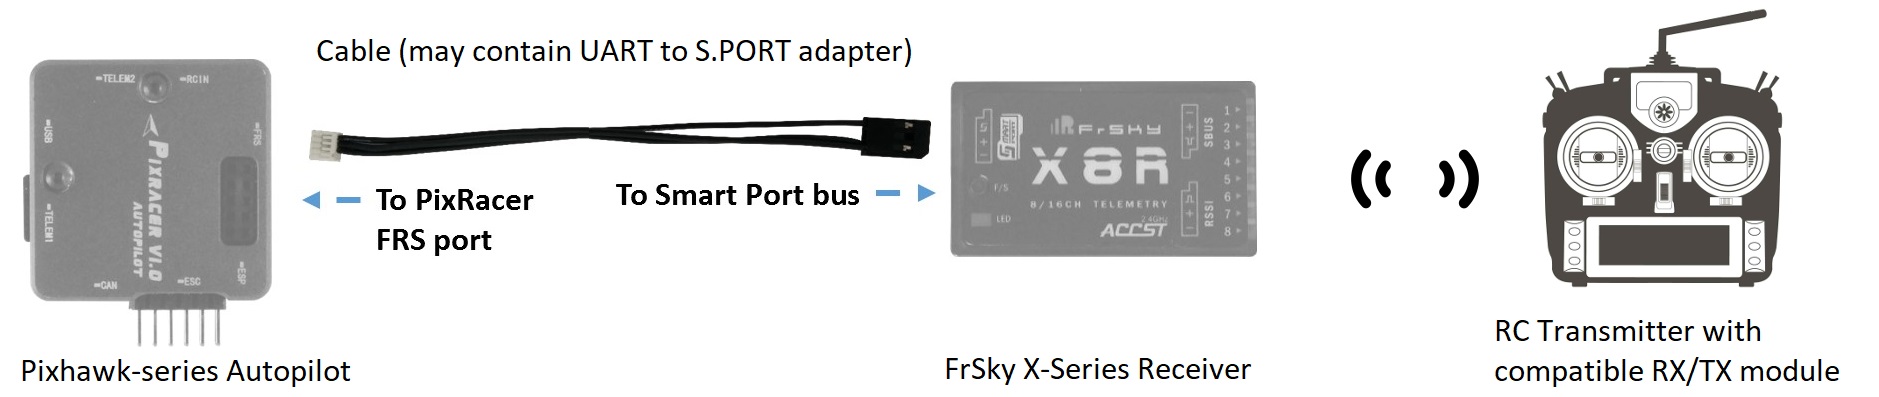
- A cable to connect the FrSky receiver Smart Port (SPort) to a flight controller UART.
First connect the receiver for RC channels, e.g. connect the S.Bus ports on the reciever and the flight controller.
Then set up FrSky telemetry by separately connecting the SPort on the receiver to any free UART on the flight controller, and then configure PX4 to run FrSky telemetry on that UART.
This is done slightly differently, depending on whether the SPort receiver has a pin for an uninverted output, and/or the Pixhawk version.
# Pixhawk FMUv4 (and prior)
For Pixhawk FMUv4 and earlier, UART ports and receiver telemetry ports are typically incompatible (with the exception of Pixracer).
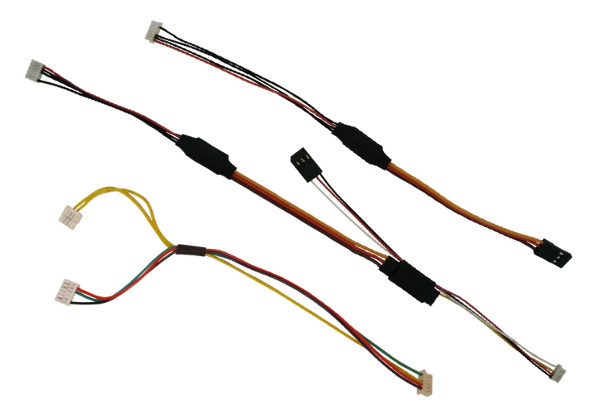
Generally SPort receivers have an inverted S.Port signal and you have to use a converter cable to split the S.Port into uninverted TX and RX for connecting to the Pixhawk UART. An example is shown below.
TIP
When connecting to an inverted S.Port it is usually cheaper and easier to buy a ready made cable that contains this adapter and has the appropriate connectors for the autopilot and receiver. Creating a DIY cable requires electronics assembly expertise.
If using an S.Port receiver with a pin for uninverted output you can simply attach one of the UART's TX pins.
Then configure PX4.
# Pixhawk FMUv5/STM32F7 and later
For Pixhawk FMUv5 and later PX4 can read either inverted (or uninverted) S.Port signals directly - no special cable is required.
Note
More generally this is true on autopilots with STM32F7 or later (e.g. Durandal has a STM32H7 and can read inverted or uninverted S.Port signals directly).
Simply attach one of the UART's TX pins to the SPort inverted or uninverted pin (PX4 will auto-detect and handle either type). Then configure PX4.
# PX4 Configuration
Configure the serial port on which FrSky will run using TEL_FRSKY_CONFIG. There is no need to set the baud rate for the port, as this is configured by the driver.
Note
You can use any free UART, but typically TELEM 2 is used for FrSky telemetry (except for Pixracer, which is pre-configured to use the FrSky port by default).
TIP
If the configuration parameter is not available in QGroundControl then you may need to add the driver to the firmware:
drivers/telemetry/frsky_telemetry
No further configuration is required; FrSky telemetry auto-starts when connected and detects D or S mode.
# Compatible RC Transmitters
You will need an RC transmitter that can receive the telemetry stream (and that is bound to the FrSky receiver).
Popular alternatives include:
- FrSky Taranis X9D Plus (recommended)
- FrSky Taranis X9D
- FrSky Taranis X9E
- FrSky Taranis Q X7
- Turnigy 9XR Pro
The above transmitters can display telemetry data without any further configuration. The following section(s) explain how you can customise telemetry display (for example, to create a better UI/UX).
# Taranis - LuaPilot Setup
Compatible Taranis receivers (e.g. X9D Plus) running OpenTX 2.1.6 or newer can use the LuaPilot script to modify the displayed telemetry (as shown in the screenshot below).
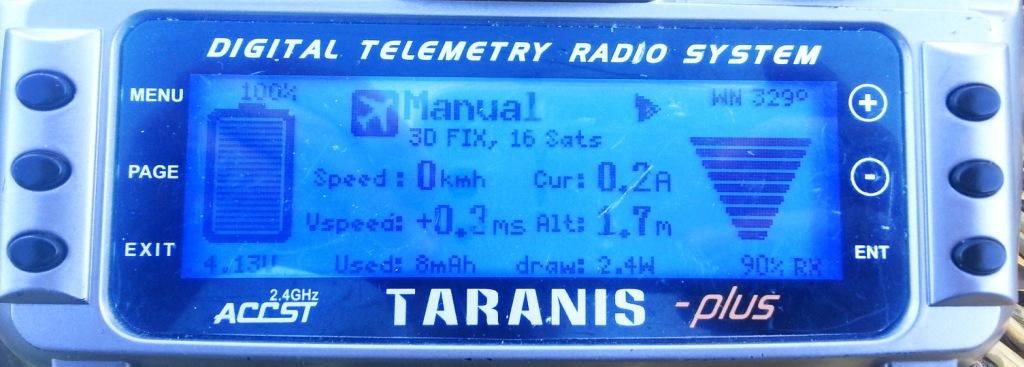
Instructions for installing the script can be found here: LuaPilot Taranis Telemetry script > Taranis Setup OpenTX 2.1.6 or newer (opens new window)
If you open the LuaPil.lua script with a text editor, you can edit the configuration. Suggested modifications include:
local BattLevelmAh = -1- Use the battery level calculation from the vehiclelocal SayFlightMode = 0- There are no WAV files for the PX4 flight modes
# Telemetry Messages
FrySky Telemetry can transmit most of the more useful status information from PX4. S-Port and D-Port receivers transmit different sets of messages, as listed in the following sections.
# S-Port
S-Port receivers transmit the following messages from PX4 (from here (opens new window)):
- AccX, AccY, AccZ: Accelerometer values.
- Alt: Barometer based altitude, relative to home location.
- Curr: Actual current consumption (Amps).
- Fuel: Remaining battery percentage if
battery_capacityvariable set and variablesmartport_fuel_percent = ON, mAh drawn otherwise. - GAlt: GPS altitude, sea level is zero.
- GPS: GPS coordinates.
- GSpd: Current horizontal ground speed, calculated by GPS.
- Hdg: Heading (degrees - North is 0°).
- VFAS: Actual battery voltage value (Voltage FrSky Ampere Sensor).
- VSpd: Vertical speed (cm/s).
- Tmp1: Flight mode, sent as an integer: 18 - Manual, 23 - Altitude, 22 - Position, 27 - Mission, 26 - Hold, 28 - Return, 19 - Acro, 24 0 Offboard, 20 - Stabilized, 25 - Takeoff, 29 - Land, 30 - Follow Me.
- Tmp2: GPS information. Right-most digit is GPS fix type (0 = none, 2 = 2D, 3 = 3D). Other digits are number of satellites.
Note
The following "standard" S-Port messages are not supported by PX4: ASpd, A4.
# D-port
D-Port receivers transmit the following messages (from here (opens new window)):
- AccX, AccY, AccZ: Accelerometer values.
- Alt: Barometer based altitude, init level is zero.
- Cels: Average cell voltage value (battery voltage divided by cell number).
- Curr: Actual current consumption (Amps).
- Fuel: Remaining battery percentage if capacity is set, mAh drawn otherwise.
- Date: Time since powered.
- GAlt: GPS altitude, sea level is zero.
- GPS: GPS coordinates.
- GSpd: Current speed, calculated by GPS.
- Hdg: Heading (degrees - North is 0°).
- RPM: Throttle value if armed, otherwise battery capacity. Note that blade number needs to be set to 12 in Taranis.
- Tmp1: Flight mode (as for S-Port).
- Tmp2: GPS information (as for S-Port).
- VFAS: Actual battery voltage value (Voltage FrSky Ampere Sensor).
- Vspd: Vertical speed (cm/s).
# FrSky Telemetry Receivers
Pixhawk/PX4 supports D (old) and S (new) FrSky telemetry. The table belows all FrSky receivers that support telemetry via a D/S.PORT (in theory all of these should work).
TIP
Note that the X series receivers listed below are recommended (e.g. XSR, X8R). The R and G series have not been tested/validated by the test team, but should work.
| Receiver | Range | Combined output | Digital telemetry input | Dimensions | Weight |
|---|---|---|---|---|---|
| D4R-II | 1.5km | CPPM (8) | D.Port | 40x22.5x6mm | 5.8g |
| D8R-XP | 1.5km | CPPM (8) | D.Port | 55x25x14mm | 12.4g |
| D8R-II Plus | 1.5km | no | D.Port | 55x25x14mm | 12.4g |
| X4R | 1.5km | CPPM (8) | Smart Port | 40x22.5x6mm | 5.8g |
| X4R-SB | 1.5km | S.Bus (16) | Smart Port | 40x22.5x6mm | 5.8g |
| X6R / S6R | 1.5km | S.Bus (16) | Smart Port | 47.42×23.84×14.7mm | 15.4g |
| X8R / S8R | 1.5km | S.Bus (16) | Smart Port | 46.25 x 26.6 x 14.2mm | 16.6g |
| XSR / XSR-M | 1.5km | S.Bus (16) / CPPM (8) | Smart Port | 26x19.2x5mm | 3.8g |
| RX8R | 1.5km | S.Bus (16) | Smart Port | 46.25x26.6x14.2mm | 12.1g |
| RX8R PRO | 1.5km | S.Bus (16) | Smart Port | 46.25x26.6x14.2mm | 12.1g |
| R-XSR | 1.5km | S.Bus (16) / CPPM (8) | Smart Port | 16x11x5.4mm | 1.5g |
| G-RX8 | 1.5km | S.Bus (16) | Smart Port + integrated vario | 55.26178mm | 5.8g |
| R9 | 10km | S.Bus (16) | Smart Port | 43.3x26.8x13.9mm | 15.8g |
| R9 slim | 10km | S.Bus (16) | Smart Port | 43.3x26.8x13.9mm | 15.8g |
Note
The above table originates from http://www.redsilico.com/frsky-receiver-chart and FrSky product documentation (opens new window).
# Ready-Made Cables
Ready-made cables for use with Pixhawk FMUv4 and earlier (except for Pixracer) are available from:
Craft and Theory (opens new window). Versions are available with DF-13 compatible PicoBlade connectors (for FMUv2/3DR Pixhawk, FMUv2/HKPilot32) and JST-GH connectors (for FMUv3/Pixhawk 2 "The Cube" and FMUv4/PixRacer v1).
# DIY Cables
It is possible to create your own adapter cables. You will need connectors that are appropriate for your autopilot (e.g. JST-GH connectors for FMUv3/Pixhawk 2 "The Cube" and FMUv4/PixRacer v1, and DF-13 compatible PicoBlade connectors for older autopilots).
The Pixracer includes electronics for converting between S.PORT and UART signals, but for other boards you will need a UART to S.PORT adapter. These can be sourced from:
- FrSky FUL-1 (opens new window): unmannedtech.co.uk (opens new window)
- SPC: getfpv.com (opens new window), unmannedtechshop.co.uk (opens new window)
More information about the connections for different boards is given below.
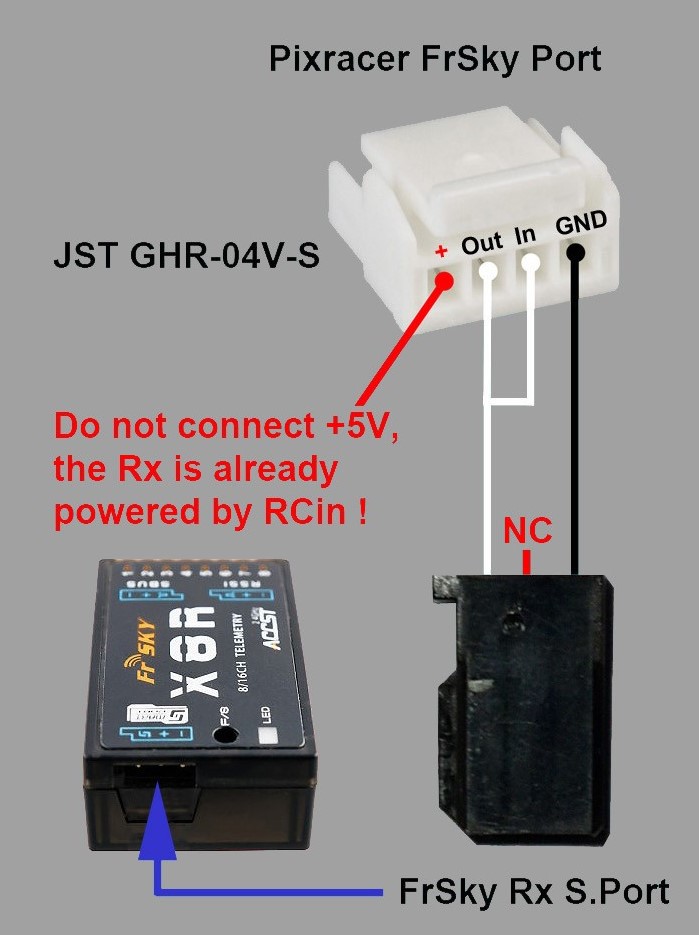
# Pixracer to S-port Receivers
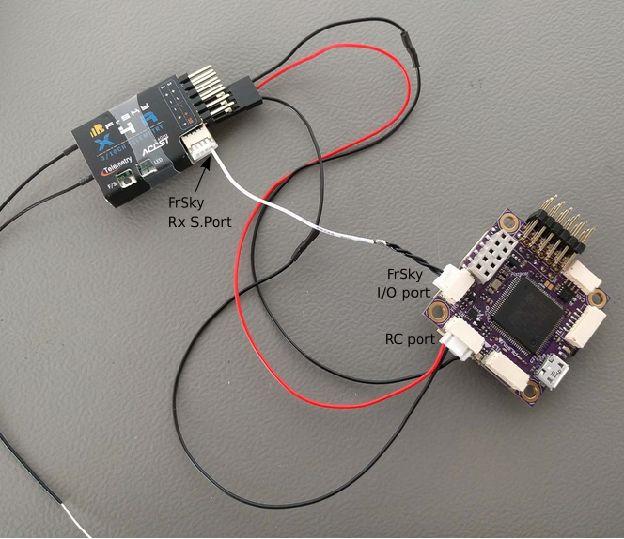
Connect the Pixracer FrSky TX and RX lines together (solder the wires together) to the X series receiver's S.port pin. GND need not be attached as this will have been done when attaching to S.Bus (normal RC connection).
The S-port connection is shown below (using the provided I/O Connector).
# Pixracer to D-port Receivers
TIP
The vast majority of users now prefer to use S.PORT.
Connect the Pixracer FrSky TX line (FS out) to the receiver's RX line. Connect the Pixracer FrSky RX line (FS in) to the receivers TX line. GND need not be connected as this will have been done when attaching to RC/SBus (for normal RC).
# Pixhawk Pro
Pixhawk 3 Pro can be connected to TELEM4 (no additional software configuration is needed). You will need to connect via a UART to S.PORT adapter board, or a ready-made cable.
# Pixhawk FMUv5 and later
Simply attach one of the UART's TX pins to the SPort inverted or uninverted pin (PX4 will auto-detect and handle either type).
# Other Boards
Most other boards connect to the receiver for FrSky telemetry via the TELEM2 UART. This includes, for example: Pixhawk 1, mRo Pixhawk, Pixhawk2.
You will need to connect via a UART to S.PORT adapter board, or a ready-made cable.
# Additional Information
For additional information, see the following links: