# ROS 2 사용 설명서(PX4-ROS 2 브리지)
PX4에서 ROS 2를 설정하고 사용하는 방법을 설명합니다.
필요한 소프트웨어를 설치하고 ROS 2 애플리케이션을 구축하는 방법에 대한 지침과 ROS2-PX4 브리지 아키텍처 및 애플리케이션 파이프라인에 대한 개요를 제공합니다.
PX4 Autopilot의 Fast DDS 인터페이스는 DDS 도메인(ROS 노드 포함)에서 실행 및 연결된 모든 애플리케이션에서 활용할 수 있습니다.
ROS 2 없이 microRTPS 브리지 사용 방법은 RTPS/DDS 인터페이스 섹션을 참고하십시오.
ROS
2에서 PX4를 사용하는 방법에 대한 보다 자세하고 시각적인 설명은 PX4 유지 관리자의 다음 프레젠테이션을 참조하십시오.
# 개요
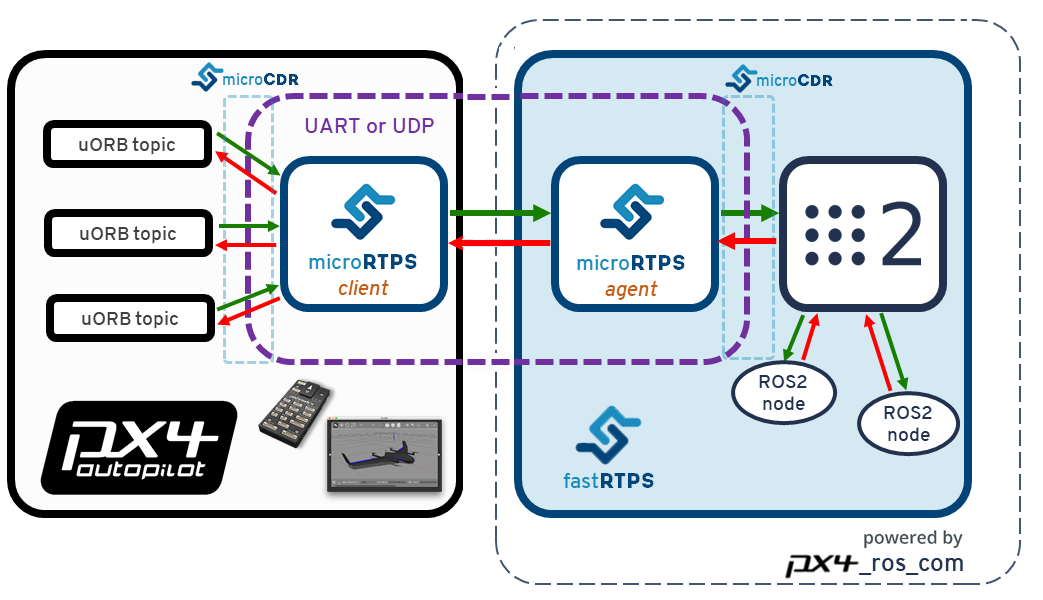
ROS 2의 애플리케이션 파이프라인은 기본 통신 미들웨어(DDS/RTPS) 덕분에 매우 간단합니다. microRTPS Bridge는 PX4에서 실행되는 클라이언트와 ROS 컴퓨터에서 실행되는 에이전트로 구성되며, UORB와 ROS 2간의 양방향 메시지 변환을 제공합니다. 이를 통하여, PX4 UORB 데이터에 직접 게시 및 구독하는 ROS 2 리스너 또는 광고주 노드를 생성할 수 있습니다! 이것을 아래 다이어그램에서 설명합니다.
ROS 2는 px4_msgs (opens new window) 및 px4_ros_com (opens new window) 패키지를 사용하여 일치하는 메시지 정의가 클라이언트와 에이전트 코드를 생성하는 데 사용되는지 확인하고(중요함), ROS 코드를 빌드시에는 PX4가 있어야 합니다.
px4_msgscontains PX4 ROS message definitions. When this project is built it generates the corresponding ROS 2-compatible typesupport, used by ROS 2 nodes, and IDL files, used byfastddsgento generate the microRTPS agent code.px4_ros_comcontains the microRTPS agent code templates for the agent publishers and subscribers. The build process runs afastddsgeninstance to generate the code for themicrortps_agent, which compiles into a single executable.
PX4 Autopilot 프로젝트는 (마스터 분기에서) 변경될 때마다, 새 메시지 정의로 px4_msgs (opens new window)를 자동으로 업데이트합니다.
ROS
애플리케이션에 액세스할 수 있는 uORB 주제의 하위 집합은 px4_msgs/msg (opens new window)에 위치합니다.
PX4 firmware contains the microRTPS client based on its build-time message definitions.
Note
Astute readers will note that the generated agent might not have been built with that same set of definitions (unless they were both built of the same 'master' commit).
PX4에서 ROS 2를 설정하려면 다음이 필요합니다.
Fast DDS 설치 가이드에 따라 Fast RTPS(DDS) 2.0.0(이상) 및 Fast-RTPS-Gen 1.0.4를 설치합니다.
- Create also a branch per release in both
px4_ros_comandpx4_msgs, so both the message definitions and agent code match the ones present on the PX4/client side by the time of the release. - Have an initial message exchange of the bridge configuration, using the messages structs MD5SUMs to verify if the messages definitions are the same, and if not, disable their stream and warn the user.
Note
최신 종속성을 확인하려면 가이드를 확인하십시오. While microRTPS client is the same, the IDL files used by ROS 2 are slightly different from the ROS-independent files generated in PX4 builds. The other detail is that the "normal" PX4 build doesn't use fastddsgen with typesupport for ROS 2 networks - and that's also one of the main reasons we have a separate microRTPS agent in px4_ros_com, which is completely compatible with ROS 2 networks. We use the px4_msg to generate appropriate IDL files for the micrortps_agent in px4_ros_com.
# 설치 및 설정
To setup ROS 2 for use with PX4 you will need to:
- Fast DDS 설치
- ROS2 설치
- ROS 2 작업 공간 빌드
- 설치 상태 확인(선택 사항)
# Fast DDS 설치
ROS 2와 해당 종속성을 설치합니다.
이 섹션에서는 홈 디렉토리에서 호스팅되는 ROS 2 작업 공간을 만드는 방법을 보여줍니다(필요에 따라 명령을 수정하여 소스 코드를 다른 곳에 배치). px4_ros_com 및 px4_msg 패키지가 작업 영역 폴더에 복제한 다음, 스크립트를 사용하여 작업 영역을 빌드합니다.
:::
# ROS2 설치
Note
빌드 프로세스는 다른 환경 구성을 소싱하는 빌드 프로세스의 여러 단계에 해당하는 콘솔에서 새 탭을 엽니다. ::: :::warning If ROS_DOMAIN_ID is set in environment variables from ROS2 tutorial, you need to unset ROS_DOMAIN_ID for connection between ROS2 and microRTPS-agent. ::: To install ROS 2 and its dependencies:
ROS 2 브리지 패키지
px4_ros_com와px4_msgs를/src디렉토리에 복제합니다.master분기는 기본적으로 복제됩니다.$ git clone https://github.com/PX4/px4_ros_com.git ~/px4_ros_com_ros2/src/px4_ros_com $ git clone https://github.com/PX4/px4_msgs.git ~/px4_ros_com_ros2/src/px4_msgseigen3_cmake_moduleis also required, since Eigen3 is used on the transforms library:$ cd ~/px4_ros_com_ros2/src/px4_ros_com/scripts $ source build_ros2_workspace.bashSome Python dependencies must also be installed (using
piporapt):sudo pip3 install -U empy pyros-genmsg setuptools
# ROS 2 작업 공간 빌드
This section shows how create a ROS 2 workspace hosted in your home directory (modify the commands as needed to put the source code elsewhere). The px4_ros_com and px4_msg packages are cloned to a workspace folder, and then a script is used to build the workspace.
TIP
모든 스크립트 옵션은 --help 인수를 사용하여 출력합니다. 특히 --verbose 인수는 전체 colcon 빌드 출력을 보여줍니다.
To create and build the workspace:
- Create a workspace directory using:
$ mkdir -p ~/px4_ros_com_ros2/src - PX4 Autopilot 프로젝트의 루트에서 새 터미널을 열고, PX4 Gazebo 시뮬레이션을 실행합니다.
make px4_sitl_rtps gazebo - 새 터미널에서 ROS 2 작업 공간을
소싱한 다음 UDP를 전송 프로토콜로 사용하여micrortps_agent데몬을 시작합니다.$ source ~/px4_ros_com_ros2/install/setup.bash $ micrortps_agent -t UDP
TIP
All script options can be listed by calling it with the --help argument. In particular the --verbose argument shows the full colcon build output.
Note
The px4_ros_com/scripts directory contains multiple scripts for building different kinds of workspaces.
# 설치 상태 확인
One way to check that the installation/setup succeeded is to test that the bridge can communicate with PX4. We can do this by running the bridge against PX4 running in the simulator.
Setup your PX4 Ubuntu Linux development environment - the default instructions get the latest version of PX4 source and install all the needed tools.
작업 공간을 빌드합니다.
colcon build --symlink-install --event-handlers console_direct+Once PX4 has fully started the terminal will display the NuttShell/System Console. Note also that PX4 SITL will automatically start the
micrortps_clientconnected to UDP ports 2019 and 2020.On a new terminal,
sourcethe ROS 2 workspace and then start themicrortps_agentdaemon with UDP as the transport protocol:$ source ~/px4_ros_com_ros2/install/setup.bash $ micrortps_agent -t UDPOpen a new terminal and start a "listener" using the provided launch file:
$ source ~/px4_ros_com_ros2/install/setup.bash
$ ros2 launch px4_ros_com sensor_combined_listener.launch.py
If the bridge is working correctly you will be able to see the data being printed on the terminal/console where you launched the ROS listener:
RECEIVED DATA FROM SENSOR COMBINED
================================
ts: 870938190
gyro_rad[0]: 0.00341645
gyro_rad[1]: 0.00626475
gyro_rad[2]: -0.000515705
gyro_integral_dt: 4739
accelerometer_timestamp_relative: 0
accelerometer_m_s2[0]: -0.273381
accelerometer_m_s2[1]: 0.0949186
accelerometer_m_s2[2]: -9.76044
accelerometer_integral_dt: 4739
You can also verify the rate of the message using ros2 topic hz. E.g. in the case of sensor_combined use ros2 topic hz /fmu/sensor_combined/out:
average rate: 248.187
 min: 0.000s max: 0.012s std dev: 0.00147s window: 2724
average rate: 248.006
 min: 0.000s max: 0.012s std dev: 0.00147s window: 2972
average rate: 247.330
 min: 0.000s max: 0.012s std dev: 0.00148s window: 3212
average rate: 247.497
 min: 0.000s max: 0.012s std dev: 0.00149s window: 3464
average rate: 247.458
 min: 0.000s max: 0.012s std dev: 0.00149s window: 3712
average rate: 247.485
 min: 0.000s max: 0.012s std dev: 0.00148s window: 3960
# ROS 2 예제 애플리케이션
# ROS 2 리스너 생성
With the px4_ros_com built successfully, one can now take advantage of the generated microRTPS agent app and also from the generated sources and headers of the ROS 2 msgs from px4_msgs, which represent a one-to-one matching with the uORB counterparts.
그런 다음 일반 rclcpp::Node 기본 클래스의 하위 클래스인 SensorCombinedListener 클래스를 생성합니다.
이것은 sensor_combined uORB 메시지가 수신될 때(현재는 RTPS/DDS 메시지로) 콜백 함수를 생성하고 메시지가 수신될 때마다 메시지 필드의 내용을 출력합니다.
#include <rclcpp/rclcpp.hpp>
#include <px4_msgs/msg/sensor_combined.hpp>
아래 줄은 하나 이상의 호환 가능한 ROS 게시자와 일치시킬 수 있는 sensor_combined_topic에 대한 구독을 만듭니다.
/**
 * @brief Sensor Combined uORB topic data callback
 */
class SensorCombinedListener : public rclcpp::Node
{
SensorCombinedListener 클래스를 ROS 노드로 인스턴스화하는 작업은 main 함수에서 수행됩니다.
public:
    explicit SensorCombinedListener() : Node("sensor_combined_listener") {
        subscription_ = this->create_subscription<px4_msgs::msg::SensorCombined>(
            "SensorCombined_PubSubTopic",
            10,
            [this](const px4_msgs::msg::SensorCombined::UniquePtr msg) {
            std::cout << "\n\n\n\n\n\n\n\n\n\n\n\n\n\n\n\n\n\n\n\n\n\n\n\n";
            std::cout << "RECEIVED SENSOR COMBINED DATA"   << std::endl;
            std::cout << "============================="   << std::endl;
            std::cout << "ts: "          << msg->timestamp    << std::endl;
            std::cout << "gyro_rad[0]: " << msg->gyro_rad[0]  << std::endl;
            std::cout << "gyro_rad[1]: " << msg->gyro_rad[1]  << std::endl;
            std::cout << "gyro_rad[2]: " << msg->gyro_rad[2]  << std::endl;
            std::cout << "gyro_integral_dt: " << msg->gyro_integral_dt << std::endl;
            std::cout << "accelerometer_timestamp_relative: " << msg->accelerometer_timestamp_relative << std::endl;
            std::cout << "accelerometer_m_s2[0]: " << msg->accelerometer_m_s2[0] << std::endl;
            std::cout << "accelerometer_m_s2[1]: " << msg->accelerometer_m_s2[1] << std::endl;
            std::cout << "accelerometer_m_s2[2]: " << msg->accelerometer_m_s2[2] << std::endl;
            std::cout << "accelerometer_integral_dt: " << msg->accelerometer_integral_dt << std::endl;
        });
    }
ROS 2 광고주 노드는 DDS/RTPS 네트워크(따라서 PX4 Autopilot)에 데이터를 게시합니다.
private:
    rclcpp::Subscription<px4_msgs::msg::SensorCombined>::SharedPtr subscription_;
};
px4_ros_com/src/advertisers 아래의 debug_vect_advertiser.cpp를 예로 들면 먼저 debug_vect msg 헤더를 포함한 필수 헤더를 가져옵니다.
int main(int argc, char *argv[])
{
    std::cout << "Starting sensor_combined listener node..." << std::endl;
    setvbuf(stdout, NULL, _IONBF, BUFSIZ);
    rclcpp::init(argc, argv);
    rclcpp::spin(std::make_shared<SensorCombinedListener>());

    rclcpp::shutdown();
    return 0;
}
# ROS 2 광고주 만들기
그런 다음 코드는 일반 rclcpp::Node 기본 클래스의 하위 클래스인 DebugVectAdvertiser 클래스를 생성합니다.
Taking as an example the debug_vect_advertiser.cpp under px4_ros_com/src/advertisers, first we import required headers, including the debug_vect msg header.
#include <chrono>
#include <rclcpp/rclcpp.hpp>
#include <px4_msgs/msg/debug_vect.hpp>
DebugVectAdvertiser 클래스를 ROS 노드로 인스턴스화하는 작업은 main 함수에서 수행됩니다.
class DebugVectAdvertiser : public rclcpp::Node
{
The code below creates a function for when messages are to be sent. The messages are sent based on a timed callback, which sends two messages per second based on a timer.
public:
    DebugVectAdvertiser() : Node("debug_vect_advertiser") {
        publisher_ = this->create_publisher<px4_msgs::msg::DebugVect>("DebugVect_PubSubTopic", 10);
        auto timer_callback =
        [this]()->void {
            auto debug_vect = px4_msgs::msg::DebugVect();
            debug_vect.timestamp = std::chrono::time_point_cast<std::chrono::microseconds>(std::chrono::steady_clock::now()).time_since_epoch().count();
            std::string name = "test";
            std::copy(name.begin(), name.end(), debug_vect.name.begin());
            debug_vect.x = 1.0;
            debug_vect.y = 2.0;
            debug_vect.z = 3.0;
            RCLCPP_INFO(this->get_logger(), "\033[97m Publishing debug_vect: time: %llu x: %f y: %f z: %f \033[0m",
                                debug_vect.timestamp, debug_vect.x, debug_vect.y, debug_vect.z);
            this->publisher_->publish(debug_vect);
        };
        timer_ = this->create_wall_timer(500ms, timer_callback);
    }

private:
    rclcpp::TimerBase::SharedPtr timer_;
    rclcpp::Publisher<px4_msgs::msg::DebugVect>::SharedPtr publisher_;
};
The instantiation of the DebugVectAdvertiser class as a ROS node is done on the main function.
int main(int argc, char *argv[])
{
    std::cout << "Starting debug_vect advertiser node..." << std::endl;
    setvbuf(stdout, NULL, _IONBF, BUFSIZ);
    rclcpp::init(argc, argv);
    rclcpp::spin(std::make_shared<DebugVectAdvertiser>());

    rclcpp::shutdown();
    return 0;
}
# 오프보드 제어
For a complete reference example on how to use Offboard control with PX4, see: ROS 2 Offboard control example.
# 수동 작업 공간 설정(참고용)
Note
This is provided to help you better understand the build process and how to include the ROS1 workspace. It is not needed to build or use ROS 2. It additionally includes instructions for building the ros1_bridge package, which is used in ROS (1) via ROS 2 Bridge.
This section describes the process to manually setup your workspace and build the px4_ros_com, px4_msgs, and ros1_bridge package. The topic effectively explains the operation of the build_ros2_workspace.bash script in the installation instructions).
To build the ROS 2 workspace only:
cd를px4_ros_com_ros2디렉토리에 넣고 ROS 2 환경을 소싱합니다. 이전 작업 공간이 이전에 설정되었다는 메시지가 표시되더라도 신경 쓰지 마십시오.source /opt/ros/foxy/setup.bashROS 2 작업 영역에 빌드할 수 있도록
ros1_bridge패키지를 복제합니다.git clone https://github.com/ros2/ros1_bridge.git -b dashing ~/px4_ros_com_ros2/src/ros1_bridge
To build both ROS 2 and ROS (1) workspaces (replacing the previous steps):
cd를px4_ros_com_ros2디렉토리에 넣고 ROS 2 환경을 소싱합니다. 이전 작업 공간이 이전에 설정되었다는 메시지가 표시되더라도 신경 쓰지 마십시오.source /opt/ros/foxy/setup.bashClone the
ros1_bridgepackage so it can be built on the ROS 2 workspace:git clone https://github.com/ros2/ros1_bridge.git -b dashing ~/px4_ros_com_ros2/src/ros1_bridgeBuild the
px4_ros_comandpx4_msgspackages, excluding theros1_bridgepackage:colcon build --symlink-install --packages-skip ros1_bridge --event-handlers console_direct+
Note
--event-handlers console_direct+ only serve the purpose of adding verbosity to the colcon build process, and can be removed if one wants a more "quiet" build.
Then build the ROS(1) packages side. First open a new terminal window and source the ROS(1) environment that was installed on the system:
source /opt/ros/melodic/setup.bashBuild the
px4_ros_comandpx4_msgspackages on the ROS end (using the terminal opened in the previous step):cd ~/px4_ros_com_ros1 && colcon build --symlink-install --event-handlers console_direct+Open another new terminal and then source the environments and workspaces in the order listed below:
source ~/px4_ros_com_ros1/install/setup.bash
source ~/px4_ros_com_ros2/install/setup.bash
Finally, build the
ros1_bridge:cd ~/px4_ros_com_ros2 && colcon build --symlink-install --packages-select ros1_bridge --cmake-force-configure --event-handlers console_direct+
Note
The build process may consume a lot of memory resources. On a resource limited machine, reduce the number of jobs being processed in parallel (e.g. set environment variable MAKEFLAGS=-j1). For more details on the build process, see the build instructions on the ros1_bridge (opens new window) package page.
# 작업 공간 청소
clean_all.bash 스크립트(px4_ros_com/scripts에 있음)는 이 정리 프로세스를 쉽게 하기 위해 제공되며, 이 스크립트는 위에 나열된 모든 작업 공간 옵션 (ROS 2, ROS 1 및 둘 다)을 정리할 수 있습니다.
이를 사용하는 가장 일반적인 방법은 ROS(1) 작업 공간 디렉토리 경로를 전달하는 것입니다(일반적으로 기본 경로에 없기 때문에).
The clean_all.bash script (in px4_ros_com/scripts) is provided to ease this cleaning process, this script can be used to clean all of the workspace options listed above (ROS 2, ROS 1, and Both)
The most common way of using it is by passing it the ROS (1) workspace directory path (since it's usually not on the default path):
$ source clean_all.bash --ros1_ws_dir <path/to/px4_ros_com_ros1/ws>
TIP
Like the build scripts, the clean_all.bash script also has a --help guide.