# 罗盘校准
罗盘校准过程配置了所有连接的外部和内部 magnetometers。 QGroundControl will guide you to position the vehicle in a number of set orientations and rotate the vehicle about the specified axis.
You will need to calibrate your compass on first use, and you may need to recalibrate it if the vehicles is ever exposed to a very strong magnetic field, or if it is used in an area with abnormal magnetic characteristics.
Two types of compass calibration are available:
- Complete: This calibration is required after installing the autopilot on an airframe for the first time or when the configuration of the vehicle has changed significantly. It compensates for hard and soft iron effects by estimating an offset and a scale factor for each axis.
- Partial ("Quick Calibration"): This calibration can be performed as a routine when preparing the vehicle for a flight, after changing the payload, or simply when the compass rose seems inaccurate. This type of calibration only estimates the offsets to compensate for a hard iron effect.
注解
If you are using an external magnetometer/compass (or a compass integrated into a GPS module) make sure it is mounted as far as possible from other electronics and in a supported orientation. Instructions for connecting your GPS+compass can be found in Basic Assembly for your specific autopilot hardware. Once connected, QGroundControl will automatically detect the external magnetometer.
提示
Indications of a poor compass calibration include multicopter circling during hover, toilet bowling (circling at increasing radius/spiraling-out, usually constant altitude, leading to fly-way), or veering off-path when attempting to fly straight.
# 执行校准
# Complete Calibration
The calibration steps are:
Choose a location away from large metal objects or magnetic fields. :::tip Metal is not always obvious! Avoid calibrating on top of an office table (often contain metal bars) or next to a vehicle. Calibration can even be affected if you're standing on a slab of concrete with uneven distribution of re-bar. :::
Start QGroundControl and connect the vehicle.
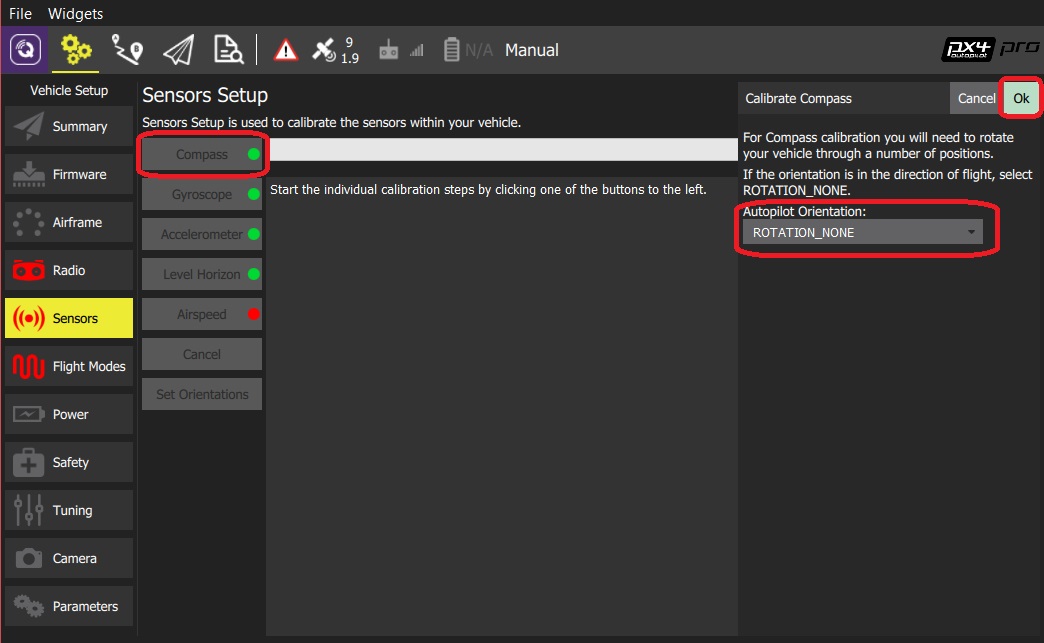
Select the Gear icon (Vehicle Setup) in the top toolbar and then Sensors in the sidebar.
Click the Compass sensor button.
注解
You should already have set the Autopilot Orientation. If not, you can also set it here.
Click OK to start the calibration.
把你的飞机放置在下面显示的某一个方向,并保持静止。 随后提示(方向图像变为黄色)在指定方向旋转飞行器。 该位置标定完成后,屏幕上的相应图示将变成绿色。
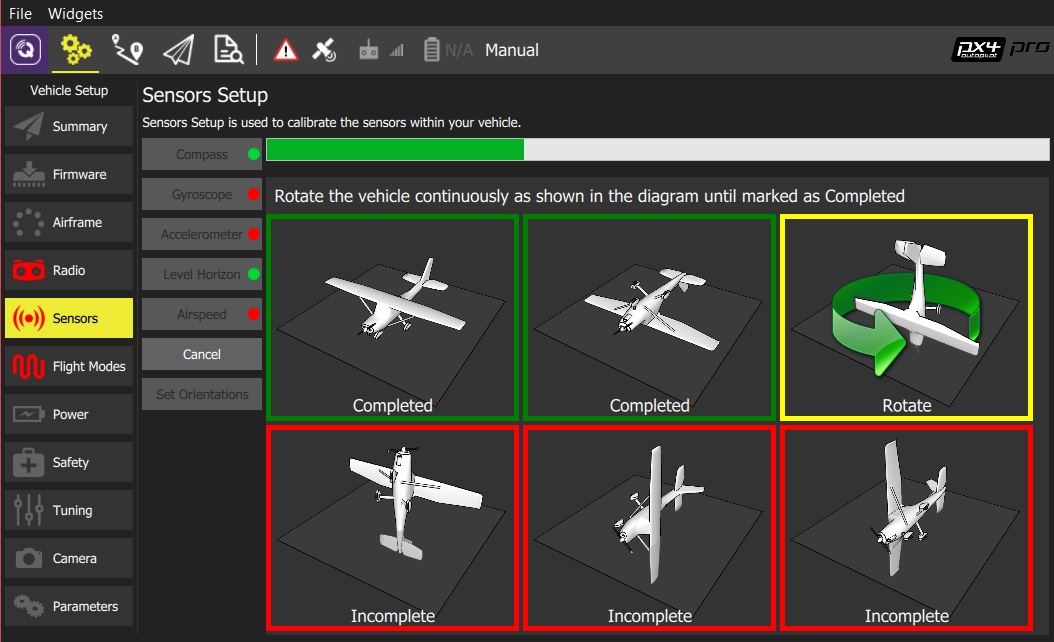
在机体的所有方向上重复校准步骤。
Once you've calibrated the vehicle in all the positions QGroundControl will display Calibration complete (all orientation images will be displayed in green and the progress bar will fill completely). You can then proceed to the next sensor.
# Partial "Quick" Calibration
This calibration is similar to the well-known figure-8 compass calibration done on a smartphone:
- Hold the vehicle in front of you and randomly perform partial rotations on all its axes.
- Wait for the heading estimate to stabilize and verify that the compass rose is pointing to the correct direction (this can take a couple of seconds).
Notes:
- There is no start/stop for this type of calibration (the algorithm runs continuously when the vehicle is disarmed).
- The calibration is immediately applied to the data (no reboot is required) but is saved to the calibration parameters after disarming the vehicle only (the calibration is lost if no arming/disarming sequence is performed between calibration and shutdown).
- The amplitude and the speed of the partial rotations done in step 1 can affect the calibration quality. However, 2-3 oscillations of ~30 degrees in every direction is usually enough.