# 나침반 보정
나침반 보정은 내부 및 외부 나침반 센서들을 설정합니다. QGroundControl에서 차량을 설정 방향으로 배치하고, 지정된 축을 기준으로 차량을 회전하도록 안내합니다.
최초 사용시에는 나침반을 보정하여야하며, 차량이 매우 강한 자기장에 노출되었거나 비정상적인 자기 특성이있는 지역에서 사용되는 경우에는 나침반을 다시 보정하는 것이 좋습니다.
Two types of compass calibration are available:
- Complete: This calibration is required after installing the autopilot on an airframe for the first time or when the configuration of the vehicle has changed significantly. It compensates for hard and soft iron effects by estimating an offset and a scale factor for each axis.
- Partial ("Quick Calibration"): This calibration can be performed as a routine when preparing the vehicle for a flight, after changing the payload, or simply when the compass rose seems inaccurate. This type of calibration only estimates the offsets to compensate for a hard iron effect.
Note
외부 자력계/나침반(또는 GPS 모듈에 통합된 나침반)을 사용하는 경우 다른 전자 장치와 가능한 한 멀리 지원되는 방향으로 장착되었는지 확인하십시오. GPS/나침반 통합 모듈을 연결하는 방법은 특정 오토파일럿 하드웨어의 조립 기초편을 참고하십시오. 연결되면 QGroundControl에서 외부 자기장 센서를 자동으로 감지합니다.
TIP
나침반 보정이 잘못된 경우에는 호버링 중 멀티 콥터 회전, 변기 볼링 (반경 증가 / 스파이럴 아웃, 일반적으로 일정한 고도에서 회전, 플라이 웨이로 이어지는) 또는 직선 비행시에 경로를 벗어나는 경우가 있습니다.
# 보정 방법
# Complete Calibration
보정 절차는 다음과 같습니다:
큰 금속 물체등과 같이 자기장이 강한 곳에서 멀리 떨어진 위치를 선택하십시오. :::tip 금속이 많은 장소는 보정 작업에 적당하지 않습니다. 사무실 테이블 위에서나 (종종 금속 막대 포함) 또는 차량 옆에서 보정하지 마십시오. 철근이 고르지 않게 분포된 콘크리트 슬래브 근처 장소들도 보정에 영향을 미칠 수 있습니다. :::
QGroundControl을 시작하고 드론에 연결합니다.
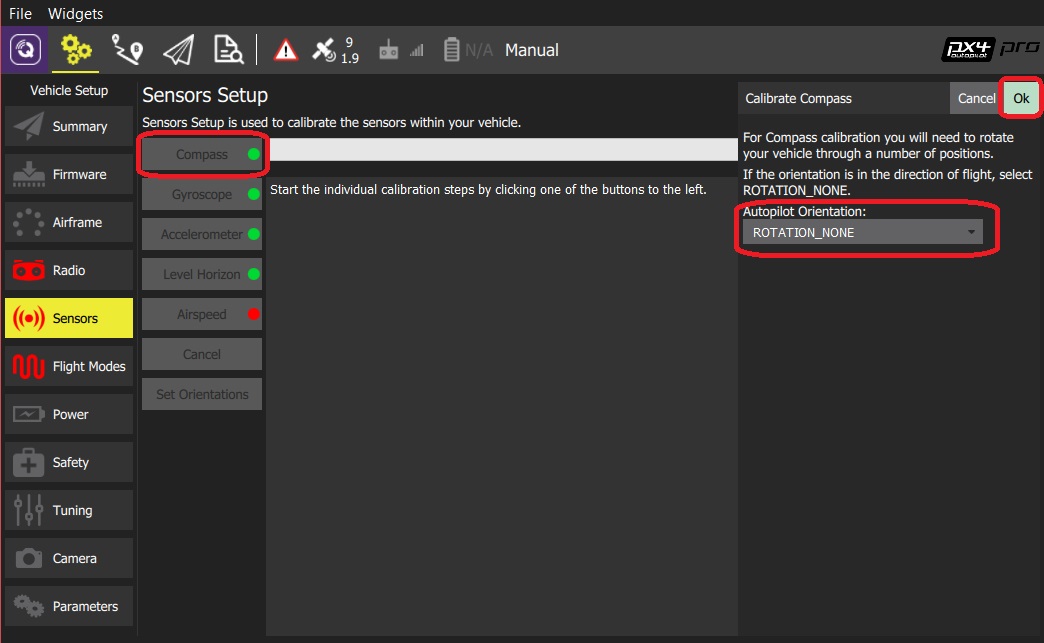
상단 도구 모음에서 톱니 바퀴 아이콘(기체 설정)을 선택한 다음 가장자리 표시줄에서 센서를 선택하십시오.
나침반 센서 버튼을 클릭합니다.
Note
이 작업 이전에 비행콘트롤러 방향을 미리 설정하여야 합니다. 미리 설정하지 않았다면, 여기에서 설정할 수 있습니다.
확인을 눌러 보정작업을 시작합니다.
기체를 아래에 표시된 자세로 놓고 그대로 유지해주십시오 메시지가 표시되면(방향 이미지가 노란색으로 변함) 기체를 지정축을 기준으로 한 방향으로 회전시킵니다. 현재 방향에 대해 보정이 완료되면 화면의 그림이 녹색으로 바뀝니다.
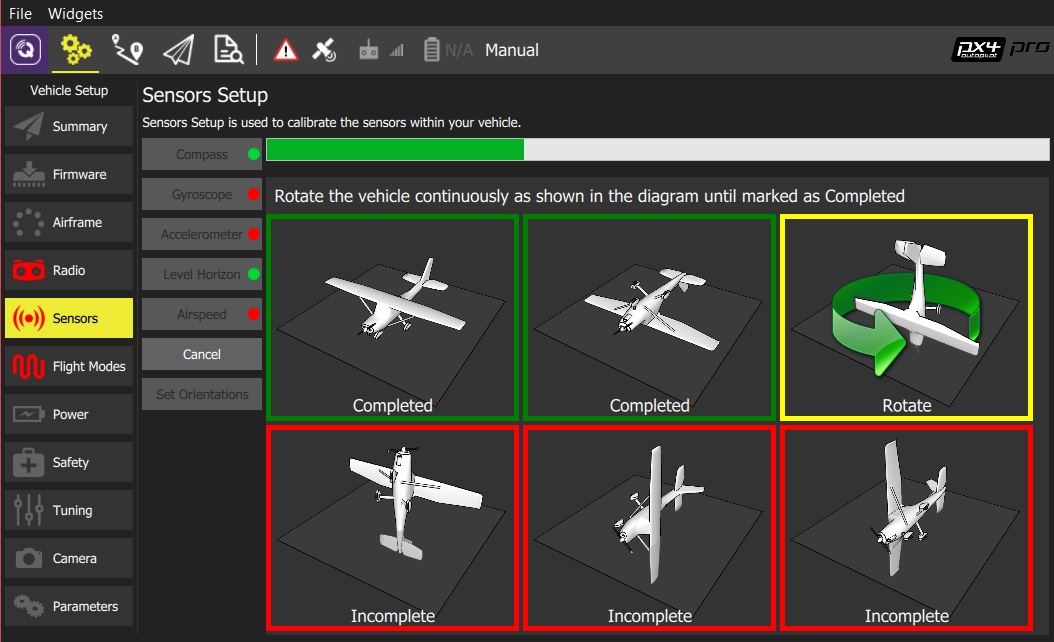
드론의 모든 방향에 대해 보정 과정을 반복합니다.
모든 방향에서 보정 작업이 종료되면, QGroundControl에서 Calibration complete 메시지를 표시합니다 (모든 이미지는 녹색으로 표시되고 프로그레스 바는 끝까지 채워집니다). 그런 다음 다음 센서의 보정 작업을 진행합니다.
# Partial "Quick" Calibration
This calibration is similar to the well-known figure-8 compass calibration done on a smartphone:
- Hold the vehicle in front of you and randomly perform partial rotations on all its axes.
- Wait for the heading estimate to stabilize and verify that the compass rose is pointing to the correct direction (this can take a couple of seconds).
Notes:
- There is no start/stop for this type of calibration (the algorithm runs continuously when the vehicle is disarmed).
- The calibration is immediately applied to the data (no reboot is required) but is saved to the calibration parameters after disarming the vehicle only (the calibration is lost if no arming/disarming sequence is performed between calibration and shutdown).
- The amplitude and the speed of the partial rotations done in step 1 can affect the calibration quality. However, 2-3 oscillations of ~30 degrees in every direction is usually enough.