# 탑재 중량과 카메라
PX4는 카메라와 같은 다양한 장치들을 탑재할 수 있습니다.
Payloads are connected to Fight Controller outputs, and can generally be triggered automatically in missions, or manually using RC passthrough, mapping to a joystick, or MAVLink/MAVSDK commands.
Note
Payloads (actuators) can be tested in the pre-arm state, which disables motors but allows actuators to move. 이 방법은 차량이 시동 상태에서 테스트하는 것보다 더 안전합니다.
# 드론 매핑
매핑 드론은 카메라를 사용하여 이미지를 촬영합니다.
MAVLink 카메라 프로토콜 (opens new window)을 지원하는 MAVLink 카메라는 PX4와 QGroundControl에서 최적으로 통합됩니다. MAVSDK는 독립형 카메라 작업 (opens new window)과 임무 (opens new window)에서 MAVLink 프로토콜을 위한 간단한 API를 제공합니다.
카메라는 PWM이나 GPI 출력을 사용하여 비행콘트롤러에 직접 연결할 수 있습니다. PX4는 비행콘트롤러에 연결된 카메라에 다음과 같은 MAVLink 명령/임무 항목 세트를 지원합니다.
- MAV_CMD_DO_SET_CAM_TRIGG_INTERVAL (opens new window) - 캡처 시간 간격을 설정합니다.
- MAV_CMD_DO_SET_CAM_TRIGG_DIST (opens new window) - 캡처 거리 간격을 설정합니다.
- MAV_CMD_DO_TRIGGER_CONTROL (opens new window) - 캡처 시작/중지 (위 메시지를 사용하여 정의한 거리 또는 시간 사용).
The following topics show how to connect and configure a camera:
- Camera Triggering from flight controller PWM or GPIO outputs, or via MAVLink.
- Camera Capture feedback via hotshoe input.
# Cargo Drones (Package Delivery)
Cargo drones commonly use grippers, winches, and other mechanisms to release packages at their destinations.
PX4 supports package delivery in missions using a gripper. Grippers can also be triggering using the MAV_CMD_DO_GRIPPER (opens new window) MAVLink command, or manually via a Joystick button.
For setup and usage information see:
Note
Support for winches and other release mechanisms is also intended.
If you need to perform cargo delivery using hardware that is not yet integrated, you can use Generic Actuator Control.
# 감시, 검색 및 구출
감시, 검색 및 구조용 드론은 매핑 드론과 요구 사항이 유사합니다. 주요 차이점은 계획된 조사 영역을 비행하는 것 외에는 이미지 및 비디오 캡처 카메라에 대한 독립 실행형 제어가 필요한 점과 주야 작업이 가능하여야 한다는 점입니다.
MAVLink 카메라 프로토콜 (opens new window)을 지원하는 카메라를 사용하십시오.이 카메라는 이미지 및 비디오 캡처, 확대/축소, 저장 관리, 동일한 차량의 여러 카메라 및 카메라 간 전환을 지원합니다. 이러한 카메라는 QGroundControl 또는 MAVSDK를 통해 수동으로 제어할 수 있습니다 (독립형 카메라 작동 (opens new window) 및 임무 (opens new window) 모두). MAVLink 연동 카메라 설정법은 카메라 트리거를 참조하십시오.
Note
Cameras connected directly to the flight controller only support camera triggering, and are unlikely to be suitable for most surveillance/search work.
수색 및 구조용 드론은 실종 등산객을 위한 비상 용품과 같은 화물을 운반할 수 있습니다. See Cargo Drones above for information about payload delivery.
# Agricultural Drones/Crop Spraying
Agricultural drones are commonly used for mapping crop health and pest detection and animal management (herding, tracking, etc.). These cases are similar to the mapping and surveillance, search & rescue cases above. While specific crops/animals may need specialist cameras, the integration with PX4 is the same.
Agricultural drone may also be used for crop spraying. In this case the sprayer must be controlled as a generic actuator:
- The Generic Actuator Control with MAVLink section explains how you can connect flight controller outputs to your sprayer so that they can be controlled using MAVLink. Most sprayers provide controls to activate/deactivate a pump; some also allow control over the rate of flow or the spray field (i.e. by controlling the nozzle shape, or using a spinner to distribute the payload).
- You can define the area to spray using a Survey pattern (opens new window), or you can define the grid to fly using waypoints. In either case, it is important to ensure that the vehicle flight path and altitude provide adequate coverage for your particular spray being used.
- You should add a "Set actuator" mission item to your mission before and after the survey pattern in order to enable and disable the sprayer.
# Generic Actuator Control
You can connect arbitrary hardware to unused PX4 outputs and control it using RC Control or MAVLink (either as commands or in a mission).
This is useful when you need to use a payload type for which there is no associated MAVLink command, or that is not supported by PX4.
Note
Prefer using integrated hardware and hardware-specific MAVLink commands to generic actuator control when possible. Using integrated hardware allows optimised mission planning and behaviour.
# Generic Actuator Control with MAVLink
MAV_CMD_DO_SET_ACTUATOR (opens new window) can be used to set the value of up to 6 actuators (at a time). This command can be used in missions by creating a "Set actuator" mission item, or as a stand alone command.
The outputs that are to be controlled are specified in the Actuators configuration screen by assigning the functions Offboard Actuator Set 1 to Offboard Actuator Set 6 to the desired actuator outputs.
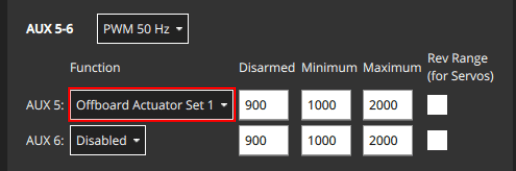
MAV_CMD_DO_SET_ACTUATOR param1 to param6 control the outputs mapped by Offboard Actuator Set 1 to Offboard Actuator Set 6 respectively.
For example, in the image above, the AUX5 output is assigned the function Offboard Actuator Set 1 function. To control the actuator attached to AUX5 you would set the value of MAV_CMD_DO_SET_ACTUATOR.param1.
# Generic Actuator Control with RC
Up to 6 autopilot PWM or CAN outputs can be controlled using RC channels. The outputs that are to be controlled are specified in the Actuators configuration screen by assigning the functions RC AUX 1 to RC AUX 6 to the desired actuator outputs.
To map a particular RC channel to an output function RC AUX n (and hence it's assigned output) you use the RC_MAP_AUXn parameter that has the same n number.
For example, to control an actuator attached to AUX pin 3 (say) you would assign the output function RC AUX 5 to the output AUX3. You could then use set the RC channel to control the AUX3 output using RC_MAP_AUX5.
# Generic Actuator Control in Missions
To use generic actuator control in a mission you must first configure the outputs that you want to control using MAVLink.
Then in QGroundControl you can set the value of actuator outputs in a mission using the Set actuator mission item (this adds a MAV_CMD_DO_SET_ACTUATOR (opens new window) to the uploaded mission plan).
It is important to note that with generic actuator control, neither QGroundControl or PX4 know anything about the hardware being triggered. When processing the mission item, PX4 will simply set the outputs to the specified values and then immediately proceed to the next mission item. If the hardware requires time to activate and you need to pause at the current waypoint for this to happen, then you will need to plan the mission with additional items to achieve the desired behaviour.
Note
This is one reason why integrated hardware is preferred! It allows missions to be written generically, with any hardware-specific behaviour or timing managed by the flight stack configuration.
To use a generic actuator in a mission:
Create a waypoint mission item where you want the actuator command.
Change the waypoint mission item to a "Set actuator" mission item:
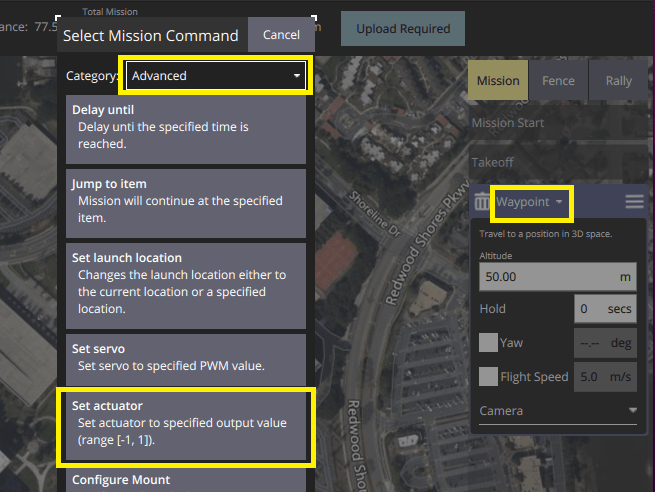
- Select the header on the waypoint mission editor to open the Select Mission Command editor.
- Select the category Advanced, and then the Set actuator item (if the item is not present, try a more recent version of QGroundControl or a daily build). This will change the mission item type to "Set actuator".
Select the actuators that are connected and set their values (these are normalized between -1 and 1).

# MAVSDK (예제 스크립트)
음 MAVSDK (opens new window) 예제 코드 (opens new window)는 MAVSDK Action 플러그인의 set_actuator() (opens new window) 함수를 사용하여 페이로드를 해제하는 방법을 설명합니다.
The set_actuator() index values map to the MAVLink payload outputs defined for your airframe.
MAVSDK
sends the MAV_CMD_DO_SET_ACTUATOR (opens new window) MAVLink command under the hood.
#include <mavsdk/mavsdk.h>
#include <mavsdk/plugins/action/action.h>
#include <chrono>
#include <cstdint>
#include <iostream>
#include <future>

using namespace mavsdk;

void usage(const std::string& bin_name)
{
    std::cerr << "Usage :" << bin_name << " <connection_url> <actuator_index> <actuator_value>\n"
              << "Connection URL format should be :\n"
              << " For TCP : tcp://[server_host][:server_port]\n"
              << " For UDP : udp://[bind_host][:bind_port]\n"
              << " For Serial : serial:///path/to/serial/dev[:baudrate]\n"
              << "For example, to connect to the simulator use URL: udp://:14540\n";
}

int main(int argc, char** argv)
{
    if (argc != 4) {
        usage(argv[0]);
        return 1;
    }

    const std::string connection_url = argv[1];
    const int index = std::stod(argv[2]);
    const float value = std::stof(argv[3]);

    Mavsdk mavsdk;
    const ConnectionResult connection_result = mavsdk.add_any_connection(connection_url);

    if (connection_result != ConnectionResult::Success) {
        std::cerr << "Connection failed: " << connection_result << '\n';
        return 1;
    }

    std::cout << "Waiting to discover system...\n";
    auto prom = std::promise<std::shared_ptr<System>>{};
    auto fut = prom.get_future();

    // We wait for new systems to be discovered, once we find one that has an
    // autopilot, we decide to use it.
    mavsdk.subscribe_on_new_system([&mavsdk, &prom]() {
        auto system = mavsdk.systems().back();

        if (system->has_autopilot()) {
            std::cout << "Discovered autopilot\n";

            // Unsubscribe again as we only want to find one system.
            mavsdk.subscribe_on_new_system(nullptr);
            prom.set_value(system);
        }
    });

    // We usually receive heartbeats at 1Hz, therefore we should find a
    // system after around 3 seconds max, surely.
    if (fut.wait_for(std::chrono::seconds(3)) == std::future_status::timeout) {
        std::cerr << "No autopilot found, exiting.\n";
        return 1;
    }

    // Get discovered system now.
    auto system = fut.get();

    // Instantiate plugins.
    auto action = Action{system};

    std::cout << "Setting actuator...\n";
    const Action::Result set_actuator_result = action.set_actuator(index, value);

    if (set_actuator_result != Action::Result::Success) {
        std::cerr << "Setting actuator failed:" << set_actuator_result << '\n';
        return 1;
    }

    return 0;
}