# 기본 개념
무인 항공기의 기본 개념과 PX4 사용법을 설명합니다. 초보자뿐만 아니라 전문가에게도 유익한 자료들이 많이 있습니다.
기본 개념에 익숙하시면, 기본 조립편에서 자동비행장치의 배선 방법을 공부할 수 있습니다. To load firmware and set up the vehicle with QGroundControl, see Basic Configuration.
# 드론의 정의
드론은 원격이나 자동으로 조종할 수 있는 무인 로봇입니다.
드론은 개인, 산업체, 공공기관 및 국방 분야 (opens new window) 등의 다양한 분야에서 사용되고 있습니다. 또한, 항공 사진, 화물 운송, 경주, 수색 및 탐사 등의 분야에서 사용됩니다.
Different types of drones are used for air, ground, sea, and underwater. 드론을 가르키는 공식 용어에는 UAV(Unmanned Aerial Vehicles), UAS(Unmanned Aerial Systems, UGV(Unmanned Ground Vehicles), USV(Unmanned Surface Vehicles)와 UUV(Unmanned Underwater Vehicles) 등이 있습니다.
자율비행장치(오토파일럿)는 드론의 두뇌에 해당하는 장치입니다. It consists of flight stack software running on vehicle controller ("flight controller") hardware.
Some drones also have a separate on-vehicle companion computer. These provide powerful general-purpose computing platform for networking, computer vision, and many other tasks.
# PX4 자동비행장치
PX4 (opens new window) is powerful open source autopilot flight stack.
PX4의 주요 특징들은 아래와 같습니다.
- Controls many different vehicle frames/types, including: aircraft (multicopters, fixed-wing aircraft and VTOLs), ground vehicles and underwater vehicles.
- 차량 컨트롤러, 센서 및 다양한 주변 장치에 적합한 매우 탁월한 선택입니다.
- 유연하고 강력한 비행 모드와 안전 기능을 지원합니다.
- Robust and deep integration with companion computers and robotics APIs (ROS 2, MAVSDK (opens new window)).
PX4는 QGroundControl 지상국, 픽스호크 하드웨어 (opens new window), 보조 컴퓨터, 카메라, MAVLink 프로토콜 지원 하드웨어를 통합하는 MAVSDK (opens new window)를 포함하는 방대한 드론 플랫폼의 핵심입니다. PX4는 드론코드 프로젝트 (opens new window)의 지원을 받고 있습니다.
# QGroundControl
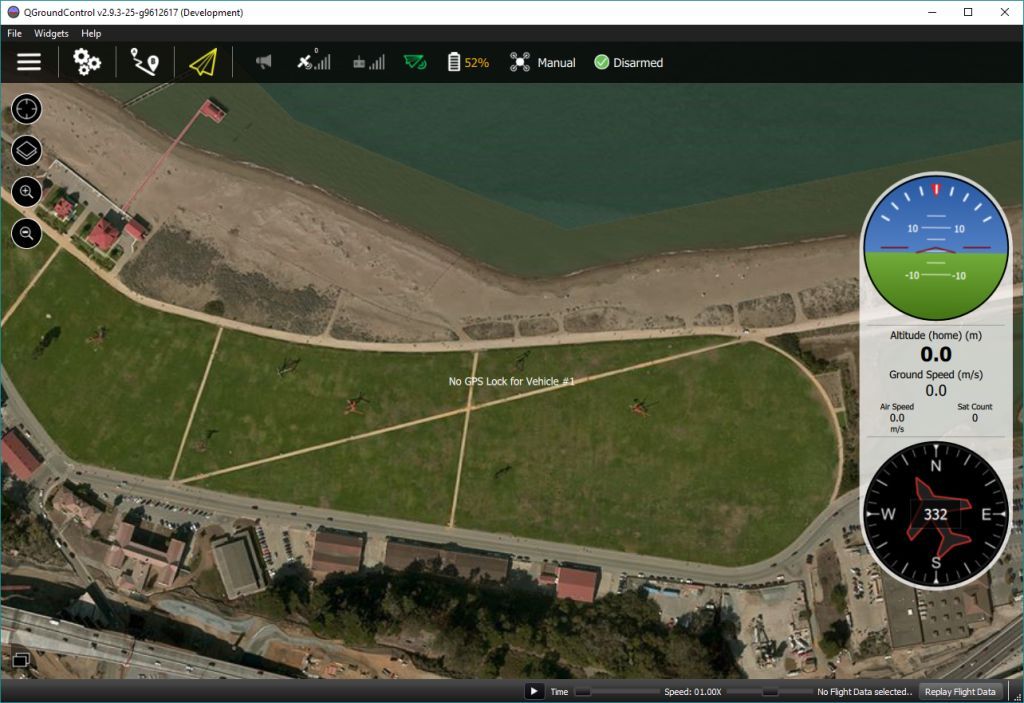
드론코드에서 지원하는 지상제어 S/W는 QGroundControl (opens new window)입니다. You can use QGroundControl to load (flash) PX4 onto the vehicle control hardware, you can setup the vehicle, change different parameters, get real-time flight information and create and execute fully autonomous missions.
QGroundControl runs on Windows, Android, MacOS or Linux. 여기 (opens new window)에서 필요한 프로그램을 다운로드하여 설치할 수 있습니다.
# 비행 컨트롤러(보드)
PX4는 초기에는 Pixhawk 시리즈에서만 실행되도록 설계되었으나, 지금은 리눅스 뿐만 아니라 다양한 하드웨어에서도 실행됩니다. 기체의 물리적 조건, 운용 목적 및 비용을 고려하여 최적의 보드를 선택할 수 있습니다.
자세한 내용은 비행 컨트롤러 선택편을 참고하십시오.
# 센서
PX4는 기체의 상태 측정하기 위하여 센서를 사용합니다. 이는 자율비행 기체 안정화에 필수 과정입니다. The system minimally requires a gyroscope, accelerometer, magnetometer (compass) and barometer. 자동 모드와 기타 모드를 사용하기 위해서는 GPS와 같은 위치측정시스템이 필요합니다. Fixed-wing and VTOL-vehicles should additionally include an airspeed sensor (very highly recommended).
더 자세한 정보는 다음을 참고하십시오.
# 출력 장치: 모터, 서보, 액츄에이터
PX4 uses outputs to control: motor speed (e.g. via ESC), flight surfaces like ailerons and flaps, camera triggers, parachutes, grippers, and many other types of payloads.
The outputs may be PWM ports or DroneCAN nodes (e.g. DroneCAN motor controllers). 아래 그림은 Pixhawk 4와 Pixhawk 4 미니의 PWM 출력 포트를 설명합니다.
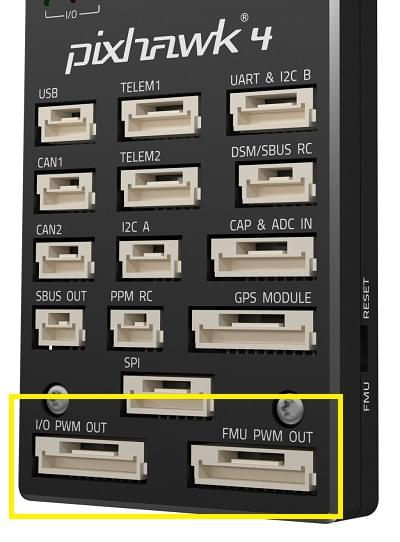
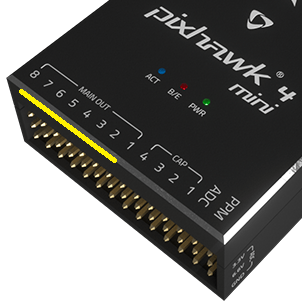
출력 장치는 크게 MAIN 포트와 AUX 포트로 나누며, 포트는 번호로 구분됩니다. MAINn과 AUXn의 n에는 1 ~ 6 또는 1 ~ 8까지의 번호가 부여됩니다. They might also be marked as IO PWM Out and FMU PWM OUT (or similar).
WARNING
A flight controller may only have MAIN PWM outputs (like the Pixhawk 4 Mini), or may have only 6 outputs on either MAIN or AUX. Ensure that you select a controller that has enough ports/outputs for your airframe.
You can connect almost any output to any motor or other actuator, by assigning the associated function ("Motor 1") to the desired output ("AUX1") in QGroundControl: Actuator Configuration and Testing. Note that the functions (motor and control surface actuator positions) for each frame are given in the Airframe Reference.
참고:
- Pixhawk controllers have an FMU board and may have a separate IO board. 별도의 입출력 보드가 있을 경우에는,
AUX포트는 FMU 보드에 연결하고,MAIN포트는 입출력 보드에 연결합니다. 다른 경우로는MAIN포트를 FMU 보드에 연결하고,AUX포트가 없을 수도 있습니다. - The FMU output ports can use D-shot or One-shot protocols (as well as PWM), which provide much lower-latency behaviour. FMU 출력 포트는 레이싱 드론처럼 높은 성능이 요구되는 기체에 사용됩니다.
MAIN포트와AUX포트에는 PWM/Dshot/OneShot 출력 제어에 충분한 6개에서 8개의 출력 포트를 가지고 있습니다. 이론적으로는, 보드 버스에서 더 많은 출력 포트를 제공할 수 있습니다. UAVCAN 버스에는 이러한 제한이 없습니다.
# 전기변속기(ESC)와 모터
Many PX4 drones use brushless motors that are driven by the flight controller via an Electronic Speed Controller (ESC) (the ESC converts a signal from the flight controller to an appropriate level of power delivered to the motor).
PX4가 지원하는 전기변속기와 모터 정보는 여기를 참고하십시오.
- 전기변속기와 모터
- 전기변속기 보정
- 전기변속기 펌웨어와 프로토콜 개요 (opens new window)(oscarliang.com)
# 배터리와 전원
PX4 드론은 리튬-폴리머(LiPo) 배터리를 가장 많이 사용합니다. The battery is typically connected to the system using a Power Module or Power Management Board, which provide separate power for the flight controller and to the ESCs (for the motors).
배터리와 배터리 설정 정보는 배터리 설정과 기본 조립(예: 픽스호크 4 배선 빠른 시작 > 전원)를 참고하십시오.
# Manual Control
Pilots can control a vehicle manually using either a Radio Control (RC) System or a Joystick/Gamepad controller connected via QGroundControl.
PX4 does not _require_ a manual control system for autonomous flight modes.
Note
Both methods can be used for most manual control use cases, such as surveys. RC systems are recommended when first tuning/testing a new frame design or when flying racers/acrobatically (and in other cases where low latency is important).
# 무선 조종(RC)
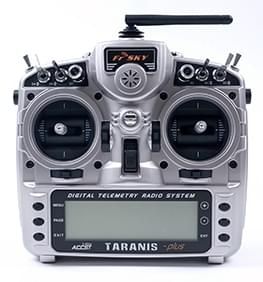
Radio Control (RC) systems can be used to manually control PX4.
They consist of a ground based RC controller that uses a radio transmitter to communicate stick/control positions to a receiver on the vehicle. 일부 RC에서는 자동조종장치에서 전송한 텔레메트리를 수신할 수 있습니다.
RC 선택 방법은 RC 선택을 참고하십시오. 다음과 같은 관련 주제들을 설명합니다.
- Radio/Remote Control Setup - Remote control configuration in QGroundControl.
- Manual Flying - Learn how to fly with a remote control.
- FrSky 텔레메트리 - PX4의 텔레메트리 정보나 상태 정보를 수신을 위한 RC 송신기 설정방법을 설명합니다.
# 지상제어 S/W와 조이스틱
A Joystick/Gamepad connected through QGroundControl can also be used to manually control PX4.
With this approach, QGroundControl translates stick/button information from a connected Joystick into MAVLink-protocol messages, which are then sent to PX4 using the shared telemetry radio link. The telemetry radio must have sufficient bandwidth for both manual control and other telemetry messages, and of course this approach means that you must have a ground station running QGroundControl.
Joysticks are also used to manually fly PX4 in a simulator.
Note
Controllers like the Auterion Skynav (opens new window) and UAVComponents MicroNav (opens new window) integrate QGC and a Joystick, and connect the vehicle via a high bandwidth telemetry radio link.
# 안전 스위치
Some vehicles have a safety switch that must be engaged before the vehicle can be armed (when armed, motors are powered and propellers can turn).
보통 안전 스위치는 GPS 장치에 장착되어 있으나, 별도의 부품으로 제공되기도 합니다.
# 텔레메트리 무선 통신
Data/Telemetry Radios can provide a wireless MAVLink connection between a ground control station like QGroundControl and a vehicle running PX4. 비행중인 기체의 매개변수 변경, 실시간 텔레메트로 통신, 임무 변경 등의 작업을 수행할 수 있습니다.
# 외부 보조 컴퓨터
A Companion Computer (also referred to as "mission computer" or "offboard computer"), is a separate on-vehicle computer that communicates with PX4 to provide higher level command and control.
The companion computer usually runs Linux, as this is a much better platform for "general" software development, and allows drones to leverage pre-existing software for computer vision, networking, and so on.
The flight controller and companion computer may be pre-integrated into a single baseboard, simplifying hardware development, or may be separate, and are connected via a serial cable, Ethernet cable, or wifi. The companion computer typically communicates with PX4 using a high level Robotics API such as MAVSDK (opens new window) or ROS 2.
관련 주제는 다음과 같습니다:
- Companion Computers
- 오프보드 모드 - PX4 외부의 지상 통제국이나 보조 컴퓨터로 제어하는 비행 모드
- 로보틱스 API
# SD 카드 (휴대용 저장 장치)
PX4는 비행 로그를 SD 카드에 저장합니다. UAVCAN 주변 장치를 사용하거나 비행 임무 수행에는 SD 카드가 필수입니다.
기본적으로, PX4는 부팅 과정에 SD 카드가 없으면, 포맷 실패 경고음을 두 번 울립니다. 그리고, 위에서 설명한 다수의 기능들이 작동하지 않습니다.
TIP
픽스호크 보드에서 지원하는 SD 카드의 최대 용량은 32GB입니다. The SanDisk Extreme U3 32GB is highly recommended.
SD 카드는 선택 사항입니다. SD 카드가 없는 비행 콘트롤어는 다음의 작업들을 수행하여야 합니다.
- CBRK_BUZZER 매개변수로 알림음을 껍니다.
- 스트림 로그를 다른 보조 장치에 기록합니다.
- 비행 임무를 RAM/플래시에 저장합니다.
# 시동 및 해제
A vehicle is said to be armed when all motors and actuators are powered, and disarmed when nothing is powered. There is also a prearmed state when only actuators are powered.
WARNING
Armed vehicles can be dangerous as propellors will be spinning.
Arming is triggered by default (on Mode 2 transmitters) by holding the RC throttle/yaw stick on the bottom right for one second (to disarm, hold stick on bottom left). PX4에서 무선 조종 스위치로 시동을 걸 수 있도록 설정할 수 있습니다. 또한, 지상통제국에서 시동 명령을 MAVLink로 전송할 수 있습니다.
To reduce accidents, vehicles should be armed as little as possible when the vehicle is on the ground. By default, vehicles are:
- Disarmed or Prearmed (motors unpowered) when not in use, and must be explicitly armed before taking off.
- Automatically disarm/prearm if the vehicle does not take off quickly enough after arming (the disarm time is configurable).
- Automatically disarm/prearm shortly after landing (the time is configurable).
- 기체는 정상 상태가 아니면, 시동은 걸리지 않습니다.
- Arming is prevented if the vehicle has a safety switch that has not been engaged.
- 수직이착륙기는 고정익 모드에서는 시동이 걸리지 않습니다(기본 설정).
When prearmed you can still use actuators, while disarming unpowers everything. Prearmed and disarmed should both safe, and a particular vehicle may support either or both.
TIP
Sometimes a vehicle will not arm for reasons that are not obvious. QGC v4.2.0 (Daily build at time of writing) and later provide an arming check report in Fly View > Arming and Preflight Checks (opens new window). From PX4 v1.14 this provides comprehensive information about arming problems along with possible solutions.
시동 및 해제에 관한 자세한 내용은 시동 준비, 시동, 시동 해제를 참고하십시오.
# 비행 모드
비행 모드는 다양한 유형과 수준의 차량 자동화 기능을 제공합니다. Autonomous modes are fully controlled by the autopilot, and require no pilot/remote control input. 예를 들어 이륙, 복귀 및 착륙 등의 작업을 자동으로 제어할 수 있습니다. 또 다른 자율 모드에는 사전 프로그래밍된 임무 수행, GPS 위치 정보 비행, 외부 컴퓨터 또는 지상제어S/W 명령에 의한 비행 작업이 가능합니다.
Manual modes are controlled by the user (via the RC control sticks/joystick) with assistance from the autopilot. Different manual modes enable different flight characteristics - for example, some modes enable acrobatic tricks, while others are impossible to flip and will hold position/course against wind.
TIP
모든 기체마다 모든 비행 모드가 적용되지 않습니다. 비행 모드는 조건이 충족된 기체에만 적용할 수 있습니다. 대부분의 모드에서는 GPS 위치 정보가 필요합니다.
비행 모드에 자세한 정보는 비행 모드를 참고하십시오. RC 스위치로 비행 모드를 변경하는 방법은 비행 모드 설정을 참고하십시오.
# 안전 설정(사고 방지)
PX4는 시스템 사고시에 기체을 보호하고 복구할 수 있는 안전 시스템이 있으며, 이와 관련된 여러가지 설정들이 있습니다. 안정 설정으로 안전 비행 지역과 조건을 지정하고, 안전 장치에서 수행하는 작업(예: 착륙, 위치 유지 또는 지정된 지점으로 복귀)을 설정할 수 있습니다.
Note
You can only specify the action for the first failsafe event. 이벤트가 발생하면, 시스템은 특별한 처리 코드를 실행하여 안전 장치 트리거가 분리된 시스템에서 기체별 코드에 의해 관리되도록 합니다.
주요 안전장치는 다음과 같습니다.
- 배터리 부족
- RC(원격 제어) 신호 상실
- 위치 상실(GPS 전역 위치 추정 품질이 너무 낮음)
- 외부 보드 연결 손실(예: 보조 컴퓨터와의 연결이 끊어짐)
- 데이터 링크 손실(예: GCS에 대한 텔레메트리 연결이 끊어짐)
- 지리적 경계 위반(가상 실린더 내부로 기체 비행을 제한합니다)
- 미션 안전장치(재 이륙 시 이전 미션이 실행되는 것을 방지합니다)
- 트래픽 회피(예: ADSB 응답기에 의해 작동됩니다)
더 자세한 내용은 안전편을 참고하십시오.
# 전진 방향
차량, 보트 및 항공기에는 전진 방향이 정해져 있습니다.
Note
VTOL 테일 시터의 방향은 멀티콥터 설정(즉, 이륙, 호버링, 착륙 중 차량 포즈)에 의하여 결정됩니다.
차량의 전진 방향을 알아야만 차량의 이동 벡터와 정렬할 수 있습니다. 멀티콥터는 모든 방향에서 대칭인 경우에도 전진 방향이 정의됩니다. 제조사에서는 일반적으로 프로펠러나 팔(프레임)에 색깔을 사용하여 차량의 전진 방향을 표시합니다.
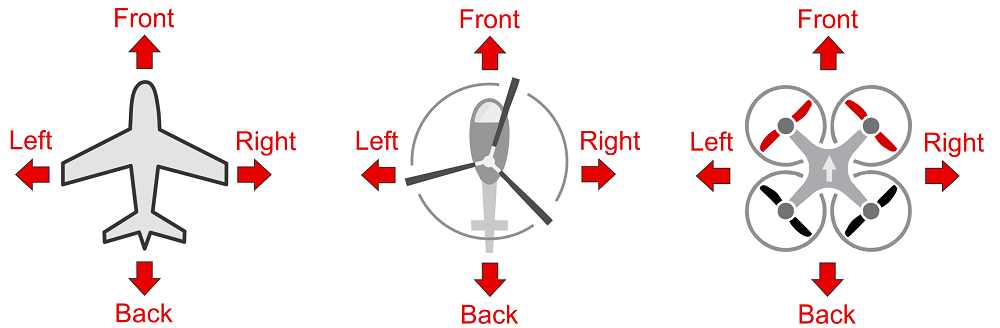
위 그림에서 전진 방향은 멀티콥터의 프로펠러에 빨간색으로 표시되어 있습니다.
비행 콘트롤러 방향에서 전진 방향에 대한 자세한 정보를 참고하십시오.