# UAVCAN
![]() UAVCAN (opens new window) is an onboard network which allows the autopilot to connect to avionics/peripherals.
It uses rugged, differential signalling, and supports firmware upgrades over the bus and status feedback from peripherals.
UAVCAN (opens new window) is an onboard network which allows the autopilot to connect to avionics/peripherals.
It uses rugged, differential signalling, and supports firmware upgrades over the bus and status feedback from peripherals.
The videos section contains additional information and guides.
Note
PX4 requires an SD card for UAVCAN node allocation and firmware upgrade. It is not used during flight by UAVCAN.
# Supported Hardware
It supports hardware like:
- ESC/Motor controllers
- Airspeed sensors
- GNSS receivers for GPS and GLONASS
- Power monitors
- Distance sensors
- Optical Flow
- Generic CAN Node (enables use of I2C, SPI, UART sensors on the CAN bus).
Note
PX4 does not support UAVCAN servos (at time of writing).
# Wiring
All UAVCAN components share the same connection architecture/are wired the same way. Connect all on-board UAVCAN devices into a chain and make sure the bus is terminated at the end nodes (the order in which the nodes are connected/chained does not matter).
The following diagram shows this for a flight controller connected to UAVCAN motor controllers (ESCs) and a UAVCAN GNSS.
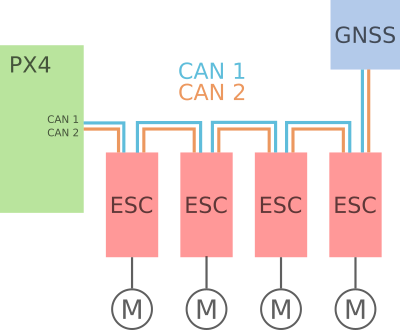
The diagram does not show any power wiring. Refer to your manufacturer instructions to confirm whether components require separate power or can be powered from the CAN bus itself.
For more information about proper bus connections see Cyphal/CAN Device Interconnection (opens new window) (Zubax KB)) (Zubax KB).
Note
- While the connections are the same, the connectors may differ across devices.
- An second/redundant" CAN interface may be used, as shown above (CAN2). This is optional, but can increase the robustness of the connection.
# PX4 Configuration
In order to use UAVCAN components with PX4 you will first need to enable the UAVCAN driver:
Power the vehicle using the battery (you must power the whole vehicle, not just the flight controller) and connect QGroundControl.
Navigate to the Vehicle Setup > Parameters screen.
UAVCAN_ENABLE must be set to one of the non-zero values.
The values are:
0: UAVCAN driver disabled.1: Sensors Manual Config.2: Sensors Automatic Config.3: Sensors and Actuators (ESCs) Automatic Config
Use
1if none of the connected UAVCAN devices support automatic configuration (check the manual!),2or3if some of them support automatic configuration, and3if you're using UAVCAN ESCs (this assigns motor controls to the UAVCAN bus rather than PWM).
Note
You will need to manually allocate static ids for any nodes that don't support automatic configuration. When using dynamic configuration, any manually allocated ids should be given a value greater than the number of UAVCAN devices (to avoid clashes).
Most UAVCAN sensors require no further setup (they are plug'n'play, unless specifically noted in their documentation).
UAVCAN motor controllers (ESCs) additionally require the motor order be set, and may require a few other parameters be set. Whether this can be done using the simple QGroundControl setup UI depends on the type of ESC (see link for information).
# Troubleshooting
# UAVCAN devices dont get node ID/Firmware Update Fails
PX4 requires an SD card for UAVCAN node allocation and during firmware update (which happen during boot). Check that there is a (working) SD card present and reboot.
# Motors not spinning when armed
If the PX4 Firmware arms but the motors do not start to rotate, check that parameter UAVCAN_ENABLE=3 to use UAVCAN ESCs.
If the motors do not start spinning before thrust is increased, check UAVCAN_ESC_IDLT=1.
# Videos
Intro to UAVCAN and Practical Example with Setup in QGroundControl!
UAVCAN for drones — PX4 Developer Summit Virtual 2020
Getting started using UAVCAN v1 with PX4 on the NXP UAVCAN Board — PX4 Developer Summit Virtual 2020
UAVCAN: a highly dependable publish-subscribe protocol for hard real-time intravehicular networking — PX4 Developer Summit Virtual 2019
# Developer Information
- UAVCAN Development: Topics related to development and integration of new UAVCAN hardware into PX4.