# RTPS/DDS 인터페이스: PX4-고속 RTPS(DDS) 브리지
microRTPS Bridge라고 하는 PX4-Fast RTPS(DDS) Bridge는 PX4 Autopilot에 RTPS(Real Time Publish Subscribe) 인터페이스를 추가합니다. 다양한 PX4 Autopilot 내부 구성요소와 (오프보드) Fast DDS 애플리케이션 간의 uORB 메시지 교환을 실시간으로 가능하게 합니다.
이를 통하여 DDS 도메인(ROS 노드 포함)에서 실행되고 연결된 애플리케이션과 통합되어 센서 데이터, 명령 및 기타 차량 정보를 쉽게 공유할 수 있습니다.
다음 가이드는 RTPS/DDS 브리지 아키텍처를 설명하고, PX4 Autopilot에서 원격 측정 업데이트를 구독하기 위하여 간단한 Fast DDS 애플리케이션을 작성하는 방법을 설명합니다.
RTPS는 OMG(Object Management Group) DDS(Data Distribution Service) 표준의 기본 프로토콜입니다. 발행/구독 패턴을 사용하여 확장 가능하고, 실시간 및 고성능의 상호 운용 데이터 통신이 목표입니다.
Fast DDS는 최신 버전의 RTPS 프로토콜/DDS 미들웨어를 가볍게 구현한 것입니다. 이전에는 Fast RTPS라는 이름이 붙었습니다.
# RTPS는 언제 사용해야 합니까?
RTPS는 비행 콘트롤러와 오프보드 부품간에 중요한 정보를 실시간 및 안정적으로 공유하는 경우에 사용합니다. It is instrumental in cases where offboard software needs to become a peer of software components running in PX4 (sending and receiving uORB topics).
사용 사례에는 컴퓨터 비전 로봇 라이브러리와의 통신과 액추에이터와 센서간의 실시간 데이터가 차량 제어 등이 있습니다.
Fast DDS는 MAVLink를 대체하는 것이 아닙니다. MAVLink는 지상국, 짐벌, 카메라 및 기타 오프보드 부품과 통신에 가장 적합한 프로토콜입니다(Fast DDS는 더 높은 주파수에서 일부 주변 장치와 작업할 수 있는 기회를 제공할 수 있지만).
TIP
링크의 추가 제약이 있는 느린 통신환경(예: 무선 원격 측정)에서 Fast RTPS(DDS)를 사용할 수 있습니다. 원격 분석 채널에 쉽게 과부하가 걸릴 수 있다는 점을 염두에 두십시오.
# 아키텍쳐 개요
# microRTPS 브리지
microRTPS 브리지는 PX4와 DDS 참여 애플리케이션 간에 메시지를 교환하여, 각 시스템에서 사용하는 uORB와 RTPS/DDS 메시지를 원활하게 변환합니다.
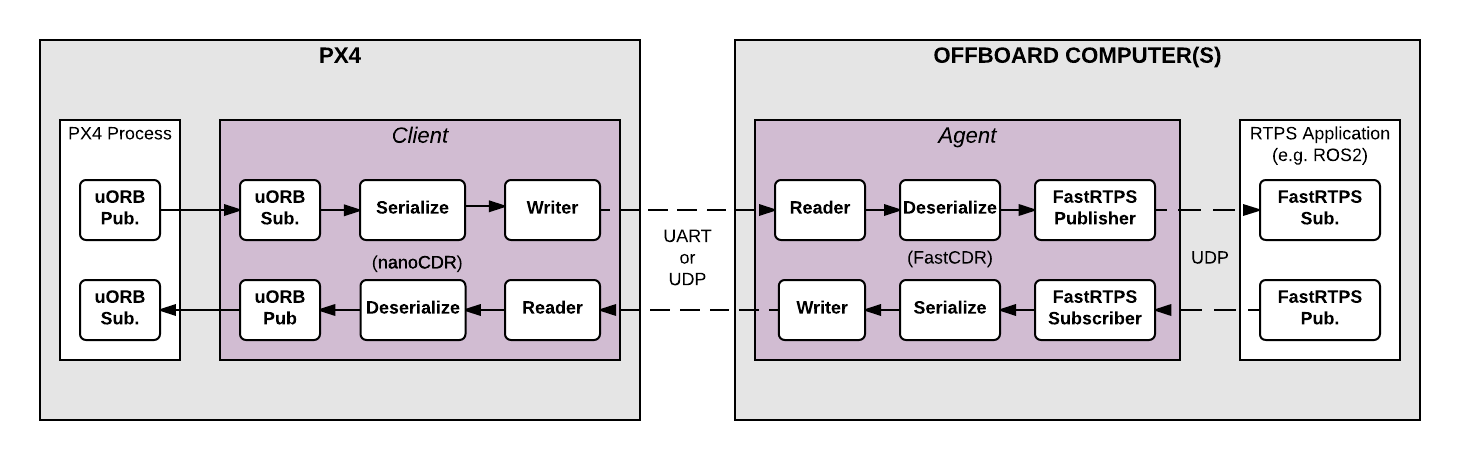
아키텍처의 핵심 요소는 위의 다이어그램에 표시된 클라이언트와 에이전트 프로세스입니다.
# microRTPS 클라이언트
클라이언트는 비행 콘트롤러에서 실행되는 PX4 자동항법장치의 미들웨어 데몬 프로세스입니다. 이 클라이언트는 다른 PX4 자동항법장치 구성 요소에서 게시한 uORB 주제를 구독하고, 모든 업데이트를 에이전트(UART 또는 UDP 포트를 통해)에 보내고, 에이전트 및 PX4 자동항법장치에 uORB 메시지로 게시합니다.
# microRTPS 에이전트
에이전트는 오프보드 컴퓨터(비행 콘트롤러 외부)의 데몬 프로세스로 실행됩니다. This agent watches for uORB update messages from the Client and (re)publishes them over RTPS, and also subscribes to "uORB" RTPS/DDS messages from other DDS-participant applications and forwards them to the Client.
# microRTPS 에이전트/클라이언트 통신
에이전트와 클라이언트는 직렬 통신(UART) 또는 UDP 네트워크로 연결되며, uORB 정보는 전송전에 CDR 직렬화 (opens new window)됩니다(CDR 직렬화는 서로 다른 플랫폼 간에 직렬 데이터 교환을 위한 공통 형식입니다.)
에이전트와 모든 Fast DDS 애플리케이션은 UDP로 연결되며, 동일한 기기 또는 다른 기기에 있을 수 있습니다. 일반적인 설정에서는 클라이언트에 연결된 동일 시스템(예: 개발 컴퓨터, Linux 보조 컴퓨터 또는 컴퓨팅 보드)에 있습니다. 이것은 Wi-Fi 링크 또는 USB로 가능합니다.
# 코드 생성
# 종속성
필요 코드를 생성하고 다음 단계를 진행하기 위하여 Fast DDS 2.0.0 이상 및 Fast-RTPS-Gen 1.0.4(이후 아님!)를 설치합니다. 설치 가이드를 참고하십시오.
RTPS는 ROS 2(Robot Operating System)의 미들웨어로 채택되었습니다.
ROS 2 애플리케이션과 개발 워크플로에서의 자세한 사용 방법은 PX4-ROS 2 브리지를 참고하십시오.
# Fast RTPS(DDS) 애플리케이션(ROS 독립)
브리지를 생성, 구축 및 사용하는 데 필요한 코드는 PX4-Autopilot이 컴파일시에 자동으로 생성됩니다.
클라이언트 애플리케이션도 일반 빌드 프로세스의 일부로 컴파일되고, 펌웨어에 빌드됩니다. 에이전트는 대상 컴퓨터에서 수동으로 컴파일하여야 합니다.
TIP
대부분의 사용자는 그렇게 할 필요가 없습니다. 그래도, 브리지는 수동으로 생성할 수 있으므로 빌드 프로세스에 대한 보다 자세한 개요를 제공하고 문제 해결에 유용합니다.
# 지원 uORB 메시지
생성된 브리지 코드는 ROS 애플리케이션을 배포 여부에 상관없이 RTPS를 통하여 uORB 주제의 지정된 하위 집합을 게시/구독할 수 있도록 합니다.
자동 코드 생성의 경우 uorb_rtps_message_ids.yaml이라는 PX4 PX4-Autopilot/msg/tools/ 디렉토리에 yaml 정의 파일이 있습니다. 이 파일은 RTPS와 함께 사용할 uORB 메시지 세트, 메시지를 보내거나 받을지 또는 둘 다 할지 여부와 DDS/RTPS 미들웨어에서 사용할 메시지의 RTPS ID를 정의합니다.
Note
모든 RTPS 메시지는 이 파일에 ID 설정이 필요합니다.
rtps:
  - msg: actuator_armed
    id: 0
  - msg: actuator_control
    id: 1
  - ...
  - msg: airspeed
    id: 5
    send: true
  - msg: battery_status
    id: 6
    send: true
  - msg: camera_capture
    id: 7
  - msg: camera_trigger
    id: 8
    receive: true
  - ...
  - msg: sensor_baro
    id: 63
    receive: true
    send: true
# 클라이언트 (PX4/PX4-Autopilot)
클라이언트 소스 코드는 일반 빌드 프로세스의 일부로 생성, 컴파일 및 PX4 Autopilot 펌웨어에 빌드됩니다.
NuttX/Pixhawk 비행 콘트롤러용 PX4 Autopilot 펌웨어를 빌드하려면 구성 대상에서 _rtps 기능을 사용하십시오.
예를 들어, RTPS를 px4_fmu-v4에 빌드하려면:
make px4_fmu-v4_rtps
SITL 대상 펌웨어를 빌드하려면:
make px4_sitl_rtps
클라이언트 애플리케이션은 NuttShell/System Console에서 실행할 수 있습니다. 명령어 구문은 다음과 같습니다(가변 인수를 지정할 수 있음).
> micrortps_client start|stop|status [options]
  -t <transport>          [UART|UDP] Default UART
  -d <device>             UART device. Default /dev/ttyACM0
  -l <loops>              How many iterations will this program have. -1 for infinite. Default -1.
  -w <sleep_time_ms>      Time in ms for which each iteration sleep. Default 1ms
  -b <baudrate>           UART device baudrate. Default 460800
  -p <poll_ms>            Time in ms to poll over UART. Default 1ms
  -r <reception port>     UDP port for receiving. Default 2019
  -s <sending port>       UDP port for sending. Default 2020
  -i <ip_address>         Select IP address (remote) values: <x.x.x.x>. Default: 127.0.0.1
Note
기본적으로 클라이언트는 데몬으로 실행되지만, 자동으로 시작되지 않으며 수동으로 실행하여야 합니다.
PX4 Autopilot 펌웨어 초기화 코드는 향후 영구 데몬 프로세스로 클라이언트를 자동으로 시작할 수 있습니다.
예를 들어, UDP로 에이전트에 연결하는 SITL로 클라이언트 데몬을 실행하려면 다음 명령어를 실행하십시오.
micrortps_client start -t UDP
# Offboard Fast DDS 인터페이스의 에이전트(ROS 독립)
연결된 PX4 Autopilot 펌웨어를 빌드할 때 에이전트 코드가 자동으로 생성되며, 소스 코드 폴더는 다음과 같습니다: build/<target-platform>/src/modules/ micrortps_bridge/micrortps_client/micrortps_agent/
에이전트 애플리케이션을 빌드합니다.
cd build/<target-platform>/src/modules/micrortps_bridge/micrortps_client/micrortps_agent
mkdir build && cd build
cmake ..
make
에이전트의 명령 구문은 다음과 같습니다.
$ ./micrortps_agent [options]
  -t <transport>          [UART|UDP] Default UART.
  -d <device>             UART device. Default /dev/ttyACM0.
  -w <sleep_time_us>      Time in us for which each iteration sleep. Default 1ms.
  -b <baudrate>           UART device baudrate. Default 460800.
  -p <poll_ms>            Time in ms to poll over UART. Default 1ms.
  -r <reception port>     UDP port for receiving. Default 2019.
  -s <sending port>       UDP port for sending. Default 2020.
  -n <set namespace>      Set a namespace for the micrortps_agent.
에이전트를 시작하려면 클라이언트에 대한 연결을 지정하기 위한 적절한 옵션과 함께 micrortps_agent를 실행하십시오(기본 옵션은 Linux 기기에서 UART 포트를 통한 클라이언트).
예를 들어, UDP로 micrortps_agent를 시작하려면 다음을 실행합니다.
./micrortps_agent -t UDP
# Fast DDS 리스너 애플리케이션 생성
클라이언트(비행 콘트롤러)와 에이전트(오프보드 컴퓨터)가 실행되고 연결되면, Fast DDS 애플리케이션이 게시하고 RTPS를 사용하여 PX4 Autopilot에서 uORB 주제를 구독하십시오.
이 예는 sensor_combined 주제를 구독하고 PX4 Autopilot에서 게시된 업데이트를 인쇄하는 Fast DDS "리스너" 애플리케이션을 만드는 방법을 보여줍니다. 연결된 RTPS 애플리케이션은 에이전트와 동일한 네트워크상의 모든 컴퓨터에서 실행할 수 있습니다. 이 예에서 에이전트와 리스너 애플리케이션은 같은 컴퓨터에 있습니다.
fastrtpsgen 스크립트를 사용하여, IDL 메시지 파일에서 간단한 RTPS 애플리케이션을 생성할 수 있습니다.
RTPS
메시지는 IDL 파일에 정의되고, fastrtpsgen을 사용하여 C++로 컴파일됩니다.
브리지 코드 빌드시에 송수신 uORB 메시지의 IDL 파일이 생성되며, 이러한 IDL 파일은 PX4 자동조종장치 통신용 Fast DDS 애플리케이션을 생성에 필요합니다.
빌드 대상은 다음 디렉토리에서 찾을 수 있습니다: build/BUILDPLATFORM/src/modules/micrortps_bridge/micrortps_agent/idl/*.idl.
다음 명령을 입력하여 애플리케이션을 생성합니다.
cd /path/to/PX4/PX4-Autopilot
cd build/px4_sitl_rtps/src/modules/micrortps_bridge
mkdir micrortps_listener
cd micrortps_listener
fastrtpsgen -example x64Linux2.6gcc ../micrortps_agent/idl/sensor_combined.idl
This creates a basic subscriber and publisher, and a main-application that you can run.
Linux에서 애플리케이션을 빌드하고 실행합니다.
init(): To change the subscription topic name (by default, the micrortps agent publishes the data on the named topic:fmu/sensor_combined/out),onNewDataMessage(): To print the received sensor combined data.
bool sensor_combinedSubscriber::init(Subscriber* sub)
{
    // Create RTPSParticipant

    ParticipantAttributes PParam;
    PParam.rtps.setName("Participant_subscriber"); //You can put the name you want
    mp_participant = Domain::createParticipant(PParam);
    if(mp_participant == nullptr)
    {
        return false;
    }

    //Register the type

    Domain::registerType(mp_participant, static_cast<TopicDataType*>(&myType));

    // Create Subscriber

    SubscriberAttributes Rparam;
    Rparam.topic.topicKind = NO_KEY;
    Rparam.topic.topicDataType = myType.getName(); //Must be registered before the creation of the subscriber
    Rparam.topic.topicName = "fmu/sensor_combined/out";
    mp_subscriber = Domain::createSubscriber(mp_participant,Rparam, static_cast<SubscriberListener*>(&m_listener));
    if(mp_subscriber == nullptr)
    {
        return false;
    }
    return true;
}
void sensor_combinedSubscriber::SubListener::onNewDataMessage(Subscriber* sub)
{
    // Take data
    sensor_combined_ st;

    if(sub->takeNextData(&st, &m_info))
    {
        if(m_info.sampleKind == ALIVE)
        {
            // Print your structure data here.
            ++n_msg;
            std::cout << "\n\n\n\n\n\n\n\n\n\n";
            std::cout << "Sample received, count=" << n_msg << std::endl;
            std::cout << "=============================" << std::endl;
            std::cout << "gyro_rad: " << st.gyro_rad().at(0);
            std::cout << ", " << st.gyro_rad().at(1);
            std::cout << ", " << st.gyro_rad().at(2) << std::endl;
            std::cout << "gyro_integral_dt: " << st.gyro_integral_dt() << std::endl;
            std::cout << "accelerometer_timestamp_relative: " << st.accelerometer_timestamp_relative() << std::endl;
            std::cout << "accelerometer_m_s2: " << st.accelerometer_m_s2().at(0);
            std::cout << ", " << st.accelerometer_m_s2().at(1);
            std::cout << ", " << st.accelerometer_m_s2().at(2) << std::endl;
            std::cout << "accelerometer_integral_dt: " << st.accelerometer_integral_dt() << std::endl;
            std::cout << "magnetometer_timestamp_relative: " << st.magnetometer_timestamp_relative() << std::endl;
            std::cout << "magnetometer_ga: " << st.magnetometer_ga().at(0);
            std::cout << ", " << st.magnetometer_ga().at(1);
            std::cout << ", " << st.magnetometer_ga().at(2) << std::endl;
            std::cout << "baro_timestamp_relative: " << st.baro_timestamp_relative() << std::endl;
            std::cout << "baro_alt_meter: " << st.baro_alt_meter() << std::endl;
            std::cout << "baro_temp_celcius: " << st.baro_temp_celcius() << std::endl;

        }
    }
}
이제 출력되는 센서 정보를 조회할 수 있습니다.
Sample received, count=10119
Received sensor_combined data
=============================
gyro_rad: -0.0103228, 0.0140477, 0.000319406
gyro_integral_dt: 0.004
accelerometer_timestamp_relative: 0
accelerometer_m_s2: -2.82708, -6.34799, -7.41101
accelerometer_integral_dt: 0.004
magnetometer_timestamp_relative: -10210
magnetometer_ga: 0.60171, 0.0405879, -0.040995
baro_timestamp_relative: -17469
baro_alt_meter: 368.647
baro_temp_celcius: 43.93
Now you should see the sensor information being printed out:
mavlink stop-all
Note
Make sure the Client is running, if the Listener application does not print anything.
# 실제 하드웨어로 브리지 설정
This section is work-in-progress.
# 문제 해결
# 클라이언트가 선택한 UART 포트가 사용 중이라고 보고함
If the selected UART port is busy, it's possible that the MAVLink application is already being used. If both MAVLink and RTPS connections are required you will have to either move the connection to use another port or using the available protocol splitter for PX4 and companion computers.
TIP
A quick/temporary fix to allow bridge testing during development is to stop MAVLink from NuttShell:
export FASTRTPSGEN_DIR=/path/to/fastrtps/install/folder/bin
# 에이전트가 빌드되지 않음/fastrtpsgen을 찾을 수 없습니다.
기본 경로에 Fast DDS를 설치하지 않은 경우에는 make를 실행하기 전에 FASTRTPSGEN_DIR 환경 변수를 설정하여 설치 디렉토리를 지정하여야 합니다.
Linux/Mac 환경에서는 다음과 같이 설정합니다.
On Linux/Mac this is done as shown below:
export FASTRTPSGEN_DIR=/path/to/fastrtps/install/folder/bin
Note
This should not be a problem if Fast DDS is installed in the default location.
# 보조 컴퓨터의 UART 활성화
For UART transport on a Raspberry Pi or any other companion computer you will have to enable the serial port:
userid(기본값은 라즈베리파이의 경우 pi)가dialout그룹의 구성원인지 확인합니다.groups pi sudo usermod -a -G dialout pi특히 라즈베피파이에서는 사용중인 GPIO 직렬 콘솔을 중지하여야 합니다.
sudo raspi-config표시된 메뉴에서 인터페이스 옵션 > 직렬로 이동합니다. *시리얼을 통해 로그인 셸에 액세스하시겠습니까?*에 대해 아니요를 선택합니다. 확인후 재부팅하십시오.
커널에서 UART를 확인합니다.
sudo vi /boot/config.txtenable_uart값이 1로 설정되어 있는지 확인합니다.enable_uart=1