# 부트로더 업데이트
The PX4 Bootloader is used to load firmware for Pixhawk boards (PX4FMU, PX4IO).
Pixhawk controllers usually comes with an appropriate bootloader version pre-installed. However in some case it is not present, or an older version is present that needs to be updated.
이 섹션은 픽스호크 부트로더를 업데이트 방법을 설명합니다.
Note
A case where you may need to update Pixhawk boards that install FMUv2 firmware: Firmware > FMUv2 Bootloader Update.
# Building the PX4 Bootloader
FMUv6X STM32H7)로 시작하는 보드는 인트리 PX4 부트로더를 사용합니다.
This can be built from within the PX4-Autopilot folder using the make command and the board-specific target with a _bootloader suffix. For FMUv6X the command is:
make px4_fmu-v6x_bootloader
This will build the bootloader binary as build/px4_fmu-v6x_bootloader/px4_fmu-v6x_bootloader.elf, which can be flashed via SWD or DFU. 부트로더를 빌드하는 경우 이러한 옵션중 하나를 충분히 숙지하여야합니다.
ELF 파일 대신 HEX 파일이 필요한 경우에는 objcopy를 사용하십시오.
arm-none-eabi-objcopy -O ihex build/px4_fmu-v6x_bootloader/px4_fmu-v6x_bootloader.elf px4_fmu-v6x_bootloader.hex
# Building the Legacy PX4 Bootloader
PX4 boards up to FMUv5X (before STM32H7) used a legacy PX4 bootloader (opens new window) repository.
사용 방법은 README의 지침을 참조하십시오.
# QGC Bootloader Update
The easiest approach is to first use QGroundControl to install firmware that contains the desired/latest bootloader. 그런 다음, 매개변수 SYS_BL_UPDATE를 설정하여 재시작시 부트로더 업데이트를 실행합니다.
Note
이 접근 방식은 SYS_BL_UPDATE가 펌웨어에 존해하는 경우에만 사용할 수 있습니다 (현재는 FMUv2 및 일부 사용자 지정 펌웨어).
단계는 다음과 같습니다:
SD카드를 삽입합니다 (발생할 수 있는 문제들의 디버그를 위한 부트 로그 기록을 가능하게 합니다.)
적절한 부트로더를 포함하는 이미지를 사용하여 펌웨어를 업데이트합니다.
Note
업데이트된 부트로더는 사용자 정의 펌웨어(예 : 개발팀에서 제공)로 제공되거나 최신 마스터에 포함될 수 있습니다. :::
- 기체가 재부팅될 때까지 기다리십시오.
- SYS_BL_UPDATE 파라미터를 찾아서 활성화 하십시오.
- 재부팅하십시오 (보드의 연결을 끊고 다시 연결하십시오.). 부트로더 업데이트는 수 초 안에 완료됩니다.
일반적으로이 시점에서 새로 설치된 부트로더를 사용하여 다시 펌웨어를 업데이트 할 수 있습니다.
An specific example of this process for updating the FMUv2 bootloader is given below.
# FMUv2 Bootloader Update
If QGroundControl installs the FMUv2 target (see console during installation), and you have a newer board, you may need to update the bootloader in order to access all the memory on your flight controller.
Note
Early FMUv2 Pixhawk-series flight controllers had a hardware issue that restricted them to using 1MB of flash memory. The problem is fixed on newer boards, but you may need to update the factory-provided bootloader in order to install FMUv3 Firmware and access all 2MB available memory.
To update the bootloader:
SD카드를 삽입합니다 (발생할 수 있는 문제들의 디버그를 위한 부트 로그 기록을 가능하게 합니다.)
Update the Firmware to PX4 master version (when updating the firmware, check Advanced settings and then select Developer Build (master) from the dropdown list). QGroundControl will automatically detect that the hardware supports FMUv2 and install the appropriate Firmware.
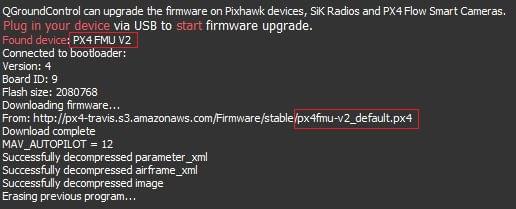
기체가 재부팅될 때까지 기다리십시오.
SYS_BL_UPDATE 파라미터를 찾아서 활성화 하십시오.
재부팅하십시오 (보드의 연결을 끊고 다시 연결하십시오.). 부트로더 업데이트는 수 초 안에 완료됩니다.
Then Update the Firmware again. This time QGroundControl should autodetect the hardware as FMUv3 and update the Firmware appropriately.
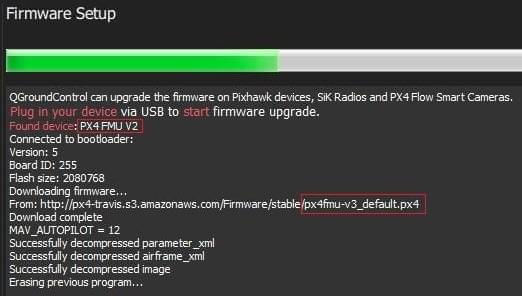
Note
If the hardware has the Silicon Errata it will still be detected as FMUv2 and you will see that FMUv2 was re-installed (in console). In this case you will not be able to install FMUv3 hardware.
# Dronecode Probe 부트로더 업데이트
아래에서 dronecode probe를 사용하여 수동 부트로더 업데이트 방법을 설명합니다:
부트로더를 포함한 바이너리를 만드십시오 (개발자 팀에서 다운받거나, 직접 소스를 빌드하십시오).
USB로 컴퓨터와 Dronecode probe를 연결하십시오.
바이너리가 들어 있는 디렉토리에서 아래 커맨드를 터미널에 입력하십시오.
bash
  arm-none-eabi-gdb px4fmuv5_bl.elf
The gdb terminal appears and it should display the following output:
bash
  GNU gdb (GNU Tools for Arm Embedded Processors 7-2017-q4-major) 8.0.50.20171128-git
  Copyright (C) 2017 Free Software Foundation, Inc. License GPLv3+: GNU GPL version 3 or later <a href="http://gnu.org/licenses/gpl.html" x-nc="1">http://gnu.org/licenses/gpl.html</a>
  This is free software: you are free to change and redistribute it.
There is NO WARRANTY, to the extent permitted by law.
Type "show copying"    and "show warranty" for details.
This GDB was configured as "--host=x86_64-linux-gnu --target=arm-none-eabi".
Type "show configuration" for configuration details.
For bug reporting instructions, please see:
  <a href="http://www.gnu.org/software/gdb/bugs/" x-nc="1">http://www.gnu.org/software/gdb/bugs/</a>.
Find the GDB manual and other documentation resources online at:
  <a href="http://www.gnu.org/software/gdb/documentation/" x-nc="1">http://www.gnu.org/software/gdb/documentation/</a>.
For help, type "help".
Type "apropos word" to search for commands related to "word"...
Reading symbols from px4fmuv5_bl.elf...done.
/dev/serial/by-id 디렉토리에서 ls 커맨드를 입력해
<dronecode-probe-id>를 찾으십시오.아래 커맨드로 Dronecode probe에 연결하십시오:
tar ext /dev/serial/by-id/<dronecode-probe-id>Pixhawk를 다른 USB 케이블로 전원을 넣고, FMU-DEBUG 포트로 Dronecode probe에 연결하십시오.
Note
Dronecode 프로브를 FMU-DEBUG 포트에 연결하려면 케이스를 제거해야 할 수 있습니다 (예 : Pixhawk 4에서는 T6 Torx 드라이버를 사용하여이 작업을 수행합니다). :::
아래 커맨드로 Pixhawk의 swd를 스캔하고 연결하십시오:
(gdb) mon swdp_scan
(gdb) attach 1
1. 이제 바이너리를 픽스호크에 로드하십시오:

```bash
(gdb) load
After the bootloader has updated you can Load PX4 Firmware using QGroundControl.
# 기타 보드 (Non-Pixhawk)
Pixhawk 시리즈가 아닌 보드는 자체적인 부트로더 업데이트 방식이 있습니다.
Betaflight로 사전 플래싱된 보드에 대해서는 Betaflight 시스템 부트로더 플래싱을 참조하십시오.