# PX4 소프트웨어 빌드
PX4는 시뮬레이션 대상과 하드웨어 대상을 콘솔이나 IDE에서 구축할 수 있습니다.
Note
이 지침을 따르기 전에 먼저 호스트 운영 체제와 대상 하드웨어에 대한 개발자 도구 모음을 설치하여야 합니다. 이 저장소를 Github 계정과 연결된 복사본을 만들어 (opens new window), 이 원본을 로컬 컴퓨터에 복제 (opens new window)하는 것이 좋습니다.
TIP
일반적인 빌드 문제에 대한 해결 방법은 아래 문제 해결을 참고하십시오.
# PX4 소스 코드 다운로드
PX4 소스 코드는 Github의 PX4/PX4-Autopilot (opens new window) 저장소에 저장되어 있습니다. 최신 버전을 컴퓨터에 다운로드하려면 터미널에 다음 명령을 실행하십시오.
git clone https://github.com/PX4/PX4-Autopilot.git --recursive
Note
이것이 최신 코드를 빌드하기 위해 필요합니다. GIT 예제 > PX4에 코드 기여는 PX4에 기여하기 위해 git을 사용 방법을 설명합니다.
# 최초 빌드 (jMAVSim 시뮬레이션 활용)
먼저 콘솔 환경에서 시뮬레이션 대상을 빌드합니다. 이를 통하여 실제 하드웨어와 IDE로 사용전에 시스템 설정을 검증할 수 있습니다.
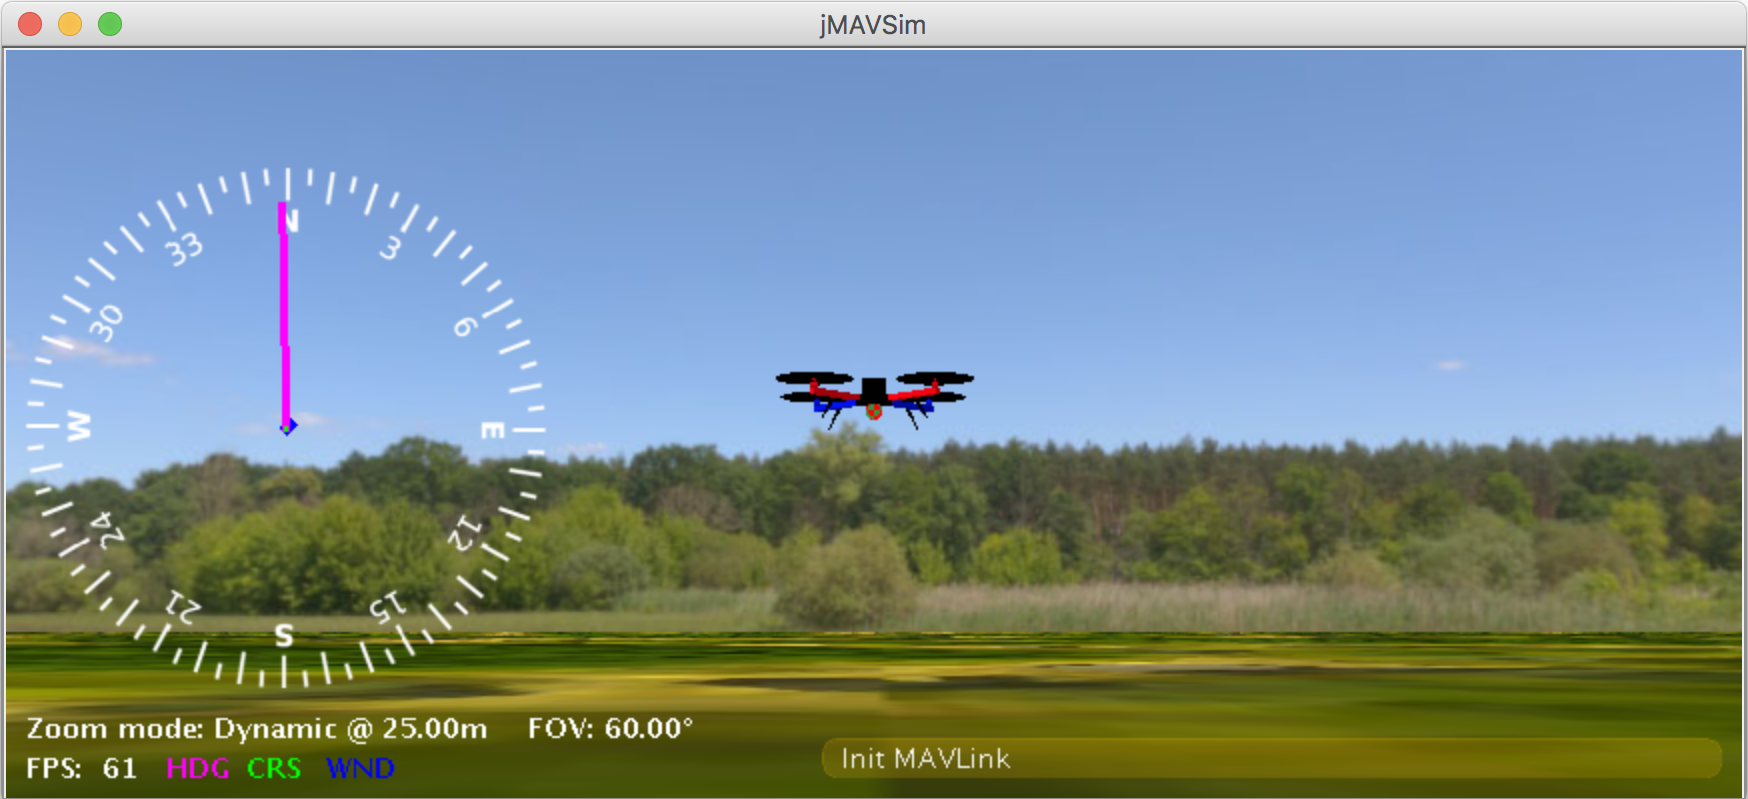
PX4-Autopilot 디렉토리로 이동하여, 다음 명령을 사용하여 jMAVSim을 시작합니다.
make px4_sitl jmavsim
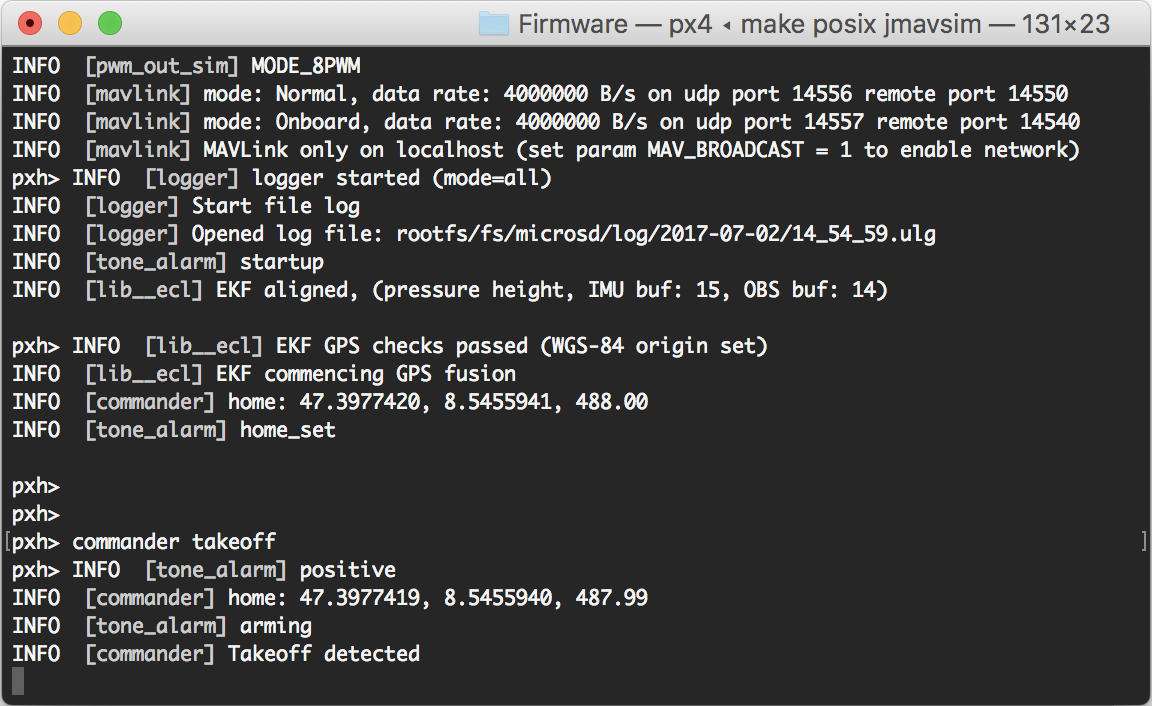
그러면, 아래와 같은 PX4 콘솔이 나타납니다.
Note
You may need to start QGroundControl before proceeding, as the default PX4 configuration requires a ground control connection before takeoff. This can be downloaded from here (opens new window).
The drone can be flown by typing:
pxh> commander takeoff
The drone can be landed by typing commander land and the whole simulation can be stopped by doing CTRL+C (or by entering shutdown).
Flying the simulation with the ground control station is closer to the real operation of the vehicle. Click on a location in the map while the vehicle is flying (takeoff flight mode) and enable the slider. This will reposition the vehicle.

PX4 can be used with a number of other [Simulators](../simulation/README.md), including [Gazebo Simulation](../simulation/gazebo.md) and [AirSim Simulation](../simulation/airsim.md). These are also started with *make* - e.g.
make px4_sitl gazebo
NuttX 또는 Pixhawk 기반 보드용으로 빌드하려면, PX4-Autopilot 디렉토리로 이동한 다음 보드용 빌드 타겟으로 make를 호출하십시오.
# NuttX/Pixhawk 기반 보드
# NuttX용 빌드
예를 들어, Pixhawk 4 하드웨어용으로 빌드하려면 다음 명령을 사용할 수 있습니다.
성공적인 실행은 다음과 유사한 출력으로 종료됩니다.
cd PX4-Autopilot
make px4_fmu-v4_default
A successful run will end with similar output to:
-- 빌드 파일은 /home/youruser/src/PX4-Autopilot/build/px4_fmu-v4_default에 작성되었습니다.
[954/954] Creating /home/youruser/src/PX4-Autopilot/build/px4_fmu-v4_default/px4_fmu-v4_default.px4
The first part of the build target px4_fmu-v4 indicates the firmware for a particular flight controller hardware. The following list shows the build commands for the Pixhawk standard boards:
- Holybro Pixhawk 6X (FMUv6X):
make px4_fmu-v6x_default - Holybro Pixhawk 6C (FMUv6C):
make px4_fmu-v6c_default - Holybro Pixhawk 5X (FMUv5X):
make px4_fmu-v5x_default - Pixhawk 4 (FMUv5):
make px4_fmu-v5_default - Pixhawk 4 Mini (FMUv5):
make px4_fmu-v5_default - CUAV V5+ (FMUv5):
make px4_fmu-v5_default - CUAV V5 nano (FMUv5):
make px4_fmu-v5_default - Pixracer (FMUv4):
make px4_fmu-v4_default - Pixhawk 3 Pro:
make px4_fmu-v4pro_default - Pixhawk Mini:
make px4_fmu-v3_default - Pixhawk 2 (Cube Black) (FMUv3):
make px4_fmu-v3_default - mRo Pixhawk (FMUv3):
make px4_fmu-v3_default(supports 2MB Flash) - Holybro pix32 (FMUv2):
make px4_fmu-v2_default - Pixfalcon (FMUv2):
make px4_fmu-v2_default - Dropix (FMUv2):
make px4_fmu-v2_default - Pixhawk 1 (FMUv2):
make px4_fmu-v2_default:::warning You must use a supported version of GCC to build this board (e.g. the same as used by CI/docker) or remove modules from the build. PX4가 보드의 1MB 플래시 제한에 가깝기 때문에, 지원되지 않는 GCC로 빌드가 실패할 수 있습니다. 이 저장소를 Github 계정과 연결된 복사본을 만들어 (opens new window), 이 원본을 로컬 컴퓨터에 복제 (opens new window)하는 것이 좋습니다. - 2MB 플래시가 있는 Pixhawk 1:
make px4_fmu-v3_default
Build commands for non-Pixhawk NuttX fight controllers (and for all other-boards) are provided in the documentation for the individual flight controller boards.
USB로 자동조종장치에 컴파일된 바이너리를 업로드하려면 make upload 명령어를 사용하십시오. Make sure you can connect to your RPi over ssh, see instructions how to access your RPi (opens new window).
# 펌웨어 업로드 (보드 플래싱)
Append upload to the make commands to upload the compiled binary to the autopilot hardware via USB. For example
make px4_fmu-v4_default upload
다른 보드에 대한 빌드 명령어 정보는 보드별 비행 콘트롤러 페이지에서 제공됩니다(일반적으로 펌웨어 빌드 제목 아래).
Erase  : [====================] 100.0%
Program: [====================] 100.0%
Verify : [====================] 100.0%
Rebooting.

[100%] Built target upload
# 기타 보드
다음 명령어는 모든 빌드 대상을 나열합니다.
You can also list all configuration targets using the command:
make list_config_targets
# 그래픽 IDE에서의 컴파일
많은 빌드 문제는 일치하지 않는 하위 모듈이나 불완전하게 정리된 빌드 환경으로 인하여 발생합니다. 하위 모듈을 업데이트하고 distclean을 수행하면 이 오류를 수정할 수 있습니다:
# 문제 해결
# 일반 빌드 오류
XXXX바이트로 오버플로된 영역 '플래시' 오류는 펌웨어가 대상 하드웨어 플랫폼에 비해 너무 크다는 것을 나타냅니다. 이는 플래시 크기가 1MB로 제한되는 make px4_fmu-v2_default 빌드에서 나타납니다.
git submodule update --recursive
make distclean
# Flash overflowed by XXX bytes
vanilla 마스터 브랜치를 구축하는 경우, 가장 큰 원인은 지원되지 않는 GCC 버전을 사용하기 때문입니다. 이 경우, 개발자 도구 모음 지침에 지정된 버전을 설치하십시오.
자체 브랜치를 구축하는 경우, 펌웨어 크기를 1MB 제한 이상으로 늘렸을 수 있습니다. 이 경우 빌드에서 필요하지 않은 드라이버 모듈을 제거하여야 합니다.
MacOS는 실행 중인 모든 프로세스에서 기본적으로 최대 256개의 열린 파일을 허용합니다. PX4 빌드 시스템은 많은 수의 파일을 오픈하므로, 이 갯수를 초과할 수 있습니다.
# macOS: 열린 파일이 너무 많음 오류
MacOS allows a default maximum of 256 open files in all running processes. The PX4 build system opens a large number of files, so you may exceed this number.
The build toolchain will then report Too many open files for many files, as shown below:
/usr/local/Cellar/gcc-arm-none-eabi/20171218/bin/../lib/gcc/arm-none-eabi/7.2.1/../../../../arm-none-eabi/bin/ld: cannot find NuttX/nuttx/fs/libfs.a: Too many open files
macOS Catalina 10.15.1부터 cmake로 시뮬레이터를 빌드시 문제가 발생할 수 있습니다. 이 플랫폼에서 빌드 문제가 발생하면, 터미널에서 다음 명령을 실행하십시오:
- Tools/mac_set_ulimit.sh (opens new window) 스크립트를 실행하거나,
- 다음 명령어를 실행하십시오.
ulimit -S -n 300
# macOS Catalina: cmake 실행 문제
arm_none_eabi_gcc와 관련된 빌드 문제는 손상된 g++ 도구 모음 설치로 인한 것일 수 있습니다. 다음을 사용하여 누락된 종속성을 확인하여 이러한 경우인지 확인할 수 있습니다.
xcode-select --install
sudo ln -s /Library/Developer/CommandLineTools/SDKs/MacOSX.sdk/usr/include/* /usr/local/include/
# Ubuntu 18.04: arm_none_eabi_gcc와 관련된 컴파일 오류
Build issues related to arm_none_eabi_gccmay be due to a broken g++ toolchain installation. You can verify that this is the case by checking for missing dependencies using:
arm-none-eabi-gcc --version
arm-none-eabi-g++ --version
arm-none-eabi-gdb --version
arm-none-eabi-size --version
이 문제는 컴파일러를 제거하고 다시 설치 (opens new window)하여 해결할 수 있습니다.
arm-none-eabi-gdb --version
arm-none-eabi-gdb: command not found
Visual Studio Code IDE(VSCode) > 문제 해결을 참고하십시오.
# Ubuntu 18.04: Visual Studio Code는 이 큰 작업 영역에서 파일 변경 사항을 감시할 수 없습니다.
make px4_sitl jmavsim 명령을 실행시, "가져오기 실패" 오류는 일부 Python 패키지가 설치되지 않았음을 나타냅니다(예상된 위치).
# Python 패키지를 가져오지 못했습니다.
이러한 종속성을 이미 설치했다면 컴퓨터에 두 개 이상의 Python 버전이 있고(예: Python 2.7.16 Python 3.8.3) 빌드 툴체인에서 사용하는 버전에 모듈이 없는 문제일 수 있습니다.
Failed to import jinja2: No module named 'jinja2'
You may need to install it using:
    pip3 install --user jinja2
다음과 같이 종속성을 명시적으로 설치하여, 이 문제를 해결할 수 있습니다.
You should be able to fix this by explicitly installing the dependencies as shown:
pip3 install --user pyserial empty toml numpy pandas jinja2 pyyaml pyros-genmsg packaging
# PX4 빌드 타겟 만들기
The previous sections showed how you can call make to build a number of different targets, start simulators, use IDEs etc. This section shows how make options are constructed and how to find the available choices.
VENDOR_MODEL_VARIANT: (CONFIGURATION_TARGET이라고도 함)
make [VENDOR_][MODEL][_VARIANT] [VIEWER_MODEL_DEBUGGER_WORLD]
VENDOR_MODEL_VARIANT: (also known as CONFIGURATION_TARGET)
- 공급업체: 보드 제조업체:
px4,aerotenna,airmind,atlflight,auav,beaglebone,intel,nxp등 Pixhawk 시리즈 보드의 공급업체 이름은px4입니다. - 모델: 보드 모델 "모델":
sitl,fmu-v2,fmu-v3< /2>, <code>fmu-v4,fmu-v5,navio2등 - 변종: 특정 구성을 나타냅니다. 예:
rtps,lpe,기본구성에 없는 구성요소를 포함합니다. 가장 일반적으로 이것은기본값이며 생략 가능합니다.
TIP
You can get a list of all available CONFIGURATION_TARGET options using the command below:
make list_config_targets
VIEWER_MODEL_DEBUGGER_WORLD:
- VIEWER: 이것은
gazebo,jmavsim,none을 실행하고 연결할 시뮬레이터("뷰어")입니다.
TIP
none은 PX4를 시작하고 시뮬레이터(jmavsim, 전망대 또는 기타 시뮬레이터)를 기다리면, 사용할 수 있습니다. 예를 들어, make px4_sitl none_iris는 시뮬레이터 없이(그러나 홍채 기체가 있는) PX4를 시작합니다. 이 저장소를 Github 계정과 연결된 복사본을 만들어 (opens new window), 이 원본을 로컬 컴퓨터에 복제 (opens new window)하는 것이 좋습니다.
- 모델: 사용할 기체 모델(예:
iris(기본),rover,tailsitter등), 시뮬레이터에 의해 로드됩니다. 환경 변수PX4_SIM_MODEL은 선택한 모델로 설정되며, 이 모델은 시작 스크립트에서 적절한 매개변수 선택합니다. - 디버거: 사용할 디버거:
없음(기본),ide,gdb,lldb,ddd,valgrind,callgrind. 자세한 내용은 시뮬레이션 디버깅을 참고하십시오. - WORLD: (Gazebo 만). 로드되는 세계(PX4/sitl_gazebo/worlds (opens new window))를 설정합니다. 기본값은 empty.world (opens new window)입니다. 자세한 내용은 전망대 > 특정 세계 로드를 참고하십시오.
TIP
You can get a list of all available VIEWER_MODEL_DEBUGGER_WORLD options using the command below:
make px4_sitl list_vmd_make_targets
Notes:
Notes:
CONFIGURATION_TARGET과VIEWER_MODEL_DEBUGGER에 있는 대부분의 값에는 기본값이 있으므로 선택사항입니다. 예를 들어,gazebo는gazebo_iris또는gazebo_iris_none과 같습니다.- 두 개의 다른 설정 사이에 기본값을 지정하려는 경우에는, 세 개의 밑줄을 사용할 수 있습니다. 예를 들어,
gazebo___gdb는gazebo_iris_gdb와 동일합니다. VIEWER_MODEL_DEBUGGER에없음값을 사용하여 PX4를 시작하고 시뮬레이터를 실행할 수 있습니다. 예를 들어make px4_sitl_default none을 사용하여 PX4를 시작하고,./Tools/jmavsim_run.sh -l을 사용하여 jMAVSim을 시작합니다.
The VENDOR_MODEL_VARIANT options map to particular px4board configuration files in the PX4 source tree under the /boards (opens new window) directory. Specifically VENDOR_MODEL_VARIANT maps to a configuration file boards/VENDOR/MODEL/VARIANT.px4board (e.g. px4_fmu-v5_default corresponds to boards/px4/fmu-v5/default.px4board (opens new window)).
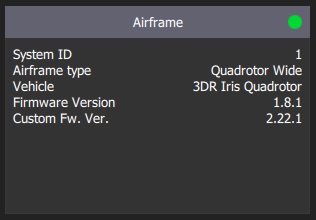
PX4 펌웨어 버전과 사용자 정의 펌웨어 버전은 MAVLink AUTOPILOT_VERSION (opens new window) 메시지를 사용하여 게시되고, QGroundControl < 2>설정 > 요약 기체 패널에서 출력됩니다.
bloaty_compare_master: Binary Size Profiling- ...
# 펌웨어 버전과 Git 태그
The PX4 Firmware Version and Custom Firmware Version are published using the MAVLink AUTOPILOT_VERSION (opens new window) message, and displayed in the QGroundControl Setup > Summary airframe panel:
WARNING
다른 git 태그 형식을 사용하는 경우에는 버전 정보가 정확하게 표시되지 않을 수 있습니다. The git tag should be formatted as <PX4-version>-<vendor-version> (e.g. the tag in the image above was set to v1.8.1-2.22.1).
WARNING
If you use a different git tag format, versions information may not be displayed properly.
← 고속 DDS 설치 최초 프로그램 작성 →