# Betaflight 시스템 부트로더 설치
이 페이지 문서는 Betaflight가 사전 설치되어 되어 있는 보드(예.OmnibusF4 SD또는 Kakute F7)에 PX4 부트로더를 설치하는 방법을 다룹니다.
부트로더 설치에는 2가지 선택지가 있습니다: Betaflight Configurator를 이용하는 것(더 쉽습니다)과, 소스로 부터 빌드하는 방법이 있습니다.
# Betaflight Configurator로 부트로더 업데이트
이제 보드에 PX4 펌웨어를 설치할 수 있습니다.
- 미리 빌드되어 있는 부트로더 바이너리를 다운 받아야 합니다. (보드에 따라 다를 수 있습니다.)
- 운영체제에 맞게 Betaflight Configurator (opens new window)를 다운로드 합니다. > Tip 만약 Chrome 웹브라우저를 사용한다면, 여기서 (opens new window) 크롬 확장 프로그램으로 Configurator를 설치하는 것으로 이 과정을 대체할 수 있습니다. :::
- PC에 보드를 연결하고 Configurator를 실행합니다.
- Load Firmware [Local] 버튼을 누릅니다.
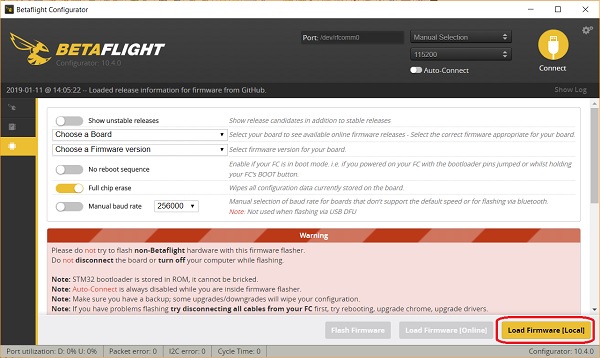
- 파일시스템으로부터 부트로더 바이너리를 선택하고 보드에 설치(flash)합니다.
다음 명령어로 Bootloader (opens new window)를 다운로드하고 빌드하십시오:
# 소스를 사용하여 부트로더 업데이트하기
# 부트로더 소스 다운로드
dfu-util (opens new window)또는 Windows의 그래픽 툴인 dfuse (opens new window)로 PX4 부트로더를 설치할 수 있습니다.
git clone --recursive  https://github.com/PX4/Bootloader.git
cd Bootloader
make <target> # For example: omnibusf4sd_bl or kakutef7_bl
# 부트로더 설치하기
아래 방법들로 설치를 시도하는 것은 무서워할 필요가 없습니다.
Don't be afraid to try flashing using any of the methods below.
Note
The STM32 MCU cannot be bricked. DFU cannot be overwritten by flashing and will always allow you to install a new firmware, even if flashing fails.
# DFU 모드로 진입
Both methods require the board to be in DFU mode. To enter DFU mode, hold the boot button down while connecting the USB cable to your computer. The button can be released after the board is powered up.
# dfu-util
dfu-util -a 0 --dfuse-address 0x08000000 -D build/<target>/<target>.bin
# dfuse
Betaflight로 다시 돌아가려면:
Flash the
# Reinstall Betaflight
In order to switch back to Betaflight:
- PX4 파라미터를 백업하십시오. 예) 파라미터를 추출 (opens new window)하여 SD 카드로 옮깁니다.
- bootloader 버튼을 누른 채 USB 케이블을 연결합니다.
- 그리고 Betaflight-configurator를 이용하여 원래대로 Betaflight를 플래시 합니다.