PX4 Vision 自主无人机开发套件(先行者版)
PX4视觉自主开发套件是一个稳定且高性价比的套件,让你能够在自动化无人机上开发计算机视觉。

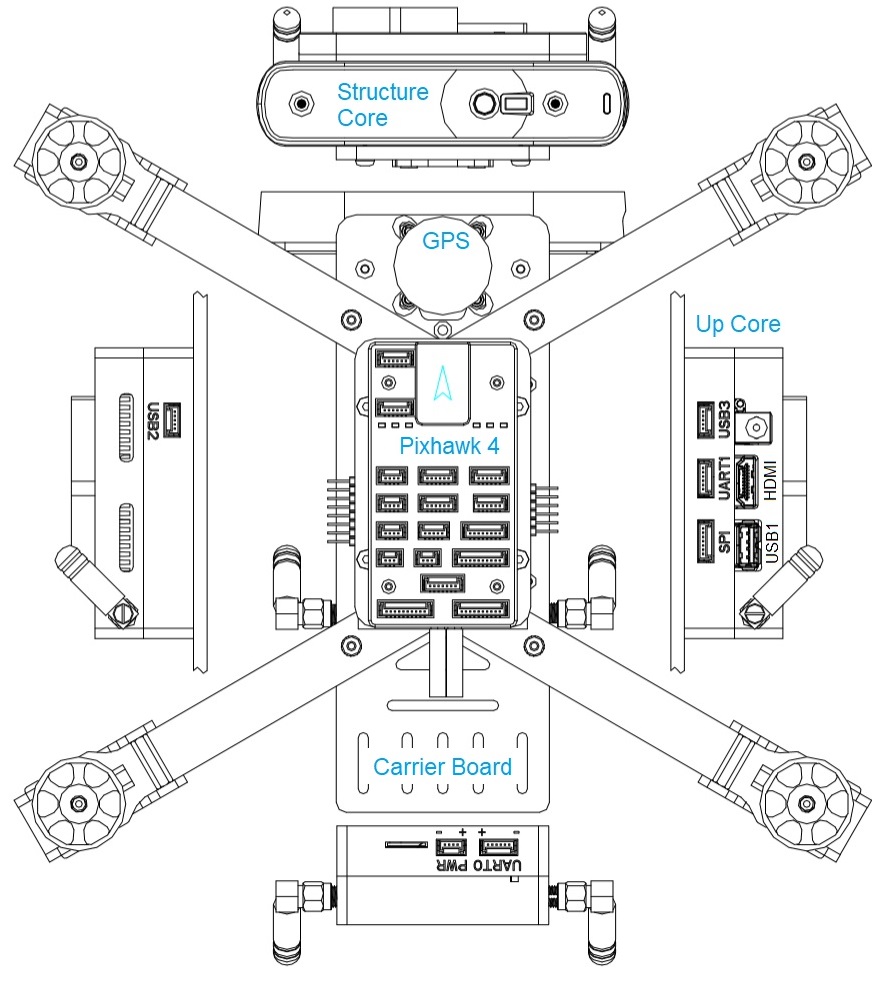
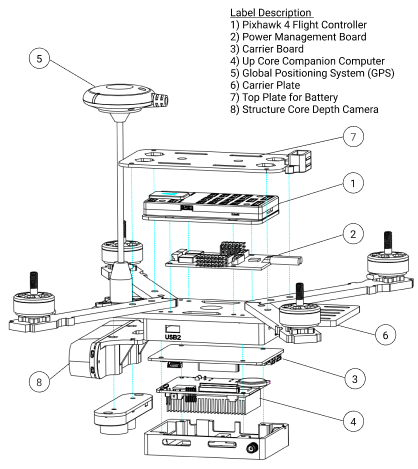
这个套件含有一个几乎到手即飞的碳纤维机架四旋翼,配备 Pixhawk 4 飞控、UP Core机载计算机,以及Structure Core深度相机。 无人机上启用了用于PX4的避障和防撞软件,开箱即用。 开发者可以使用 PX4 避障项目提供的其他功能。 修改现有代码,或尝试全新的功能。
该指南阐述了无人机准备飞行所需的最少附加步骤(安装遥控器系统和电池等)。 也包括如何起飞,以及如何修改计算机视觉代码。
警告&通知
The kit is currently an "early adopter" release. Contact sales01@holybro.com for sales enquiries.
开始了解你的开发套件
不要直接使用电源为 UP Core 计算机供电(可能会摧毁计算机)。 UP Core 只能使用电池供电。
该开发包使用前置摄像头,(它没有向下或后置深照相机)。 因此,它不能用于测试 安全着陆 或其他需要下方摄像头的功能。
只有在 GPS 工作正常时才能测试任务模式中的自主避障(飞行任务需要使用 GPS 配合)。 防撞功能需要在可获得位置的模式下进行测试,比如GPS或光流有比较好的定位。
The UP Core should only be powered using the battery (do not remove the UP Core power socket safety cover).
你需要什么其他的东西
该套件中包含了必要的无人机硬件,电池和遥控须要单独购买:
- 带有如下组件的 PX4 视觉无人机套件:
- 一个Pixhawk 4飞控(包含定制化的PX4固件)
- 一个 PMW3901 光流传感器
- 一个距离传感器
- 一个 Structure Core 深度相机
- 一个 UP Core 计算机(预装 Ubuntu 和 PX4 避障库)
- Atom CPU
- FTDI UART 连接到飞控
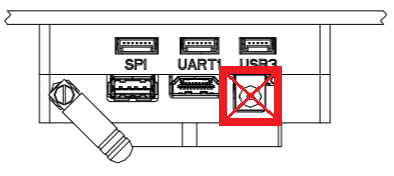
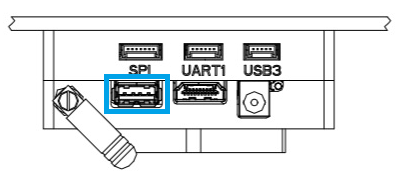
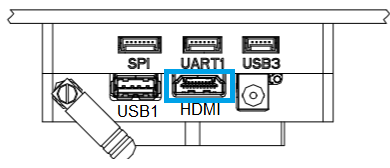
USB1:USB3-A 接口被用来从 USB2.0 储存器启动 PX4 避障环境(连接到 USB3.0 外设可能会导致GPS无法使用)。USB2:USB 2.0 接口,用于连接 JST-GH 插接件。 可以用于第二个相机,LTE模块等。 (或开发期间使用的键盘/鼠标)。USB3:USB 2.0 JST-GH 端口连接到深度摄像头HDMI:HDMI 输出- SD 卡插槽
- WiFi(连在外置天线 #1)。 允许计算机进行 WiFi 家庭网络访问/更新。
- ESP8266 连接到飞控(连在外部天线#2)。 实现与地面站的无线连接。
- 一个预先烧录捆绑软件的 USB2.0 储存棒:
- Ubuntu 18.04 LTS
- ROS Melodic
- Occipital Structure Core 相机 ROS 驱动
- MAVROS
- PX4 Avoidance
- Assorted cables, propellers, and other accessories (these can be used to attach additional peripherals).
首次使用
此外,用户也需要地面站硬件/软件:
- 电池:
- 带 XT60 母头的 4S 锂电池
- 小于115毫米长度(以适合电源插座和 GPS 支架之间的空间)
- 无线电控制系统
- 可以使用各种 PX4 兼容的遥控系统。
- 带有 R-XSR 接收机的 FrSky Taranis 发射机是一个受欢迎的配置。
- 一个 H2.0 头的内六角螺丝刀(用来打开顶部的螺丝来安装接收机)
当载具设置完成时:
- 可运行 QGC地面站(QGroundControl) 的笔记本电脑或者平板。
First-time Setup
将接收机(套件中不包含)固定在无人机上,
- 使用H2.0 十六进制键工具移除/取消顶部板块(在电池进入的地方)。
- 将接收器连接到飞控。
- 重新安装上面的外壳。
- 在无人机背部安装RC 接收器(使用双面胶或其他)。
- 确保天线无障碍物阻挡并将天线和机架电隔离。例如,在减震板下方或机臂上。
遥控和接收机配对(如果尚未完成的话)。 配对方法程序取决于接收机和遥控器(读取接收器手册)。
GPS需要高于无人机,并固定到底板。
用充好电的电池的为车辆供电。
使用 USB 线连接Pixhawk 4 和地面站。
Ensure propellers are removed before connecting the battery.
Connect the ground station to the vehicle WiFi network (after a few seconds) using the following default credentials:
- SSID: pixhawk4
- Password: pixhawk4
WiFi network SSID, password, and other credentials may be changed after connecting (if desired), by using a web browser to open the URL:
http://192.168.4.1. The baud rate must not be changed from 921600.Start QGroundControl on the ground station.
Configure/calibrate the vehicle:
The vehicle should arrive pre-calibrated (e.g. with firmware, airframe, battery, and sensors all setup). You will however need to calibrate the radio system (that you just connected) and it is often worth re-doing the compass calibration.
(Optional) Configure a Flight Mode selector switch on the remote controller.
Modes can also be changed using QGroundControl
We recommend RC controller switches are define for:
- Position Mode - a safe manual flight mode that can be used to test collision prevention.
- Mission Mode - run missions and test obstacle avoidance.
- 任务模式 - 执行任务并测试避障。
螺旋桨按照下面的方向安装:
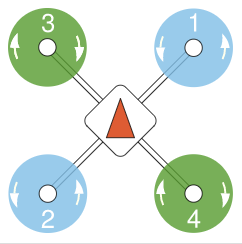
螺旋桨方向可以从标签中确定:6045 (顺时针) 和6045R (逆时针)。
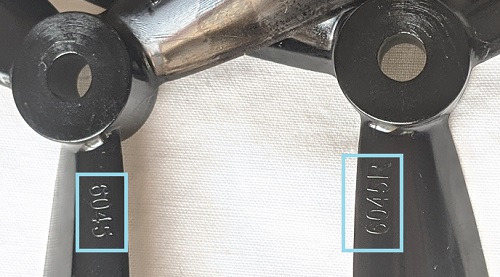
将螺旋桨向下旋紧。
Fly the Drone (with avoidance)
When the vehicle setup described above is complete:
将套件中预先烧录好镜像的U盘插入上面的**
USB1(下面高亮的)连接电池来给载具供电
The boot/startup process takes around 1 minute from the supplied USB stick (or 30 seconds from internal memory).
等到启动序列完成,并且避障系统已经启动(正在启动过程中时,飞机会拒绝解锁)
QGC显示通知日志消息:避障系统已连接
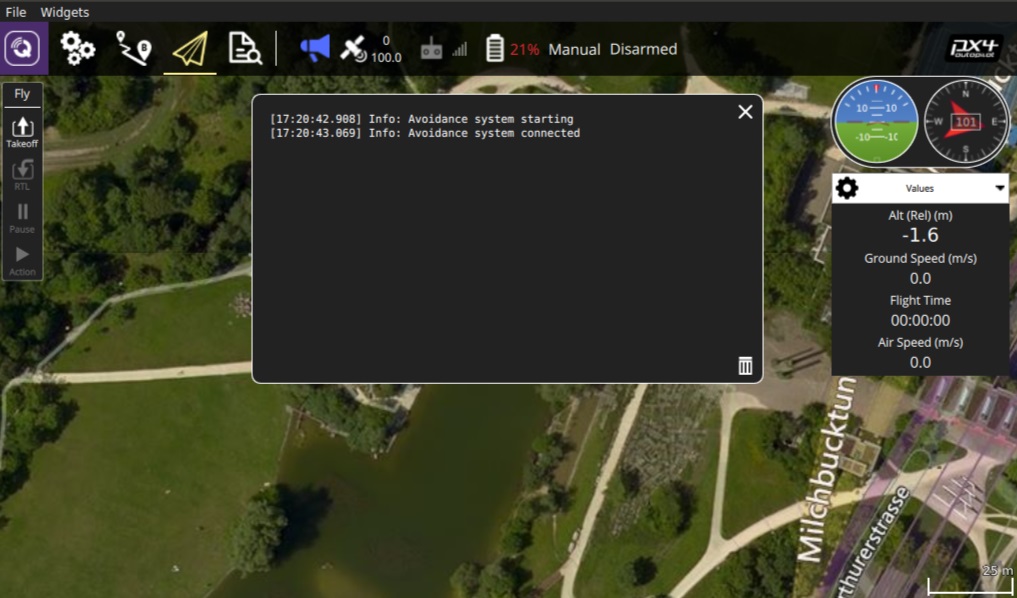
- 在结构光相机的前部将会看到一个红的激光束
- 等待 GPS LED 变成绿色. 这意味着载具的GPS已定位并且准备好起飞!
- Connect the ground station to the vehicle WiFi network.
Find a safe outdoor location for flying, ideally with a tree or some other convenient obstacle for testing PX4 Vision.
To test collision prevention, enable Position Mode and fly manually towards an obstacle. The vehicle should slow down and then stop within 6m of the obstacle (the distance can be changed using the CP_DIST parameter).
To test obstacle avoidance, create a mission where the path is blocked by an obstacle. Then switch to Mission Mode to run the mission, and observe the vehicle moving around the obstacle and then returning to the planned course.
Development using the Kit
The following sections explain how to use the kit as an environment for developing computer vision software.
PX4 Avoidance Overview
The PX4 Avoidance system consists of computer vision software running on a companion computer (with attached depth camera) that provides obstacle and/or route information to the PX4 flight stack running on a flight controller.
Documentation about the companion computer vision/planning software can be found on github here: PX4/avoidance. The project provides a number of different planner implementations (packaged as ROS nodes):
- The PX4 Vision Kit runs the localplanner by default and this is the recommended starting point for your own software.
- The globalplanner has not been tested with this kit.
- The landing planner requires a downward facing camera, and cannot used without first modifying the camera mounting.
PX4 and the companion computer exchange data over MAVLink using these interfaces:
- Path Planning Interface - API for implementing avoidance features in automatic modes.
- Collision Prevention Interface - API for vehicle based avoidance in manual position mode based on an obstacle map (currently used for collision prevention).
Installing the image on the Companion Computer
You can install the image on the UP Core and boot from internal memory (instead of the USB stick).
This is recommended because booting from internal memory is much faster, frees up a USB port, and may well provide more memory than your USB stick.
Booting from internal memory takes around 30 seconds while booting from the supplied USB2 stick boots in about a minute (other cards may take several times longer).
To flash the USB image to the UP Core:
- Insert the pre-flashed USB drive into the UP Core port labeled
USB1. - Login to the companion computer (as described above).
Open a terminal and run the following command to copy the image onto internal memory (eMMC). The terminal will prompt for a number of responses during the flashing process.
cd ~/catkin_ws/src/px4vision_ros
sudo ./flash_emmc.sh
All information saved in the UP Core computer will be removed when executing this script
Pull out the USB stick.
- Restart the vehicle. The UP Core computer will now boot from internal memory (eMMC).
Boot the Companion Computer
First insert the provided USB2.0 stick into the UP Core port labeled USB1, and then power the vehicle using a 4S battery. The avoidance system should start within about 1 minute (though this does depend on the USB stick supplied).
Fly the Drone (with avoidance) additionally explains how to verify that the avoidance system is active.
If you've already installed the image on the companion computer you can just power the vehicle (i.e. no USB stick is needed). The avoidance system should be up and running within around 30 seconds.
Once started the companion computer can be used both as a computer vision development environment and for running the software.
登录到机载计算机
To login to the companion computer:
Connect a keyboard and mouse to the UP Core via port
USB2: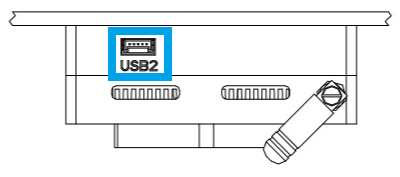
Use the USB-JST cable from the kit to get a USB A connector
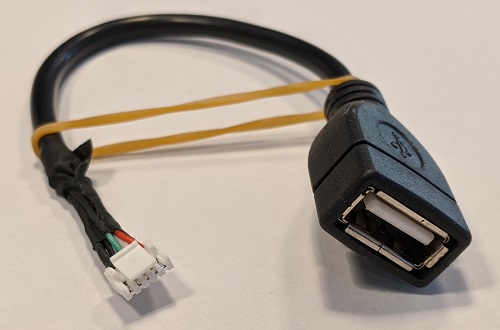
- A USB hub can be attached to the cable if the keyboard and mouse have separate connectors.
连接显示器到 UP Core 的 HDMI 接口。
The Ubuntu login screen should then appear on the monitor.
- Login to the UP Core using the credentials:
- 用户名:px4vision
- 密码:px4vision
开发/扩展 PX4 避障功能
The PX4 Vision’s UP Core computer provides a complete and fully configured environment for extending PX4 Avoidance software (and more generally, for developing new computer vision algorithms using ROS2). You should develop and test your software on the vehicle, sync it to your own git repository, and share any fixes and improvements with the wider PX4 community on the github PX4/Avoidance repo.
The catkin workspace is at ~/catkin_ws, and is preconfigured for running the PX4 avoidance local planner. The launch-from-boot file (avoidance.launch) is in the px4vision_ros package (modify this file to change what planner is launched).
The avoidance package is started on boot. To integrate a different planner, this needs to be disabled.
Disable the avoidance process using the following command:
systemctl stop avoidance.serviceYou can simply reboot the machine to restart the service.
Other useful commands are:
# restart service
systemctl start avoidance.service

# disable service (stop service and do not restart after boot)
systemctl disable avoidance.service

# enable service (start service and enable restart after boot)
systemctl enable avoidance.service
The source code of the obstacle avoidance package can be found in https://github.com/PX4/avoidance which is located in
~/catkin_ws/src/avoidance.Make changes to the code! To get the latest code of avoidance pull the code from the avoidance repo:
git pull origin git checkout origin/master- Build the package
catkin build local_planner
The ROS workspace is placed in ~/catkin_ws. For reference on developing in ROS and using the catkin workspace, see the ROS catkin tutorials.
开发 PX4 固件
The kit is designed for creating computer vision software that runs on the companion computer, and which integrates with PX4’s flexible path planning and collision prevention interfaces.
You can also modify PX4 itself, and install it as custom firmware:
- You will need to connect QGroundControl to the kit's Pixhawk 4 via USB in order to update firmware.
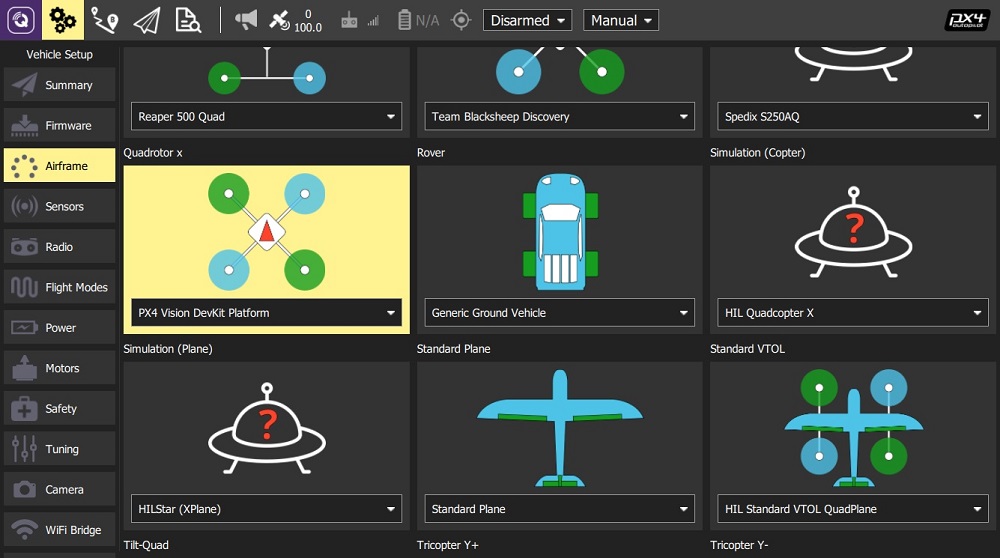
- Select the PX4 Vision DevKit airframe after loading new firmware:
Modification of PX4 code is not needed to meet most computer vision use cases. To discuss the interfaces or how to integrate other features join the PX4 slack channel: #computer-vision.
Other Development Resources
- UP Core Wiki - companion computer technical information
- Occipital Developer Forum - Structure Core camera information
- Pixhawk 4 Overview
- PX4 Avoidance software/documentation
- Path Planning Interface
How to get Technical Support?
For hardware issues, please contact Holybro at: productservice@holybro.com.
For software issues, use the following community support channels:
- PX4 discuss: Computer Vision category.
- PX4 slack channel: #avoidance