构建 PX4 软件
无论对于模拟器还是硬件目标设备,PX4固件可以在控制台或者IDE中从源码构建
若要使用模拟器,或需要修改PX4并创建自定义构建,则必须自行构建PX4。 如果您只想在实际硬件上试试 PX4,那么可以使用 QGroundControl烧录预构建的二进制文件(无需跟着下面的指导)。
下载 PX4 源代码
PX4 源代码存储在 Github 上的 PX4/PX4-Autopilot 仓库中。
如果要在您的计算机上获得 最新的(main分支)版本,请在终端中输入以下命令:
git clone https://github.com/PX4/PX4-Autopilot.git --recursive注意,您可能在安装开发工具链时已经完成了这项操作
INFO
你只需要执行它就能够得到最新的代码。 如果需要,您也可以获取特定版本的源代码。 [GIT 示例 提供了更多的信息,用于发布版本并对 PX4 作出贡献。
初次构建(使用模拟器)
首先我们要用控制台环境来构建一个模拟器目标 这使我们能够在转移到真正的硬件和 IDE 之前验证系统设置。
导航到 PX4-Autopilot 目录并使用以下命令启动 Gazebo SITL:
make px4_sitl gz_x500这将显示 PX4 控制台:

INFO
您可能需要在继续之前启动 QGroundControl ,因为默认的 PX4 配置需要在起飞前进行地面控制连接。 可以从这里下载。
可以通过键入以下命令(如上方控制台中所示)来控制飞行器。
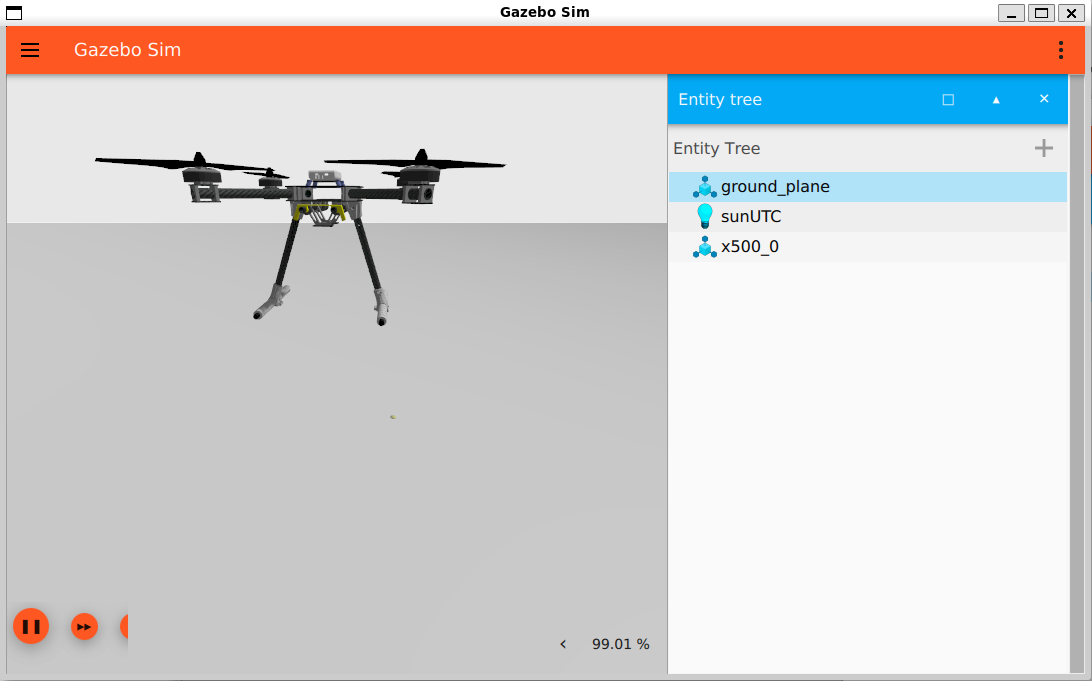
pxh> commander takeoff该载具将起飞,您将在 Gazebo simulator UI 中看到:
无人机可以通过输入 Commander land 来着陆,整个模拟可以通过 CTRL+C (或输入 shutdown )来停止。
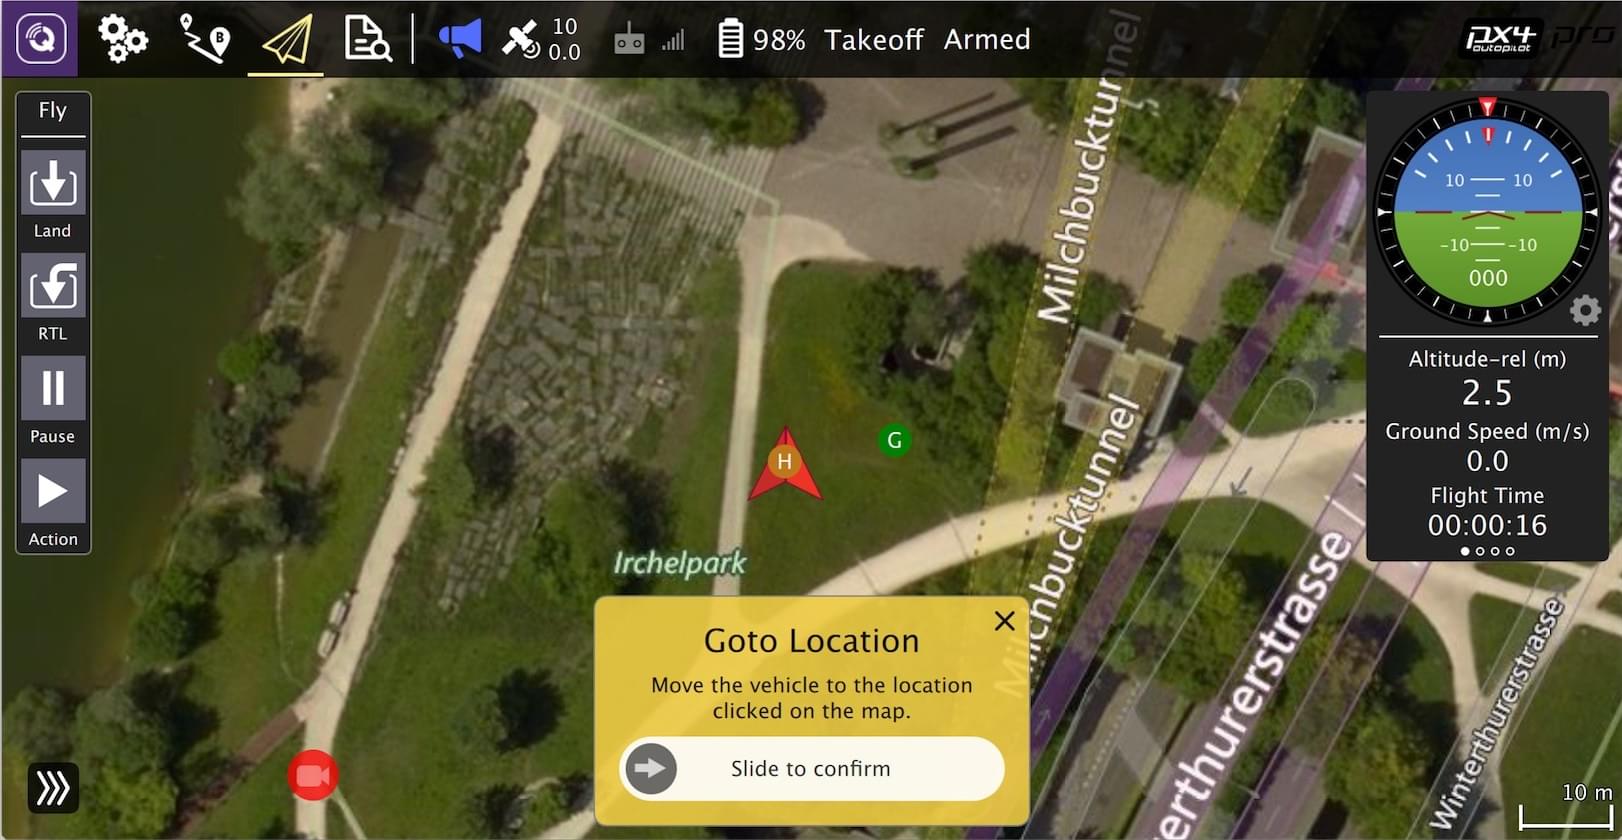
与地面站一起飞模拟器更接近飞机的实际运行。 在飞机飞行时(Takeoff飞行模式),单击地图上的某个位置并启用滑块。 这将重新定位飞机。
基于NuttX / Pixhawk 的飞控板
为NuttX构建
若要构建基于NuttX-或 Pixhawk的飞控板,请导航到 PX4-Autopilot 目录,然后调用 make ,并为您的板调用构建目标。
例如,要为 Pixhawk 4 硬件构建,可使用以下命令:
cd PX4-Autopilot
make px4_fmu-v5_default
TIP
You can also build using the px4-dev Docker container without installing the toolchain locally. From the PX4-Autopilot directory:
./Tools/docker_run.sh 'make px4_fmu-v5_default'运行成功后将输出类似结果:
-- Build files have been written to: /home/youruser/src/PX4-Autopilot/build/px4_fmu-v4_default
[954/954] Creating /home/youruser/src/PX4-Autopilot/build/px4_fmu-v4_default/px4_fmu-v4_default.px4
构建目标 px4_fmu-v4 的第一部分表示目标飞行控制器固件的硬件。 后缀(此处为_default)表示固件的_配置_,例如支持或省略特定功能。
INFO
_default 后缀是可选的。 例如,make px4_fmu-v5 和 px4_fmu-v5_default 都会生成相同的固件。
以下列表显示了Pixhawk标准飞行控制板的构建命令:
Holybro Pixhawk 6X-RT (FMUv6X):
make px4_fmu-v6xrt_defaultHolybro Pixhawk 6X (FMUv6X):
make px4_fmu-v6x_defaultHolybro Pixhawk 6C (FMUv6C):
make px4_fmu-v6c_defaultHolybro Pixhawk 6C Mini (FMUv6C):
make px4_fmu-v6c_defaultHolybro Pix32 v6 (FMUv6C):
make px4_fmu-v6c_defaultHolybro Pixhawk 5X (FMUv5X):
make px4_fmu-v5x_defaultPixhawk 4 (FMUv5):
make px4_fmu-v5_defaultPixhawk 4 Mini (FMUv5):
make px4_fmu-v5_defaultCUAV V5+ (FMUv5):
make px4_fmu-v5_default- DiscontinuedCUAV V5 nano (FMUv5):
make px4_fmu-v5_default- DiscontinuedPixracer (FMUv4):
make px4_fmu-v4_defaultPixhawk 3 Pro:
make px4_fmu-v4pro_defaultPixhawk Mini:
make px4_fmu-v3_defaultPixhawk 2 (Cube Black) (FMUv3):
make px4_fmu-v3_defaultmRo Pixhawk (FMUv3):
make px4_fmu-v3_default(支持 2MB Flash)Holybro pix32 (FMUv2):
make px4_fmu-v2_default- DiscontinuedPixfalcon (FMUv2):
make px4_fmu-v2_default- DiscontinuedDropix (FMUv2):
make px4_fmu-v2_default- DiscontinuedPixhawk 1 (FMUv2):
make px4_fmu-v2_default- DiscontinuedWARNING
You must use a supported version of GCC to build this board (e.g. the
gcc-arm-none-eabipackage from the current Ubuntu LTS, which is the same toolchain used by CI) or remove modules from the build. 使用不受支持的GCC进行构建可能会失败,因为PX4接近板载1MB闪存的容量限制。
:::
- 具有 2 MB flash 的 Pixhawk 1:
make px4_fmu-v3_default
非 Pixhawk NuttX 飞控的构建命令(以及所有其他主板的命令)均在各款飞控主板的文档中提供。
将固件烧录到飞控板
在 make 命令后添加 upload,通过USB将编译后的二进制文件上传至 autopilot 硬件。 例如
make px4_fmu-v4_default upload运行成功后将有以下输出:
Erase  : [====================] 100.0%
Program: [====================] 100.0%
Verify : [====================] 100.0%
Rebooting.

[100%] Built target upload
TIP
在 WSL2 上开发时不支持此操作。 参见 Windows 开发环境 (WSL2-基于) > 烧录主板。
其他飞控板
其他主板的构建命令详见各主板专属飞行控制器页面(通常位于_构建固件_标题下)。
您还可以使用以下命令列出所有配置目标:
make list_config_targets用图形界面 IDE 编译
[VSCode](../dev_setup/vscode.md是官方支持 (且推荐) 的 用于 PX4 开发的 IDE。 它很容易设置,可以用于编译模拟和硬件环境的 PX4。
故障处理
常规构建错误
许多构建问题是由不匹配的子模块或未完全清理的构建环境引起的。 更新子模块并进行 distclean 可以修复这些类型的错误:
git submodule update --recursive
make distclean
闪存溢出了 XXX 字节
region 'flash' overflowed by XXXX bytes 错误表明固件对目标硬件平台太大了。 这对于make px4_fmu-v2_default 构建是常见的,它的 flash 大小被限制在 1MB。
如果您正在构建_vanilla_master 分支,最可能的原因是使用不支持的 GCC版本。 In this case, install the gcc-arm-none-eabi package from the current Ubuntu LTS as described in the Developer Toolchain instructions.
如果在构建自己的分支,您可能已将固件大小增加到超过1MB的限制。 在这种情况下,您需要从构建中删除您不需要的任何驱动程序/模块。
macOS:打开文件过多错误
MacOS 默认允许在所有正在运行的进程中最多打开256个文件。 PX4构建系统打开大量文件,因此您可能会超出此数量。
构建工具链为很多文件报 Too many open files,如下所示:
arm-none-eabi-ld: cannot find NuttX/nuttx/fs/libfs.a: Too many open files解决方案是增加允许打开文件的最大数量(例如增加到300)。 您可以在每个会话的 macOS 终端 中这样做:
运行此脚本 Tools/mac_set_ulimit.sh,或
运行这个命令:
shulimit -S -n 300
macOS Catalina:运行cmake时出现问题
对于 macOS Catalina 10.15.1 ,在尝试使用 _cmake _ 构建模拟器时可能会遇到问题。 如果您在这个平台上遇到构建问题,请尝试在终端中运行以下命令:
xcode-select --install
sudo ln -s /Library/Developer/CommandLineTools/SDKs/MacOSX.sdk/usr/include/* /usr/local/include/
导入Python软件包失败
"Failed to import" errors when running the make px4_sitl gz_x500 command indicates that some Python packages are not installed (where expected).
Failed to import jinja2: No module named 'jinja2'
您可能需要使用以下方式进行安装:
    pip3 install --user jinja2
If you have already installed these dependencies this may be because there is more than one Python version on the computer (e.g. Python 2.7.16 and Python 3.8.3), and the module is not present in the version used by the build toolchain.
You should be able to fix this by installing the dependencies from the repository's requirements file:
pip3 install --user -r Tools/setup/requirements.txtPX4 创建生成目标
前面的章节显示了您如何调用 make 来构建一些不同的目标,启动模拟器,使用 IDE 等。 This section shows how make options are constructed and how to find the available choices.
使用特定配置和初始化文件调用 make 的完整语法是:
make [VENDOR_][MODEL][_VARIANT] [VIEWER_MODEL_DEBUGGER_WORLD]VENDOR_MODEL_VARIANT: (也称为CONFIGURATION_TARGET)
- **VENDOR:**主板制造商:
px4、aerotenna、airmind、atlflight、auav、beaglebone、intel、nxp等。 Pixhawk 系列主板的供应商名称为px4。 - **MODEL:**飞控板型号 “model”:
sitl、fmu-v2、fmu-v3、fmu-v4、fmu-v5、navio2等。 - VARIANT: Indicates particular configurations: e.g.
bootloader,cyphal,sih, which add or remove components to/from thedefaultconfiguration. 最常见的情况是default, 并且可能被省略。
TIP
您可以使用下面的命令获取一个可用的CONFIGURATION_TARGET选项列表:
make list_config_targetsVIEWER_MODEL_DEBUGER_WORLD:
VIEWER: 这是启动和连接的模拟器 ("查看器") :
gz,gzebo,jmavsim,noneTIP
none可以用于启动PX4并等待模拟器(jmavsim, Gazebo, Gazebo Classic, 或其他模拟器)。 例如,make px4_sitl none_iris在没有模拟器的情况下启动 PX4 (但使用 iris 机架)。
:::
MODEL:要使用的 载具 模型(例如 iris (default)、rover、tailsitter 等),该模型将由模拟器加载。 环境变量
PX4_SIM_MODEL将被设置为选中的模型,然后在启动脚本中使用以选择适当的参数。DEBUGER: 调试器使用:
none(default),ide,gdb,lldb,ddd,valgrind,callgrind. 更多信息请参阅模拟调试。WORLD: (仅限Gazebo Classic). 设置加载的世界(PX4-Autopilot/Tools/simulation/gazebo-classic/sitl_gazebo-classic/worlds)。 默认为 empty.world。 欲了解更多信息,请参阅Gazebo Classic > 加载特定世界。
TIP
您可以使用下面的命令获取_所有_可用的选项: VIEWER_MODEBUGER_WORLD
make px4_sitl list_vmd_make_targetsINFO
CONFIGURATION_TARGET和VIEWER_MODEBUGER中的大多数值都有默认值,因此是可选的。 例如,gazebo-classic等于gazebo-classic_iris或gazebo-classic_iris_none。- 如果要在其他两个设置之间指定默认值,可以使用三个下划线。 例如,
gazebo-classic___gdb相当于gazebo-classic_iris_gdb。 - 你可以使用 "none" 值为 "VIEWER_MODEBUGER" 来启动 PX4 并等待模拟器。 例如,使用
make px4_sitl_default none和 jMAVSim 使用./Tools/simulation/jmavsim/jmavsim_run.sh -l启动 PX4。
VENDOR_MODEL_VARIANT选项映射为 /boards 目录下的 PX4 源树中的特殊_px4board_ 配置文件。 具体而言,VENDOR_MODEL_VARIANT 映射到配置文件 boards/VENDOR/MODEL/VARIANT.px4board (例如 px4_fmu-v5_default 对应 boards/px4/fmu-v5/default.px4board)。
其他 make 目标在相关章节中讨论:
bloaty_compare_master:二进制大小分析- ...
固件版本和 Git 标签
_PX4固件版本_和_自定义固件版本_通过 MAVLink AUTOPILOT_VERSION消息发布,并在_QGroundControl_的设置 > 摘要机身面板中显示:
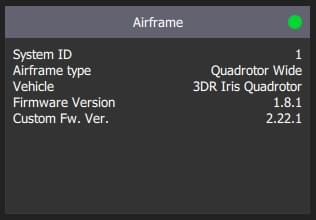
这些是在构建时从您仓库树的活动_gi tag_中提取的。 git 标签应该格式化为 <PX4-version>-<vendor-version> (例如上面图像中的标签被设置为 v1.8.1-2.22.1)。
WARNING
如果您使用不同的 git 标签格式,可能无法正确显示版本信息。