硬体仿真(HITL)
WARNING
硬体仿真被 社区支持和维护 It may or may not work with current versions of PX4.
See Toolchain Installation for information about the environments and tools supported by the core development team.
硬件在环仿真模式 (HITL 或 HIL) 下 PX4 固件代码运行在真实的飞行控制器硬件平台上。 这种方法的优点是可以在实际硬件上测试大多数的实际飞行代码。
PX4 支持多轴( jMAVSim或Gazebo Classic)及VTOL (using Gazebo Classic)的仿真。
HITL兼容机架
机架与模拟器兼容情况:
| 机架 | SYS_AUTOSTART | Gazebo Classic | jMAVSim |
|---|---|---|---|
| HIL Quadcopter X | 1002 | Y | Y |
| HIL Standard VTOL QuadPlane | 4001 | Y |
HITL 仿真环境
硬件在环仿真(HITL)模式下标准的 PX4 固件在真实的硬件上运行。 JMAVSim or Gazebo Classic (running on a development computer) are connected to the flight controller hardware via USB/UART. The simulator acts as gateway to share MAVLink data between PX4 and QGroundControl.
INFO
The simulator can also be connected via UDP if the flight controller has networking support and uses a stable, low-latency connection (e.g. a wired Ethernet connection - WiFi is usually not sufficiently reliable). For example, this configuration has been tested with PX4 running on a Raspberry Pi connected via Ethernet to the computer (a startup configuration that includes the command for running jMAVSim can be found in px4_hil.config).
The diagram below shows the simulation environment:
- A HITL configuration is selected (via QGroundControl) that doesn't start any real sensors.
- jMAVSim or Gazebo Classic are connected to the flight controller via USB.
- The simulator is connected to QGroundControl via UDP and bridges its MAVLink messages to PX4.
- Gazebo Classic and jMAVSim can also connect to an offboard API and bridge MAVLink messages to PX4.
- (Optional) A serial connection can be used to connect Joystick/Gamepad hardware via QGroundControl.

HITL 相比于 SITL
相比之下, HITL 在正常飞控硬件平台上运行正常的处于 ”HITL 模式“ 的 PX4 固件。 仿真数据进入整个仿真系统的时间点与 SITL 有所不同。
By contrast, HITL runs normal PX4 firmware in "HITL mode", on normal hardware. The simulation data enters the system at a different point than for SITL. Core modules like commander and sensors have HITL modes at startup that bypass some of the normal functionality.
完成所有的配置设定后 关闭 QGroundControl 并断开飞控板与计算机的连接。
配置 HITL
Check if HITL is in Firmware
The module required for HITL (pwm_out_sim) is not built into all PX4 firmware by default.
To check if the module is present on your Flight Controller:
Open QGroundControl
Open Analyze Tools > Mavlink Console.
Type the following command in the console:
shpwm_out_sim statusIf the returned value is
nsh: pwm_out_sim: command not found, then you don't have the module installed.
If pwm_out_sim is not present you will need to add it to the firmware in order to use HITL simulation.
Adding HITL modules to the Firmware
Add the following key to the configuration file for your flight controller to include the required module (for an example see boards/px4/fmu-v6x/default.px4board). Then re-build the firmware and flash it to the board.
text
CONFIG_MODULES_SIMULATION_PWM_OUT_SIM=yYou can alternatively use the following command to launch a GUI configuration tool, and interactively enable them at the path: modules > Simulation > pwm_out_sim. For example, to update fmu-v6x you would use:
sh
make px4_fmu-v6x boardconfigPX4 配置
Connect the autopilot directly to QGroundControl via USB.
选择机架
- Open Setup > Airframes
- Select a compatible airframe you want to test. Then click Apply and Restart on top-right of the Airframe Setup page.
如有必要, 校准您的 RC 遥控器 或操纵杆。
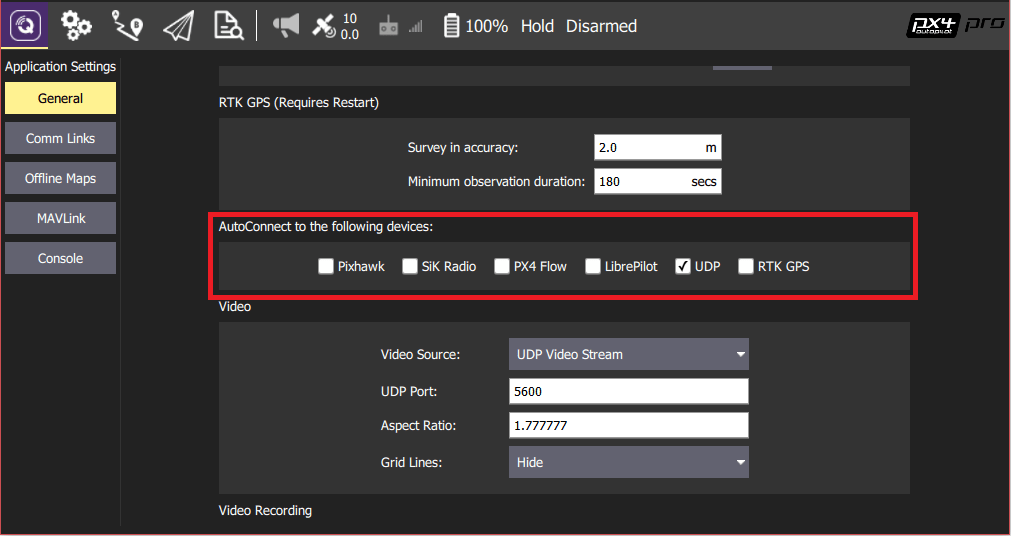
设置 UDP
Under the General tab of the settings menu, uncheck all AutoConnect boxes except for UDP.
(可选) 配置操纵杆和故障保护。 Set the following parameters in order to use a joystick instead of an RC remote control transmitter:
- COM_RC_IN_MODE to "Joystick/No RC Checks". 这允许操纵杆输入并禁用 RC 输入检查。
- NAV_RCL_ACT to "Disabled". 这可确保在没有无线遥控的情况下运行 HITL 时 RC 失控保护不会介入。
TIP
The QGroundControl User Guide also has instructions on Joystick and Virtual Joystick setup.
:::
Once configuration is complete, close QGroundControl and disconnect the flight controller hardware from the computer.
X-Plane HITL 仿真环境
总而言之, HITL 在真实硬件上运行标准 PX4 固件,而 SITL 实际上要比标准 PX4 系统执行更多的代码。
Gazebo Classic
INFO
Make sure QGroundControl is not running!
Build PX4 with Gazebo Classic (in order to build the Gazebo Classic plugins).
shcd <Firmware_clone> DONT_RUN=1 make px4_sitl_default gazebo-classicOpen the vehicle model's sdf file (e.g. Tools/simulation/gazebo-classic/sitl_gazebo-classic/models/iris_hitl/iris_hitl.sdf).
Replace the
serialDeviceparameter (/dev/ttyACM0) if necessary.INFO
The serial device depends on what port is used to connect the vehicle to the computer (this is usually
/dev/ttyACM0). An easy way to check on Ubuntu is to plug in the autopilot, open up a terminal, and typedmesg | grep "tty". The correct device will be the last one shown.
:::
Set up the environment variables:
shsource Tools/simulation/gazebo-classic/setup_gazebo.bash $(pwd) $(pwd)/build/px4_sitl_defaultand run Gazebo Classic in HITL mode:
shgazebo Tools/simulation/gazebo-classic/sitl_gazebo-classic/worlds/hitl_iris.worldStart QGroundControl. It should autoconnect to PX4 and Gazebo Classic.
jMAVSim (仅适用于四旋翼无人机)
INFO
Make sure QGroundControl is not running!
将飞行控制器连接到计算机, 并等待其启动。
在 HITL 模式下运行 jMAVSim (r如有必要,修改串口号名称
/dev/ttyACM0- 比如,在 Mac OS 上该参数应为/dev/tty.usbmodem1): sh ./Tools/jmavsim_run.sh -q -d /dev/ttyACM0 -b 921600 -r 250sh./Tools/simulation/jmavsim/jmavsim_run.sh -q -s -d /dev/ttyACM0 -b 921600 -r 250INFO
Replace the serial port name
/dev/ttyACM0as appropriate. On macOS this port would be/dev/tty.usbmodem1. On Windows (including Cygwin) it would be the COM1 or another port - check the connection in the Windows Device Manager.
:::
- Start QGroundControl. 它应该会自动连接 PX4 和 Gazebo 。
在 HITL 仿真中执行自主飞行任务
You should be able to use QGroundControl to run missions and otherwise control the vehicle.