Bootloader Update
The PX4 Bootloader is used to load firmware for Pixhawk boards (PX4FMU, PX4IO).
Pixhawk controllers usually comes with an appropriate bootloader version pre-installed. However in some cases it is not present, or an older version is present that needs to be updated, or the board has been bricked and needs to be erased and the bootloader reinstalled.
This topic explains how to build the PX4 bootloader, and several methods for flashing it to a board.
INFO
- You can use QGC Bootloader Update with firmware that includes the
bl-updatemodule. This is the easiest way to update the bootloader, provided the board is able to load firmware. - You can also use the Debug Probe to update the bootloader. This is useful for updating/fixing the bootloader when the board is bricked.
- On FMUv6X-RT you can install bootloader/unbrick boards via USB. This is useful if you don't have a debug probe.
QGC Bootloader Update (SYS_BL_UPDATE)
The easiest way to update the bootloader is to first use QGroundControl to install firmware that contains the desired/latest bootloader. You can then initiate bootloader update on next restart by setting the parameter: SYS_BL_UPDATE.
This approach can be used if the bl-update module is present in the firmware. The easiest way to check this is just to see if the SYS_BL_UPDATE parameter is found in QGroundControl.
WARNING
Boards that include the module will have the line CONFIG_SYSTEMCMDS_BL_UPDATE=y in their default.px4board file (for examples see this search). You can enable this key in your own custom firmware if needed.
The steps are:
Insert an SD card (enables boot logging to debug any problems).
Update the Firmware with an image containing the new/desired bootloader.
INFO
The updated bootloader might be included the default firmware for your board or supplied in custom firmware.
Wait for the vehicle to reboot.
Find and enable the parameter SYS_BL_UPDATE.
Reboot (disconnect/reconnect the board). The bootloader update will only take a few seconds.
Generally at this point you may then want to update the firmware again using the correct/newly installed bootloader.
An specific example of this process for updating the FMUv2 bootloader is given below.
Building the PX4 Bootloader
PX4 Bootloader FMUv6X and later
Boards starting with FMUv6X (STM32H7) use the in-tree PX4 bootloader.
This can be built from within the PX4-Autopilot directory using the make command and the board-specific target with a _bootloader suffix.
For FMUv6X the command is:
sh
make px4_fmu-v6x_bootloaderThis will build the bootloader binary as build/px4_fmu-v6x_bootloader/px4_fmu-v6x_bootloader.elf, which can be flashed via SWD or DFU. If you are building the bootloader you should be familiar with one of these options already.
If you need a HEX file instead of an ELF file, use objcopy:
sh
arm-none-eabi-objcopy -O ihex build/px4_fmu-v6x_bootloader/px4_fmu-v6x_bootloader.elf px4_fmu-v6x_bootloader.hexPX4 Bootloader FMUv5X and earlier
PX4 boards up to FMUv5X (before STM32H7) used the PX4 bootloader repository.
The instructions in the repo README explain how to use it.
Debug Probe Bootloader Update
The following steps explain how you can "manually" update the bootloader using a compatible Debug Probe:
Get a binary containing the bootloader (either from dev team or build it yourself).
Get a Debug Probe. Connect the probe your PC via USB and setup the
gdbserver.Go into the directory containing the binary and run the command for your target bootloader in the terminal:
FMUv6X
sharm-none-eabi-gdb px4_fmu-v6x_bootloader.elfFMUv6X-RT
sharm-none-eabi-gdb px4_fmu-v6xrt_bootloader.elfFMUv5
sharm-none-eabi-gdb px4fmuv5_bl.elf
INFO
H7 Bootloaders from PX4/PX4-Autopilot are named with pattern
*._bootloader.elf. Bootloaders from PX4/PX4-Bootloader are named with the pattern*_bl.elf.The gdb terminal appears and it should display (something like) the following output:
shGNU gdb (GNU Tools for Arm Embedded Processors 7-2017-q4-major) 8.0.50.20171128-git Copyright (C) 2017 Free Software Foundation, Inc. License GPLv3+: GNU GPL version 3 or later <http://gnu.org/licenses/gpl.html> This is free software: you are free to change and redistribute it. There is NO WARRANTY, to the extent permitted by law. Type "show copying" and "show warranty" for details. This GDB was configured as "--host=x86_64-linux-gnu --target=arm-none-eabi". Type "show configuration" for configuration details. For bug reporting instructions, please see: <https://www.sourceware.org/gdb/bugs/>. Find the GDB manual and other documentation resources online at: <https://www.sourceware.org/gdb/documentation/>. For help, type "help". Type "apropos word" to search for commands related to "word"... Reading symbols from px4fmuv5_bl.elf...done.Find your
<dronecode-probe-id>by running anlscommand in the /dev/serial/by-id directory.Now connect to the debug probe with the following command:
shtar ext /dev/serial/by-id/<dronecode-probe-id>Power on the Pixhawk with another USB cable and connect the probe to the
FMU-DEBUGport.INFO
If using a Zubax BugFace BF1 you may need to remove the case in order to connect to the
FMU-DEBUGport (e.g. on Pixhawk 4 you would do this using a T6 Torx screwdriver).Use the following command to scan for the Pixhawk`s SWD and connect to it:
sh(gdb) mon swdp_scan (gdb) attach 1Load the binary into the Pixhawk:
sh(gdb) load
After the bootloader has updated you can Load PX4 Firmware using QGroundControl.
FMUv2 Bootloader Update
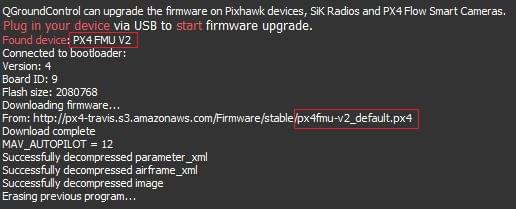
If QGroundControl installs the FMUv2 target (see console during installation), and you have a newer board, you may need to update the bootloader in order to access all the memory on your flight controller. This example explains how you can use QGC Bootloader Update to update the bootloader.
INFO
Early FMUv2 Pixhawk-series flight controllers had a hardware issue that restricted them to using 1MB of flash memory. The problem is fixed on newer boards, but you may need to update the factory-provided bootloader in order to install FMUv3 Firmware and access all 2MB available memory.
To update the bootloader:
Insert an SD card (enables boot logging to debug any problems).
Update the Firmware to PX4 master version (when updating the firmware, check Advanced settings and then select Developer Build (master) from the dropdown list). QGroundControl will automatically detect that the hardware supports FMUv2 and install the appropriate Firmware.
Wait for the vehicle to reboot.
Find and enable the parameter SYS_BL_UPDATE.
Reboot (disconnect/reconnect the board). The bootloader update will only take a few seconds.
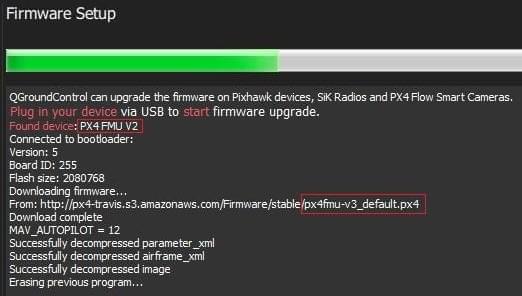
Then Update the Firmware again. This time QGroundControl should autodetect the hardware as FMUv3 and update the Firmware appropriately.
INFO
If the hardware has the Silicon Errata it will still be detected as FMUv2 and you will see that FMUv2 was re-installed (in console). In this case you will not be able to install FMUv3 hardware.
Other Boards (Non-Pixhawk)
Boards that are not part of the Pixhawk Series will have their own mechanisms for bootloader update.
For boards that are preflashed with Betaflight, see Bootloader Flashing onto Betaflight Systems.