비글본 블루
WARNING
PX4 does not manufacture this (or any) autopilot. Contact the manufacturer for hardware support or compliance issues.
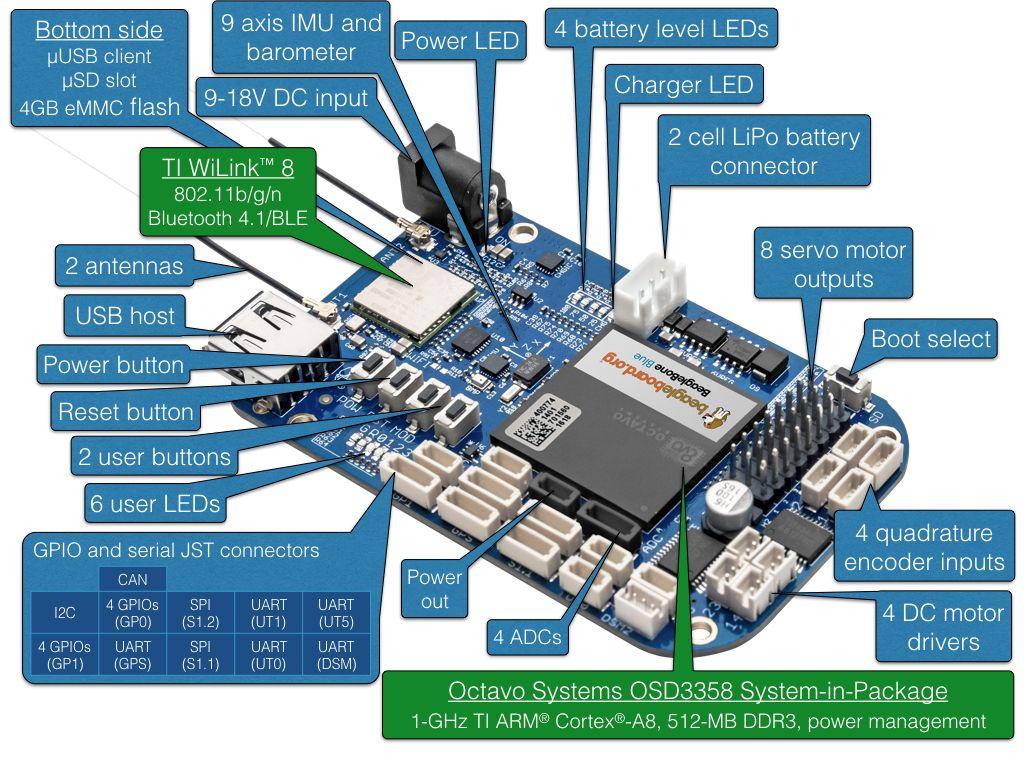
BeagleBone Blue is an all-in-one Linux-based computer. 로봇 공학에 최적화되어 있지만, 이 작고 저렴한 보드에는 비행 콘트롤러에 필요한 모든 센서와 주변 장치가 있습니다. This topic shows how to set up the board to run PX4 with librobotcontrol robotics package.
OS 이미지
BeagleBone Blue images can be found here:
- Latest stable OS image.
- Test OS images (updated frequently).
Information about flashing OS images can be found on this page. Other useful information can be found in the FAQ.
TIP
Optionally you can update to a realtime kernel, and if you do, re-check if librobotcontrol works properly with the realtime kernel.
The latest OS images at time of updating this document is AM3358 Debian 10.3 2020-04-06 4GB SD IoT.
크로스 컴파일러 빌드 (권장)
The recommended way to build PX4 for BeagleBone Blue is to compile on a development computer and upload the PX4 executable binary directly to the BeagleBone Blue.
TIP
This approach is recommended over native build due to speed of deployment and ease of use.
INFO
The PX4 build requires librobotcontrol which is automatically included in the build (but it can be installed and tested independently if required).
Beaglebone Blue WIFI 설정
보드에 쉽게 액세스하려면 Wi-Fi를 통해 네트워크에 연결할 수 있습니다.
절차는 다음과 같습니다 (보드에서 실행).
sh
sudo su
connmanctl
connmanctl>scan wifi
connmanctl>services
#(at this point you should see your network SSID appear.)
connmanctl>agent on
connmanctl>connect <SSID>
	Enter Passphrase
connmanctl>quit
INFO
The format of the <SSID> above is normally the text 'wifi' followed by a string of other characters. After entering the command you will be prompted to enter the wifi password.
Beaglebone에서 SSH 루트 로그인
Root login can be enabled on the board with:
sh
sudo su
echo "PermitRootLogin yes" >>  /etc/ssh/sshd_config && systemctl restart sshd
크로스 컴파일러 설정
First set up rsync (this is used to transfer files from the development computer to the target board over a network - WiFi or Ethernet). For rsync over SSH with key authentication, follow the steps here (on the development machine):
이전에 생성하지 않은 경우 SSH 키를 생성합니다.
shssh-keygen -t rsa- ENTER //no passphrase
- ENTER
- ENTER
Define the BeagleBone Blue board as
beaglebonein /etc/hosts and copy the public SSH key to the board for password-less SSH access:shssh-copy-id debian@beaglebone또는 beaglebone의 IP를 직접 사용할 수 있습니다.
shssh-copy-id debian@<IP>확인 메시지가 표시되면 : yes
루트 비밀번호 입력
크로스 컴파일러 설정
- 툴체인 다운로드
First install the toolchain into /opt/bbblue_toolchain/gcc-arm-linux-gnueabihf. Here is an example of using soft link to select which version of the toolchain you want to use:
shmkdir -p /opt/bbblue_toolchain/gcc-arm-linux-gnueabihf chmod -R 777 /opt/bbblue_toolchain cd /opt/bbblue_toolchain/gcc-arm-linux-gnueabihfThe ARM Cross Compiler for BeagleBone Blue can be found at Linaro Toolchain Binaries site.
TIP
GCC in the toolchain should be compatible with kernel in BeagleBone Blue. General rule of thumb is to choose a toolchain where version of GCC is not higher than version of GCC which comes with the OS image on BeagleBone Blue.
- 툴체인 다운로드
:::
     Download and unpack [gcc-linaro-13.0.0-2022.06-x86_64_arm-linux-gnueabihf.tar.xz](https://snapshots.linaro.org/gnu-toolchain/13.0-2022.06-1/arm-linux-gnueabihf/gcc-linaro-13.0.0-2022.06-x86_64_arm-linux-gnueabihf.tar.xz) to the bbblue_toolchain folder.

     Different ARM Cross Compiler versions for _BeagleBone Blue_ can be found at [Linaro Toolchain Binaries site](https://www.linaro.org/downloads/).

     ```sh
     wget https://snapshots.linaro.org/gnu-toolchain/13.0-2022.06-1/arm-linux-gnueabihf/gcc-linaro-13.0.0-2022.06-x86_64_arm-linux-gnueabihf.tar.xz
     tar -xf gcc-linaro-13.0.0-2022.06-x86_64_arm-linux-gnueabihf.tar.xz
     ```

     ::: tip
     The GCC version of the toolchain should be compatible with kernel in _BeagleBone Blue_.
:::
     As a general rule of thumb is to choose a toolchain where the version of GCC is not higher than the version of GCC which comes with the OS image on _BeagleBone Blue_.

  2. Add it to the PATH in ~/.profile as shown below

     ```sh
     export PATH=$PATH:/opt/bbblue_toolchain/gcc-arm-linux-gnueabihf/gcc-linaro-13.0.0-2022.06-x86_64_arm-linux-gnueabihf/bin
     ```

     ::: info
     Logout and Login to apply the change, or execute the same line on your current shell.
:::
  3. Setup other dependencies by downloading the PX4 source code and then running the setup scripts:

     ````sh
     git clone https://github.com/PX4/PX4-Autopilot.git --recursive
     ols
     ```

     You may have to edit the upload target to match with your setup:

     ```sh
     nano PX4-Autopilot/boards/beaglebone/blue/cmake/upload.cmake

     # in row 37 change debian@beaglebone.lan TO root@beaglebone (or root@<IP>)
     ````

     See the [Development Environment Setup](../dev_setup/dev_env_linux_ubuntu.md) instructions for additional information.
교차 컴파일 및 업로드
Compile and Upload
sh
make beaglebone_blue_default uploadINFO
Without upload, files stored local in build folder.
To test the uploaded files, run the following commands on the BeagleBone Blue board:
sh
cd /home/debian/px4
sudo ./bin/px4 -s px4.config
INFO
Currently librobotcontrol requires root access.
Native Builds (optional)
You can also natively build PX4 builds directly on the BeagleBone Blue.
After acquiring the pre-built library,
- Select the librobotcontrol installation directory, and set it in the
LIBROBOTCONTROL_INSTALL_DIRenvironment variable so that other unwanted headers will not be included - Install robotcontrol.h and rc/* into
$LIBROBOTCONTROL_INSTALL_DIR/include - Install pre-built native (ARM) version of librobotcontrol.* into
$LIBROBOTCONTROL_INSTALL_DIR/lib
Run the following commands on the BeagleBone Blue (i.e. via SSH):
종속성 설치:
shsudo apt-get update sudo apt-get install cmake python3-empy=3.3.4-2PX4 펌웨어를 BeagleBone Blue에 복제합니다.
Continue with the standard build system installation.
Changes in config
All changes can be made in the px4.config file directly on beaglebone. For example, you can change the WIFI to wlan.
INFO
If you want to change permanently, you have to change PX4-Autopilot/posix-configs/bbblue/px4.config on the Build Machine before build.
부팅 중 자동 시작
Here is an example [/etc/rc.local]:
sh
#!/bin/sh -e
#
# rc.local
#
# This script is executed at the end of each multiuser runlevel.
# Make sure that the script will "exit 0" on success or any other
# value on error.
#
# In order to enable or disable this script just change the execution
# bits.
#
# By default this script does nothing.

# wait for services to start up
/bin/sleep 25

cd /home/debian/px4

/home/debian/px4/bin/px4 -d -s /home/debian/px4/px4.config > /home/debian/px4/PX4.log &

exit 0
Below is a systemd service example [/lib/systemd/system/px4-quad-copter.service]:
sh
[Unit]
Description=PX4 Quadcopter Service
After=networking.service network-online.target
StartLimitIntervalSec=0
Conflicts=px4-fixed-wing.service

[Service]
WorkingDirectory=/home/debian/px4
User=root
ExecStart=/home/debian/px4/bin/px4 -d -s /home/debian/px4/px4.config

Restart=on-failure
RestartSec=1

[Install]
WantedBy=multi-user.target
기타
파워 서보 레일
When PX4 starts, it automatically applies power to servos.
독특한 기능
BeagleBone Blue has some unique features such as multiple choices of WiFi interfaces and power sources. Refer to comments in /home/debian/px4/px4.config for usage of these features.
SBUS 신호 변환기
SBUS signal from receiver (e.g., FrSky X8R) is an inverted signal. UARTs on BeagleBone Blue can only work with non-inverted 3.3V level signal. This tutorial contains a SBUS signal inverter circuit.
일반적인 연결
For a quadcopter with GPS and an SBUS receiver, here are typical connections:
- 비글본 블루에서 모터 1, 2, 3 및 4의 ESC를 서보 출력의 채널 1, 2, 3 및 4에 연결합니다. 비글본 블루에서 ESC 커넥터에 전원 출력이 포함되어 있는 경우 핀, 제거 및 서보 채널의 전원 출력 핀에 연결하지 마십시오.
- Connect the above mentioned converted SBUS signal to the dsm2 port if you have the matching connector for dsm2, otherwise connect it to any other available UART port and change the corresponding port in /home/debian/px4/px4.config accordingly.
- GPS 모듈의 신호를 비글본 블루의 GPS 포트에 연결합니다 BeagleBone Blue에있는 GPS 포트의 신호 핀은 3.3V만 허용하므로 이에 적합한 GPS 모듈을 선택하십시오.