Omnibus F4 SD
WARNING
This flight controller has been discontinued and is no longer commercially available.
WARNING
PX4 does not manufacture this (or any) autopilot. 지원 또는 규정준수 문제는 제조업체에 문의하십시오.
The Omnibus F4 SD is a controller board designed for racers. 일반적인 레이서 보드와 달리 SD 카드와 고속 CPU 등이 추가되었습니다.

These are the main differences compared to a Pixracer:
- 저렴한 가격
- 더 적은 IO 포트(예 : GPS 또는 Flow 센서를 연결은 가능함)
- Requires external pull up resistor on the I2C bus for external GPS, see I2C below.
- Less RAM (192 KB vs. 256 KB) and FLASH (1 MB vs. 2 MB)
- Same board dimensions as a Pixracer, but slightly smaller form factor (because it has less connectors)
- 통합 OSD(아직 소프트웨어에서 구현되지 않음)
TIP
All the usual PX4 features can still be used for your racer!
INFO
This flight controller is manufacturer supported.
주요 특징
- Main System-on-Chip: STM32F405RGT6
- CPU : 단정밀도 FPU의 168MHz ARM Cortex M4
- RAM : 192KB SRAM
- FLASH: 1 MB
- 표준 레이서 폼 팩터 : 36x36mm, 표준 30.5mm 구멍 패턴
- MPU6000 가속/자이로
- BMP280 기압계(모든 보드에 마운트된 것은 아님)
- microSD (로깅)
- Futaba S.BUS 및 S.BUS2/Spektrum DSM2 및 DSMX/Graupner SUMD/PPM 입력/Yuneec ST24
- OneShot PWM 출력(설정 가능)
- 내장 전류 센서
- 내장 OSD 칩(SPI를 통한 AB7456)
구매처
보드는 몇 가지 변형된 형태(예 : 기압계 포함 또는 제외)로 여러 공급 업체에서 생산합니다.
TIP
PX4 is compatible with boards that support the Betaflight OMNIBUSF4SD target (if OMNIBUSF4SD is present on the product page the board should work with PX4).
TIP
Any Omnibus F4 labeled derivative (e.g. clone) should work as well. 그러나, 이러한 보드의 배전은 품질이 다양합니다.
아래의 보드들은 테스트되고 작동하는 것입니다.
Hobbywing XRotor Flight Controller F4
INFO
This board fits on top of the Hobbywing XRotor Micro 40A 4in1 ESC without soldering. 이 ESC 보드는 또한 Omnibus 보드에 전원을 제공합니다.
:::
구매처:
오리지널 Airbot Omnibus F4 SD
구매처:
액세서리에는 아래의 내용물이 포함됩니다.
- ESP8266 WiFi Module for MAVLink telemetry. 다음 핀을 연결하여야합니다: GND, RX, TX, VCC 및 CH-PD (CH-PD ~ 3.3V). 전송 속도는 921600입니다.
커넥터
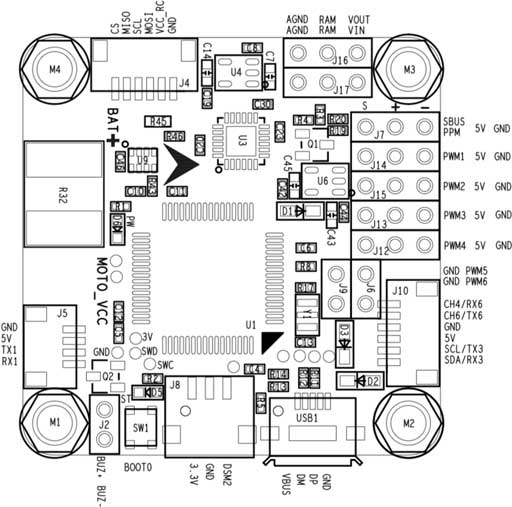
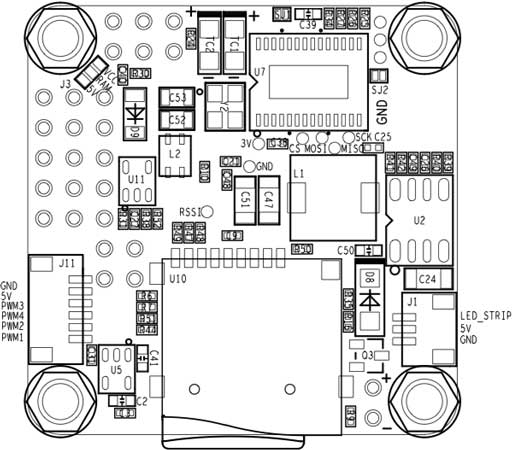
이 설계를 기반으로 한 다른 공급 업체의 보드는 레이아웃이 상당히 다를 수 있습니다. 다양한 버전의 레이아웃/실크스크린이 아래와 같습니다.
에어 봇 옴니버스 F4 SD
아래는 상단과 하단을 모두 보여주는 Airbot Omnibus F4 SD (V1)의 실크 스크린입니다.
Hobbywing XRotor 비행 콘트롤러 F4
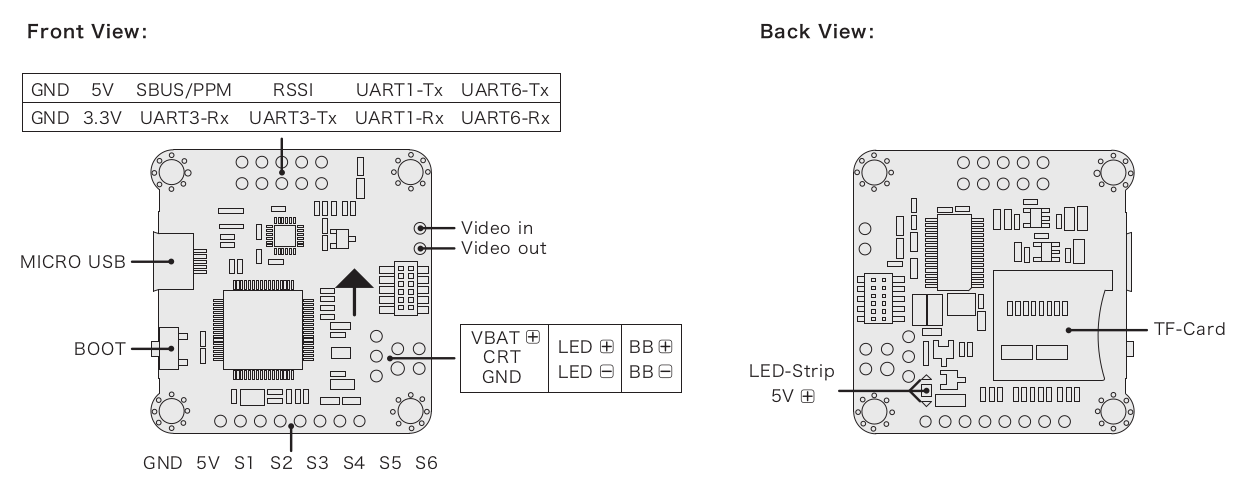
아래는 Hobbywing XRotor 비행 콘트롤러 F4의 실크스크린입니다.
핀배열
무선 조종
RC는 다음 포트중 하나에 연결됩니다.
- UART1
- SBUS/PPM 포트(인버터를 통해 내부적으로 UART1로 이동)
INFO
Some Omnibus F4 boards have a jumper connecting either or both the MCU SBUS and PPM to a single pin header. 사용하기 전에 점퍼 또는 솔더 브리지를 적절한 MCU 핀으로 설정하십시오.
UART
UART6: GPS 포트
TX: MCU 핀 PC6
RX: MCU 핀 PC7
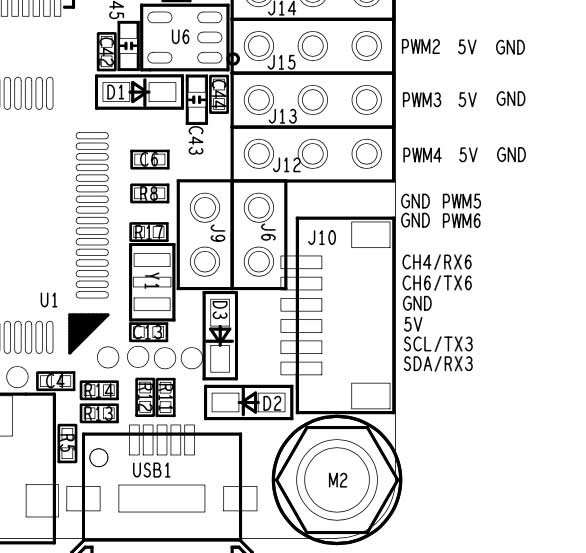
Airbot Omnibus F4 SD 핀아웃은 포트 J10(TX6 / RX6)에 있습니다.
UART4
- TX: MCU 핀 PA0
- RX: MCU 핀 PA1
- 초당 전송속도: 57600
- This can be configured as the
TELEM 2port. - 에어 봇 옴니버스 F4 SD 핀배열:
- TX: RSSI 핀
- RX: PWM 출력 5
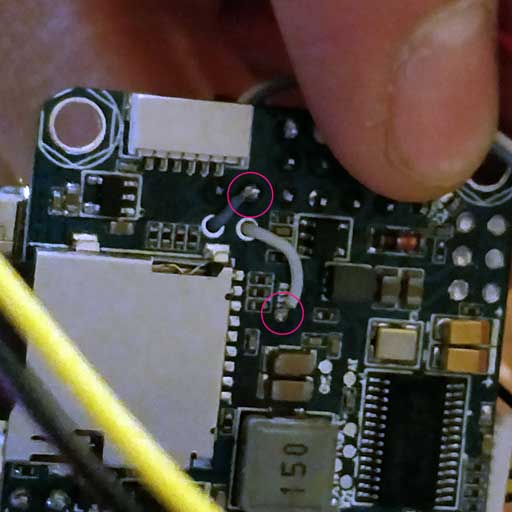
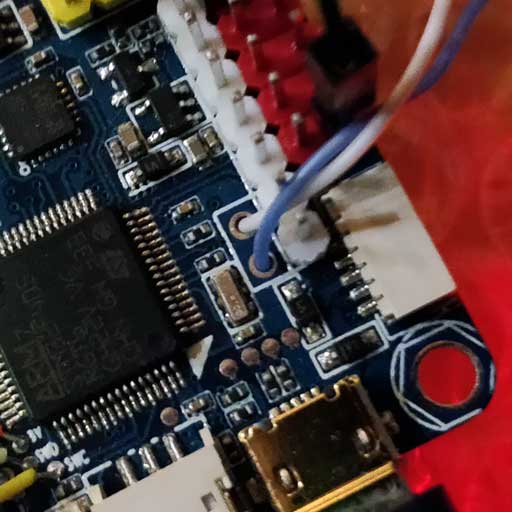
I2C
다음을 통해 사용 가능한 I2C 포트가 하나 있습니다.
- SCL: MCU 핀 PB10 (TX3로 표시 될 수 있음)
- SDA: MCU 핀 PB11 (RX3로 표시 될 수 있음)
INFO
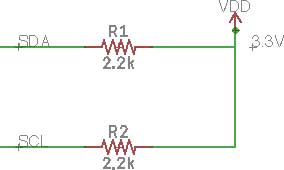
You will need external pullups on both signals (clock and data). 예를 들어, 2.2k 풀업을 사용하여 외부 매거진을 연결할 수 있습니다.
- Airbot Omnibus F4 SD Pinout is on Port J10 (SCL [clock] / SCA [data]):

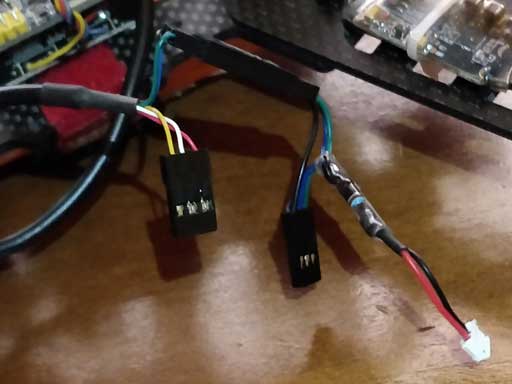
다음은 구현의 예입니다. 저는 Spektrum 플러그를 사용하여 DSM 포트에서 3.3v를 얻었으며 2.2k 저항을 통해 각 라인에 3.3v+ 만 연결하였습니다.
시리얼 포트 매핑
| UART | 장치 | 포트 |
|---|---|---|
| USART1 | /dev/ttyS0 | SerialRX |
| USART4 | /dev/ttyS1 | TELEM1 |
| USART6 | /dev/ttyS2 | GPS |
RC 텔레메트리
The Omnibus supports telemetry to the RC Transmitter using FrSky Telemetry or CRSF Crossfire Telemetry.
CRSF Crossfire 텔레메트리
TBS CRSF Telemetry may be used to send telemetry data from the flight controller (the vehicle's attitude, battery, flight mode and GPS data) to an RC transmitter such as a Taranis.
Benefits over FrSky telemetry include:
- RC와 텔레메트리에는 단일 UART 만 필요합니다.
- CRSF 프로토콜은 응답시간 느린 장치에 최적화되어 있습니다.
- 150Hz RC 업데이트 속도.
- 신호는 반전되지 않으므로 외부 인버터 로직이 필요하지 않습니다.
INFO
If you use CRSF Telemetry you will need to build custom PX4 firmware. By contrast, FrSky telemetry can use prebuilt firmware.
For Omnibus we recommend the TBS Crossfire Nano RX, since it is specifically designed for small Quads.
On the handheld controller (e.g. Taranis) you will also need a Transmitter Module. 이것은 RC 콘트롤러의 뒷면에 장착할 수 있습니다.
INFO
The referenced links above contains the documentation for the TX/RX modules.
설정
다음과 같이 Nano RX와 Omnibus 핀을 연결합니다.
| Omnibus UART1 | Nano RX |
|---|---|
| TX | Ch2 |
| RX | Ch1 |
다음으로 TX/RX 모듈을 업데이트하여 CRSF 프로토콜을 사용하고 텔레메트리를 설정합니다. Instructions for this are provided in the TBS Crossfire Manual (search for 'Setting up radio for CRSF').
PX4 CRSF Configuration
You will need to build custom firmware to use CRSF. For more information see CRSF Telemetry.
회로도
The schematics are provided by Airbot: OmnibusF4-Pro-Sch.pdf.
부트로더 업데이트
The board comes pre-installed with Betaflight. Before PX4 firmware can be installed, the PX4 bootloader must be flashed. Download the omnibusf4sd_bl.hex bootloader binary and read this page for flashing instructions.
펌웨어 빌드
To build PX4 for this target:
make omnibus_f4sd_default펌웨어 설치
미리 빌드된 펌웨어나 사용자 지정 펌웨어를 사용할 수 있습니다.
WARNING
If you use CRSF Telemetry in your radio system, as describe above, then you must use custom firmware.
펌웨어는 일반적인 방법으로 설치할 수 있습니다.
소스 빌드 및 업로드
make omnibus_f4sd_default uploadLoad the firmware using QGroundControl.
설정
In addition to the basic configuration, the following parameters are important:
| 매개변수 | 설정 |
|---|---|
| SYS_HAS_MAG | 보드에 내부 자력계가 없기 때문에 비활성화하여야 합니다. 외부 자력계를 연결하여 활성화 할 수 있습니다. |
| SYS_HAS_BARO | 보드에 기압계가 없는 경우에는 비활성화 하십시오. |
추가 정보
This page provides a good overview with pinouts and setup instructions.