ROS 2 Посібник користувача
Архітектура ROS 2-PX4 забезпечує глибоку інтеграцію між ROS 2 і PX4, дозволяючи підписникам ROS 2 або вузлам видавців безпосередньо взаємодіяти з темами uORB PX4.
Ця тема містить огляд архітектури та пайплайну додатків, а також пояснює, як налаштувати та використовувати ROS 2 з PX4.
INFO
From PX4 v1.14, ROS 2 uses uXRCE-DDS middleware, replacing the FastRTPS middleware that was used in version 1.13 (v1.13 does not support uXRCE-DDS).
The migration guide explains what you need to do in order to migrate ROS 2 apps from PX4 v1.13 to PX4 v1.14.
If you're still working on PX4 v1.13, please follow the instructions in the PX4 v1.13 Docs.
Загальний огляд
The application pipeline for ROS 2 is very straightforward, thanks to the use of the uXRCE-DDS communications middleware.

The uXRCE-DDS middleware consists of a client running on PX4 and an agent running on the companion computer, with bi-directional data exchange between them over a serial, UDP, TCP or custom link. The agent acts as a proxy for the client to publish and subscribe to topics in the global DDS data space.
The PX4 uxrce_dds_client is generated at build time and included in PX4 firmware by default. It includes both the "generic" micro XRCE-DDS client code, and PX4-specific translation code that it uses to publish to/from uORB topics. The subset of uORB messages that are generated into the client are specified in dds_topics.yaml. The generator uses the uORB message definitions in the source tree: PX4-Autopilot/msg to create the code for sending ROS 2 messages.
ROS 2 applications need to be built in a workspace that has the same message definitions that were used to create the uXRCE-DDS client module in the PX4 Firmware. You can include these by cloning the interface package PX4/px4_msgs into your ROS 2 workspace (branches in the repo correspond to the messages for different PX4 releases).
Starting from PX4 v1.16, in which message versioning was introduced, ROS2 applications may use a different version of message definitions than those used to build PX4. This requires the ROS 2 Message Translation Node to be running to ensure that messages can be converted and exchanged correctly.
Note that the micro XRCE-DDS agent itself has no dependency on client-side code. It can be built from source either standalone or as part of a ROS build, or installed as a snap.
You will normally need to start both the client and agent when using ROS 2. Note that the uXRCE-DDS client is built into firmware by default but not started automatically except for simulator builds.
INFO
In PX4v1.13 and earlier, ROS 2 was dependent on definitions in px4_ros_com. This repo is no longer needed, but does contain useful examples.
Installation & Setup
The supported and recommended ROS 2 platform for working with PX4 is ROS 2 "Humble" LTS on Ubuntu 22.04.
TIP
If you're working on Ubuntu 20.04 we recommend you update to Ubuntu 22.04. In the meantime you can use ROS 2 "Foxy" with Gazebo Classic on Ubuntu 20.04. Note that ROS 2 "Foxy" reached end-of-life in May 2023, but is (at time of writing) still stable and works with PX4.
To setup ROS 2 for use with PX4:
- Install PX4 (to use the PX4 simulator)
- Install ROS 2
- Setup Micro XRCE-DDS Agent & Client
- Build & Run ROS 2 Workspace
Other dependencies of the architecture that are installed automatically, such as Fast DDS, are not covered.
Встановлення PX4
You need to install the PX4 development toolchain in order to use the simulator.
INFO
The only dependency ROS 2 has on PX4 is the set of message definitions, which it gets from px4_msgs. You only need to install PX4 if you need the simulator (as we do in this guide), or if you are creating a build that publishes custom uORB topics.
Set up a PX4 development environment on Ubuntu in the normal way:
sh
cd
git clone https://github.com/PX4/PX4-Autopilot.git --recursive
bash ./PX4-Autopilot/Tools/setup/ubuntu.sh
cd PX4-Autopilot/
make px4_sitl
Note that the above commands will install the recommended simulator for your version of Ubuntu. If you want to install PX4 but keep your existing simulator installation, run ubuntu.sh above with the --no-sim-tools flag.
For more information and troubleshooting see: Ubuntu Development Environment and Download PX4 source.
Встановлення ROS 2
To install ROS 2 and its dependencies:
Встановлення ROS 2.
:::
::::
Some Python dependencies must also be installed (using
piporapt):shpip install --user -U empy==3.3.4 pyros-genmsg setuptools
Setup Micro XRCE-DDS Agent & Client
For ROS 2 to communicate with PX4, uXRCE-DDS client must be running on PX4, connected to a micro XRCE-DDS agent running on the companion computer.
Налаштувати агента
The agent can be installed onto the companion computer in a number of ways. Below we show how to build the agent "standalone" from source and connect to a client running on the PX4 simulator.
To setup and start the agent:
Відкрийте термінал.
Введіть наступні команди для витягування та побудови агента з вихідного коду:
shgit clone -b v2.4.3 https://github.com/eProsima/Micro-XRCE-DDS-Agent.git cd Micro-XRCE-DDS-Agent mkdir build cd build cmake .. make sudo make install sudo ldconfig /usr/local/lib/Запустіть агента з налаштуваннями для підключення до клієнта uXRCE-DDS, який працює на симуляторі:
shMicroXRCEAgent udp4 -p 8888
The agent is now running, but you won't see much until we start PX4 (in the next step).
INFO
You can leave the agent running in this terminal! Note that only one agent is allowed per connection channel.
Запустіть клієнта
The PX4 simulator starts the uXRCE-DDS client automatically, connecting to UDP port 8888 on the local host.
To start the simulator (and client):
Open a new terminal in the root of the PX4 Autopilot repo that was installed above.
:::
::::
The agent and client are now running they should connect.
The PX4 terminal displays the NuttShell/PX4 System Console output as PX4 boots and runs. As soon as the agent connects the output should include INFO messages showing creation of data writers:
sh
...
INFO  [uxrce_dds_client] synchronized with time offset 1675929429203524us
INFO  [uxrce_dds_client] successfully created rt/fmu/out/failsafe_flags data writer, topic id: 83
INFO  [uxrce_dds_client] successfully created rt/fmu/out/sensor_combined data writer, topic id: 168
INFO  [uxrce_dds_client] successfully created rt/fmu/out/timesync_status data writer, topic id: 188
...
The micro XRCE-DDS agent terminal should also start to show output, as equivalent topics are created in the DDS network:
sh
...
[1675929445.268957] info     | ProxyClient.cpp    | create_publisher         | publisher created      | client_key: 0x00000001, publisher_id: 0x0DA(3), participant_id: 0x001(1)
[1675929445.269521] info     | ProxyClient.cpp    | create_datawriter        | datawriter created     | client_key: 0x00000001, datawriter_id: 0x0DA(5), publisher_id: 0x0DA(3)
[1675929445.270412] info     | ProxyClient.cpp    | create_topic             | topic created          | client_key: 0x00000001, topic_id: 0x0DF(2), participant_id: 0x001(1)
...
Створення робочого простору ROS 2
This section shows how to create a ROS 2 workspace hosted in your home directory (modify the commands as needed to put the source code elsewhere).
The px4_ros_com and px4_msgs packages are cloned to a workspace folder, and then the colcon tool is used to build the workspace. The example is run using ros2 launch.
You should use a version of the px4_msgs package with the _same_ message definitions as the PX4 firmware you have installed in the step above. Branches in the px4_msgs repo are named to correspond to the message definitions for different PX4 releases. If for any reason you cannot ensure the same message definitions between your PX4 firmware and ROS 2 px4_msgs package, you will additionally need to start the message translation node as part of your setup process.
INFO
The example builds the ROS 2 Listener example application, located in px4_ros_com. px4_msgs is needed too so that the example can interpret PX4 ROS 2 topics.
Створення робочого простору
To create and build the workspace:
Відкрийте новий термінал.
Створіть новий каталог робочого простору та перейдіть до нього за допомогою:
shmkdir -p ~/ws_sensor_combined/src/ cd ~/ws_sensor_combined/src/INFO
A naming convention for workspace folders can make it easier to manage workspaces.
:::
Clone the example repository and px4_msgs to the
/srcdirectory (themainbranch is cloned by default, which corresponds to the version of PX4 we are running):shgit clone https://github.com/PX4/px4_msgs.git git clone https://github.com/PX4/px4_ros_com.gitSource the ROS 2 development environment into the current terminal and compile the workspace using
colcon:
:::
::::
This builds all the folders under /src using the sourced toolchain.
Запуск прикладу
To run the executables that you just built, you need to source local_setup.bash. This provides access to the "environment hooks" for the current workspace. In other words, it makes the executables that were just built available in the current terminal.
INFO
The ROS2 beginner tutorials recommend that you open a new terminal for running your executables.
In a new terminal:
Перейдіть на верхній рівень каталогу вашого робочого простору та джерело середовища ROS 2 (у цьому випадку "Humble"):
:::
::::
Source the
local_setup.bash.shsource install/local_setup.bashТепер запустіть приклад. Note here that we use
ros2 launch, which is described below.shros2 launch px4_ros_com sensor_combined_listener.launch.py
If this is working you should see data being printed on the terminal/console where you launched the ROS listener:
sh
RECEIVED DATA FROM SENSOR COMBINED
================================
ts: 870938190
gyro_rad[0]: 0.00341645
gyro_rad[1]: 0.00626475
gyro_rad[2]: -0.000515705
gyro_integral_dt: 4739
accelerometer_timestamp_relative: 0
accelerometer_m_s2[0]: -0.273381
accelerometer_m_s2[1]: 0.0949186
accelerometer_m_s2[2]: -9.76044
accelerometer_integral_dt: 4739
(Optional) Starting the Translation Node
PX4 v1.16 ExperimentalThis example is built with PX4 and ROS2 versions that use the same message definitions. If you were to use incompatible message versions you would need to install and run the Message Translation Node as well, before running the example:
Include the Message Translation Node into the example workspace or a separate workspace by running the following script:
shcd /path/to/ros_ws /path/to/PX4-Autopilot/Tools/copy_to_ros_ws.sh .Build and run the translation node:
shcolcon build source install/local_setup.bash ros2 run translation_node translation_node_bin
Керування Транспортним Засобом
To control applications, ROS 2 applications:
- підписатися на (слухати) тематичні теми, опубліковані PX4
- опублікувати у темах, які спонукають PX4 виконати певну дію.
The topics that you can use are defined in dds_topics.yaml, and you can get more information about their data in the uORB Message Reference. For example, VehicleGlobalPosition can be used to get the vehicle global position, while VehicleCommand can be used to command actions such as takeoff and land.
The ROS 2 Example applications examples below provide concrete examples of how to use these topics.
Проблеми сумісності
This section contains information that may affect how you write your ROS code.
Налаштування QoS підписника ROS 2
ROS 2 code that subscribes to topics published by PX4 must specify a appropriate (compatible) QoS setting in order to listen to topics. Specifically, nodes should subscribe using the ROS 2 predefined QoS sensor data (from the listener example source code):
cpp
...
rmw_qos_profile_t qos_profile = rmw_qos_profile_sensor_data;
auto qos = rclcpp::QoS(rclcpp::QoSInitialization(qos_profile.history, 5), qos_profile);

subscription_ = this->create_subscription<px4_msgs::msg::SensorCombined>("/fmu/out/sensor_combined", qos,
...
This is needed because the ROS 2 default Quality of Service (QoS) settings are different from the settings used by PX4. Not all combinations of publisher-subscriber Qos settings are possible, and it turns out that the default ROS 2 settings for subscribing are not! Note that ROS code does not have to set QoS settings when publishing (the PX4 settings are compatible with ROS defaults in this case).
ROS 2 & PX4 Frame Conventions
The local/world and body frames used by ROS and PX4 are different.
| Frame | PX4 | ROS |
|---|---|---|
| Body | FRD (X Forward, Y Right, Z Down) | FLU (X Forward, Y Left, Z Up) |
| World | FRD or NED (X North, Y East, Z Down) | FLU or ENU (X East, Y North, Z Up) |
TIP
See REP105: Coordinate Frames for Mobile Platforms for more information about ROS frames.
Обидві системи координат показані на зображенні нижче (FRD зліва / FLU справа).
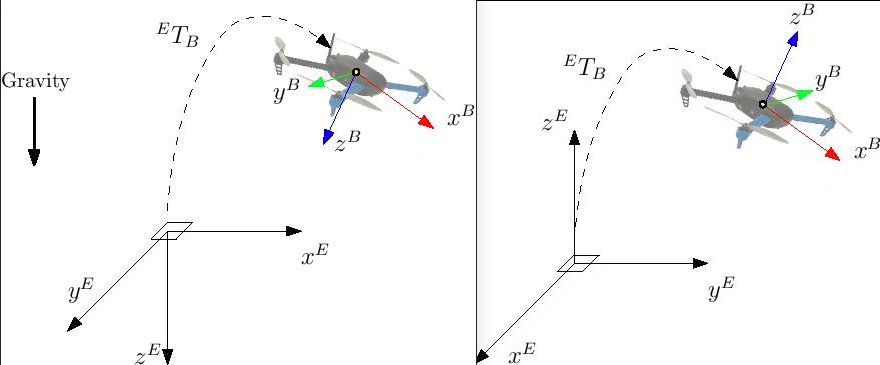
The FRD (NED) conventions are adopted on all PX4 topics unless explicitly specified in the associated message definition. Therefore, ROS 2 nodes that want to interface with PX4 must take care of the frames conventions.
Для повороту вектора з ENU на NED потрібно виконати дві основні обертання:
- first a pi/2 rotation around the
Z-axis (up), - then a pi rotation around the
X-axis (old East/new North).
- first a pi/2 rotation around the
To rotate a vector from NED to ENU two basic rotations must be performed:
- first a pi/2 rotation around the
Z-axis (down), - then a pi rotation around the
X-axis (old North/new East). Note that the two resulting operations are mathematically equivalent.
- first a pi/2 rotation around the
To rotate a vector from FLU to FRD a pi rotation around the
X-axis (front) is sufficient.To rotate a vector from FRD to FLU a pi rotation around the
X-axis (front) is sufficient.
Examples of vectors that require rotation are:
- all fields in TrajectorySetpoint message; ENU to NED conversion is required before sending them.
- all fields in VehicleThrustSetpoint message; FLU to FRD conversion is required before sending them.
Similarly to vectors, also quaternions representing the attitude of the vehicle (body frame) w.r.t. the world frame require conversion.
PX4/px4_ros_com provides the shared library frame_transforms to easily perform such conversions.
Синхронізація часу ROS, Gazebo та PX4
By default, time synchronization between ROS 2 and PX4 is automatically managed by the uXRCE-DDS middleware and time synchronization statistics are available listening to the bridged topic /fmu/out/timesync_status. When the uXRCE-DDS client runs on a flight controller and the agent runs on a companion computer this is the desired behavior as time offsets, time drift, and communication latency, are computed and automatically compensated.
For Gazebo simulations the GZBridge sets the PX4 time on every sim step (see Change simulation speed). Note that this is different from the simulation lockstep procedure adopted with Gazebo Classic.
ROS2 users have then two possibilities regarding the time source of their nodes.
Вузли ROS2 використовують годинник ОС як джерело часу
This scenario, which is the one considered in this page and in the offboard_control guide, is also the standard behaviour of the ROS2 nodes. The OS clock acts as time source and therefore it can be used only when the simulation real time factor is very close to one. The time synchronizer of the uXRCE-DDS client then bridges the OS clock on the ROS2 side with the Gazebo clock on the PX4 side. No further action is required by the user.
Вузли ROS2 використовують годинник Gazebo як джерело часу
In this scenario, ROS2 also uses the Gazebo /clock topic as time source. This approach makes sense if the Gazebo simulation is running with real time factor different from one, or if ROS2 needs to directly interact with Gazebo. On the ROS2 side, direct interaction with Gazebo is achieved by the ros_gz_bridge package of the ros_gz repository.
Use the following commands to install the correct ROS 2/gz interface packages (not just the bridge) for the ROS2 and Gazebo version(s) supported by PX4.
INFO
The repo and package READMEs show the package versions that need to be installed depending on your ROS2 and Gazebo versions.
Once the packages are installed and sourced, the node parameter_bridge provides the bridging capabilities and can be used to create an unidirectional /clock bridge:
sh
ros2 run ros_gz_bridge parameter_bridge /clock@rosgraph_msgs/msg/Clock[gz.msgs.ClockAt this point, every ROS2 node must be instructed to use the newly bridged /clock topic as time source instead of the OS one, this is done by setting the parameter use_sim_time (of each node) to true (see ROS clock and Time design).
Це завершує внесені зміни, необхідні на стороні ROS2. On the PX4 side, you are only required to stop the uXRCE-DDS time synchronization, setting the parameter UXRCE_DDS_SYNCT to false. Таким чином, Gazebo буде діяти як основний і єдиний джерело часу як для ROS2, так і для PX4.
Приклади програм ROS 2
Слухач ROS 2
The ROS 2 listener examples in the px4_ros_com repo demonstrate how to write ROS nodes to listen to topics published by PX4.
Here we consider the sensor_combined_listener.cpp node under px4_ros_com/src/examples/listeners, which subscribes to the SensorCombined message.
INFO
Build ROS 2 Workspace shows how to build and run this example.
The code first imports the C++ libraries needed to interface with the ROS 2 middleware and the header file for the SensorCombined message to which the node subscribes:
cpp
#include <rclcpp/rclcpp.hpp>
#include <px4_msgs/msg/sensor_combined.hpp>
Then it creates a SensorCombinedListener class that subclasses the generic rclcpp::Node base class.
cpp
/**
 * @brief Sensor Combined uORB topic data callback
 */
class SensorCombinedListener : public rclcpp::Node
{
This creates a callback function for when the SensorCombined uORB messages are received (now as micro XRCE-DDS messages), and outputs the content of the message fields each time the message is received.
cpp
public:
  explicit SensorCombinedListener() : Node("sensor_combined_listener")
  {
    rmw_qos_profile_t qos_profile = rmw_qos_profile_sensor_data;
    auto qos = rclcpp::QoS(rclcpp::QoSInitialization(qos_profile.history, 5), qos_profile);

    subscription_ = this->create_subscription<px4_msgs::msg::SensorCombined>("/fmu/out/sensor_combined", qos,
    [this](const px4_msgs::msg::SensorCombined::UniquePtr msg) {
      std::cout << "\n\n\n\n\n\n\n\n\n\n\n\n\n\n\n\n\n\n\n\n\n\n\n\n";
      std::cout << "RECEIVED SENSOR COMBINED DATA"   << std::endl;
      std::cout << "============================="   << std::endl;
      std::cout << "ts: "          << msg->timestamp    << std::endl;
      std::cout << "gyro_rad[0]: " << msg->gyro_rad[0]  << std::endl;
      std::cout << "gyro_rad[1]: " << msg->gyro_rad[1]  << std::endl;
      std::cout << "gyro_rad[2]: " << msg->gyro_rad[2]  << std::endl;
      std::cout << "gyro_integral_dt: " << msg->gyro_integral_dt << std::endl;
      std::cout << "accelerometer_timestamp_relative: " << msg->accelerometer_timestamp_relative << std::endl;
      std::cout << "accelerometer_m_s2[0]: " << msg->accelerometer_m_s2[0] << std::endl;
      std::cout << "accelerometer_m_s2[1]: " << msg->accelerometer_m_s2[1] << std::endl;
      std::cout << "accelerometer_m_s2[2]: " << msg->accelerometer_m_s2[2] << std::endl;
      std::cout << "accelerometer_integral_dt: " << msg->accelerometer_integral_dt << std::endl;
    });
  }
INFO
The subscription sets a QoS profile based on rmw_qos_profile_sensor_data. Це потрібно, оскільки типовий профіль якості обслуговування ROS 2 для підписників несумісний з профілем PX4 для видавців. For more information see: ROS 2 Subscriber QoS Settings,
The lines below create a publisher to the SensorCombined uORB topic, which can be matched with one or more compatible ROS 2 subscribers to the fmu/sensor_combined/out ROS 2 topic.
cpp
private:
 rclcpp::Subscription<px4_msgs::msg::SensorCombined>::SharedPtr subscription_;
};
```s

The instantiation of the `SensorCombinedListener` class as a ROS node is done on the `main` function.

```cpp
int main(int argc, char *argv[])
{
  std::cout << "Starting sensor_combined listener node..." << std::endl;
  setvbuf(stdout, NULL, _IONBF, BUFSIZ);
  rclcpp::init(argc, argv);
  rclcpp::spin(std::make_shared<SensorCombinedListener>());

  rclcpp::shutdown();
  return 0;
}
This particular example has an associated launch file at launch/sensor_combined_listener.launch.py. This allows it to be launched using the ros2 launch command.
ROS 2 Advertiser
Вузол відправника ROS 2 публікує дані в мережу DDS/RTPS (і, отже, в автопілот PX4).
Taking as an example the debug_vect_advertiser.cpp under px4_ros_com/src/advertisers, first we import required headers, including the debug_vect msg header.
cpp
#include <chrono>
#include <rclcpp/rclcpp.hpp>
#include <px4_msgs/msg/debug_vect.hpp>

using namespace std::chrono_literals;
Then the code creates a DebugVectAdvertiser class that subclasses the generic rclcpp::Node base class.
cpp
class DebugVectAdvertiser : public rclcpp::Node
{
Код нижче створює функцію для відправлення повідомлень. Повідомлення надсилаються на основі виклику за часом, який надсилає два повідомлення на секунду за таймером.
cpp
public:
  DebugVectAdvertiser() : Node("debug_vect_advertiser") {
    publisher_ = this->create_publisher<px4_msgs::msg::DebugVect>("fmu/debug_vect/in", 10);
    auto timer_callback =
    [this]()->void {
      auto debug_vect = px4_msgs::msg::DebugVect();
      debug_vect.timestamp = std::chrono::time_point_cast<std::chrono::microseconds>(std::chrono::steady_clock::now()).time_since_epoch().count();
      std::string name = "test";
      std::copy(name.begin(), name.end(), debug_vect.name.begin());
      debug_vect.x = 1.0;
      debug_vect.y = 2.0;
      debug_vect.z = 3.0;
      RCLCPP_INFO(this->get_logger(), "\033[97m Publishing debug_vect: time: %llu x: %f y: %f z: %f \033[0m",
                                    debug_vect.timestamp, debug_vect.x, debug_vect.y, debug_vect.z);
      this->publisher_->publish(debug_vect);
    };
    timer_ = this->create_wall_timer(500ms, timer_callback);
  }

private:
  rclcpp::TimerBase::SharedPtr timer_;
  rclcpp::Publisher<px4_msgs::msg::DebugVect>::SharedPtr publisher_;
};
The instantiation of the DebugVectAdvertiser class as a ROS node is done on the main function.
cpp
int main(int argc, char *argv[])
{
  std::cout << "Starting debug_vect advertiser node..." << std::endl;
  setvbuf(stdout, NULL, _IONBF, BUFSIZ);
  rclcpp::init(argc, argv);
  rclcpp::spin(std::make_shared<DebugVectAdvertiser>());

  rclcpp::shutdown();
  return 0;
}
Offboard Control
ROS 2 Offboard control example provides a complete C++ reference example of how to use offboard control of PX4 with ROS2.
Python ROS2 offboard examples with PX4 (Jaeyoung-Lim/px4-offboard) provides a similar example for Python, and includes the scripts:
offboard_control.py: Example of offboard position control using position setpointsvisualizer.py: Used for visualizing vehicle states in Rviz
Використання апаратної плати керування польотом
ROS 2 з PX4, що працює на пульті керування польотом, майже те саме, що й працювати з PX4 на симуляторі. The only difference is that you need to start both the agent and the client, with settings appropriate for the communication channel.
For more information see Starting uXRCE-DDS.
Користувацькі теми uORB
ROS 2 needs to have the same message definitions that were used to create the uXRCE-DDS client module in the PX4 Firmware in order to interpret the messages. The definition are stored in the ROS 2 interface package PX4/px4_msgs and they are automatically synchronized by CI on the main and release branches. Note that all the messages from PX4 source code are present in the repository, but only those listed in dds_topics.yaml will be available as ROS 2 topics. Тому,
If you're using a main or release version of PX4 you can get the message definitions by cloning the interface package PX4/px4_msgs into your workspace.
Якщо ви створюєте або змінюєте повідомлення uORB, вам потрібно вручну оновити повідомлення у вашому робочому просторі з вихідного дерева PX4. Generally this means that you would update dds_topics.yaml, clone the interface package, and then manually synchronize it by copying the new/modified message definitions from PX4-Autopilot/msg to its
msgfolders. Assuming that PX4-Autopilot is in your home directory~, whilepx4_msgsis in~/ros2_ws/src/, then the command might be:shrm ~/ros2_ws/src/px4_msgs/msg/*.msg cp ~/PX4-Autopilot/msg/*.msg ~/ros2_ws/src/px4_msgs/msg/INFO
Technically, dds_topics.yaml completely defines the relationship between PX4 uORB topics and ROS 2 messages. For more information see uXRCE-DDS > DDS Topics YAML.
:::
Customizing the Namespace
Custom topic and service namespaces can be applied at build time (changing dds_topics.yaml) or at runtime (useful for multi vehicle operations):
- One possibility is to use the
-noption when starting the uxrce_dds_client from command line. Ця техніка може бути використана як у симуляторах, так і на реальних транспортних засобах. - A custom namespace can be provided for simulations (only) by setting the environment variable
PX4_UXRCE_DDS_NSbefore starting the simulation.
INFO
Changing the namespace at runtime will append the desired namespace as a prefix to all topic fields in dds_topics.yaml and all service servers. Отже, команди, подібні до:
sh
uxrce_dds_client start -n uav_1або
sh
PX4_UXRCE_DDS_NS=uav_1 make px4_sitl gz_x500згенерує теми під просторами імен:
sh
/uav_1/fmu/in/  # for subscribers
/uav_1/fmu/out/ # for publishers
PX4 ROS 2 Service Servers
PX4 v1.15PX4 uXRCE-DDS middleware supports ROS 2 services. Services are remote procedure calls, from one node to another, that return a result.
A service server is the entity that will accept a remote procedure request, perform some computation on it, and return the result. They simplify communication between ROS 2 nodes and PX4 by grouping the request and response behaviour, and ensuring that replies are only returned to the specific requesting user. This is much easier that publishing the request, subscribing to the reply, and filtering out any unwanted responses.
The service servers that are built into the PX4 uxrce_dds_client module include:
/fmu/vehicle_command(definition:px4_msgs::srv::VehicleCommand.)This service can be called by ROS 2 applications to send PX4 VehicleCommand uORB messages and receive PX4 VehicleCommandAck uORB messages in response.
All PX4 service names follow the convention {extra_namespace}/fmu/{server_specific_name} where {extra_namespace} is the same custom namespace that can be given to the PX4 topics.
Details and specific examples are provided in the following sections.
VehicleCommand service
This can be used to send commands to the vehicle, such as "take off", "land", change mode, and "orbit", and receive a response.
The service type is defined in px4_msgs::srv::VehicleCommand as:
txt
VehicleCommand request
---
VehicleCommandAck reply
Users can make service requests by sending VehicleCommand messages, and receive a VehicleCommandAck message in response. The service ensures that only the VehicleCommandAck reply generated for the specific request made by the user is sent back.
VehicleCommand Service Offboard Control Example
A complete offboard control example using the VehicleCommand service is provided by the offboard_control_srv node available in the px4_ros_com package.
The example closely follows the offboard control example described in ROS 2 Offboard Control Example but uses the VehicleCommand service to request mode changes, vehicle arming and vehicle disarming.
First the ROS 2 application declares a service client of type px4_msgs::srv::VehicleCommand using rclcpp::Client() as shown (this is the same approach used for all ROS2 service clients):
cpp
rclcpp::Client<px4_msgs::srv::VehicleCommand>::SharedPtr vehicle_command_client_;Then the client is initialized to the right ROS 2 service (/fmu/vehicle_command). As the application assumes the standard PX4 namespace is used, the code to do this looks like this:
cpp
vehicle_command_client_{this->create_client<px4_msgs::srv::VehicleCommand>("/fmu/vehicle_command")}After that, the client can be used to send any vehicle command request. For example, the arm() function is used to request the vehicle to arm:
cpp
void OffboardControl::arm()
{
  RCLCPP_INFO(this->get_logger(), "requesting arm");
  request_vehicle_command(VehicleCommand::VEHICLE_CMD_COMPONENT_ARM_DISARM, 1.0);
}
where request_vehicle_command handles formatting the request and sending it over in asynchronous mode:
cpp
void OffboardControl::request_vehicle_command(uint16_t command, float param1, float param2)
{
  auto request = std::make_shared<px4_msgs::srv::VehicleCommand::Request>();

  VehicleCommand msg{};
  msg.param1 = param1;
  msg.param2 = param2;
  msg.command = command;
  msg.target_system = 1;
  msg.target_component = 1;
  msg.source_system = 1;
  msg.source_component = 1;
  msg.from_external = true;
  msg.timestamp = this->get_clock()->now().nanoseconds() / 1000;
  request->request = msg;

  service_done_ = false;
  auto result = vehicle_command_client_->async_send_request(request, std::bind(&OffboardControl::response_callback, this,
                           std::placeholders::_1));
  RCLCPP_INFO(this->get_logger(), "Command send");
}
The response is finally captured asynchronously by the response_callback method which checks for the request result:
cpp
void OffboardControl::response_callback(
      rclcpp::Client<px4_msgs::srv::VehicleCommand>::SharedFuture future) {
    auto status = future.wait_for(1s);
    if (status == std::future_status::ready) {
      auto reply = future.get()->reply;
      service_result_ = reply.result;
      // make decision based on service_result_
      service_done_ = true;
    } else {
      RCLCPP_INFO(this->get_logger(), "Service In-Progress...");
    }
  }
ros2 CLI
The ros2 CLI is a useful tool for working with ROS. You can use it, for example, to quickly check whether topics are being published, and also inspect them in detail if you have px4_msg in the workspace. Команда також дозволяє вам запускати більш складні системи ROS за допомогою файлу запуску. Декілька можливостей демонструються нижче.
ros2 topic list
Use ros2 topic list to list the topics visible to ROS 2:
sh
ros2 topic listЯкщо PX4 підключений до агента, результатом буде список типів теми:
sh
/fmu/in/obstacle_distance
/fmu/in/offboard_control_mode
/fmu/in/onboard_computer_status
...
Note that the workspace does not need to build with px4_msgs for this to succeed; topic type information is part of the message payload.
ros2 topic echo
Use ros2 topic echo to show the details of a particular topic.
Unlike with ros2 topic list, for this to work you must be in a workspace has built the px4_msgs and sourced local_setup.bash so that ROS can interpret the messages.
sh
ros2 topic echo /fmu/out/vehicle_statusКоманда виведе деталі теми під час оновлення.
sh
---
timestamp: 1675931593364359
armed_time: 0
takeoff_time: 0
arming_state: 1
latest_arming_reason: 0
latest_disarming_reason: 0
nav_state_timestamp: 3296000
nav_state_user_intention: 4
nav_state: 4
failure_detector_status: 0
hil_state: 0
...
---
ros2 topic hz
You can get statistics about the rates of messages using ros2 topic hz. For example, to get the rates for SensorCombined:
sh
ros2 topic hz /fmu/out/sensor_combinedВихід буде виглядати приблизно так:
sh
average rate: 248.187
  min: 0.000s max: 0.012s std dev: 0.00147s window: 2724
average rate: 248.006
  min: 0.000s max: 0.012s std dev: 0.00147s window: 2972
average rate: 247.330
  min: 0.000s max: 0.012s std dev: 0.00148s window: 3212
average rate: 247.497
  min: 0.000s max: 0.012s std dev: 0.00149s window: 3464
average rate: 247.458
  min: 0.000s max: 0.012s std dev: 0.00149s window: 3712
average rate: 247.485
  min: 0.000s max: 0.012s std dev: 0.00148s window: 3960
ros2 launch
The ros2 launch command is used to start a ROS 2 launch file. For example, above we used ros2 launch px4_ros_com sensor_combined_listener.launch.py to start the listener example.
Вам не потрібно мати файл запуску, але вони дуже корисні, якщо у вас складна система ROS 2, яка потребує запуску кількох компонентів.
For information about launch files see ROS 2 Tutorials > Creating launch files
Усунення проблем
Відсутні залежності
Стандартна установка повинна включати всі необхідні інструменти для ROS 2.
Якщо щось відсутнє, його можна додати окремо:
colconbuild tools should be in the development tools. Можна встановити за допомогою:shsudo apt install python3-colcon-common-extensionsБібліотеку Eigen3, яку використовує бібліотека трансформацій, повинно бути в обох пакунків: desktop та base. Воно повинно бути встановлено, як показано:
:::
::::
ros_gz_bridge not publishing on the \clock topic
If your ROS2 nodes use the Gazebo clock as time source but the ros_gz_bridge node doesn't publish anything on the /clock topic, you may have the wrong version installed. This might happen if you install ROS 2 Humble with the default "Ignition Fortress" packages, rather than using those for PX4, which uses "Gazebo Harmonic".
The following commands uninstall the default Ignition Fortress topics and install the correct bridge and other interface topics for Gazebo Harmonic with ROS2 Humble:
bash
# Remove the wrong version (for Ignition Fortress)
sudo apt remove ros-humble-ros-gz

# Install the version for Gazebo Garden
sudo apt install ros-humble-ros-gzharmonic
Додаткова інформація
- ROS 2 in PX4: Technical Details of a Seamless Transition to XRCE-DDS - Pablo Garrido & Nuno Marques (youtube)
- DDS and ROS middleware implementations