Симуляція Gazebo Classic
WARNING
Gazebo is nearing feature-parity with Gazebo Classic on PX4, and will soon replace it. Until then you can continue to use Gazebo-Classic on Ubuntu 22.04 for the few cases where you still need to. For more information see PX4-Autopilot#23602: GZ Feature tracker.
Gazebo Classic - це потужне середовище 3D симуляції для автономних систем яке зокрема підходить для перевірки уникання об'єктів та комп'ютерного зору. Ця сторінка описує її використання з SITL та єдиним рухомим засобом. Gazebo Classic can also be used with HITL and for multi-vehicle simulation.
Supported Vehicles: Quad (Iris, Hex (Typhoon H480), Generic Standard VTOL (QuadPlane), Tailsitter, Plane, Rover, Submarine/UUV.
INFO
See Simulation for general information about simulators, the simulation environment, and simulation configuration (e.g. supported vehicles).
Встановлення
INFO
If you plan to use PX4 with ROS you should follow the ROS Instructions to install both ROS and Gazebo Classic (and thereby avoid installation conflicts).
The standard installation script (/Tools/setup/ubuntu.sh) installs the Gazebo (Harmonic) simulator. If you want to use Gazebo Classic on Ubuntu 22.04 (only) you can use the following commands to remove Gazebo and then reinstall Gazebo-Classic 11:
sh
sudo apt remove gz-harmonic
sudo apt install aptitude
sudo aptitude install gazebo libgazebo11 libgazebo-dev
Note that aptitude is needed because it can resolve dependency conflicts (by removing certain packages) that apt is unable to handle.
TIP
You could also modify the installation script to install Gazebo Classic on Ubuntu 22.04 before it is run for the first time.
Запуск симуляції
Run a simulation by starting PX4 SITL and Gazebo Classic with the airframe configuration to load (multicopters, planes, VTOL, optical flow and multi-vehicle simulations are supported).
The easiest way to do this is to open a terminal in the root directory of the PX4 PX4-Autopilot repository and call make for the desired target. For example, to start a quadrotor simulation (the default):
sh
cd /path/to/PX4-Autopilot
make px4_sitl gazebo-classic
The supported vehicles and make commands are listed below (click links to see vehicle images).
INFO
For the full list of build targets run make px4_sitl list_vmd_make_targets (and filter on those that start with gazebo-classic_).
| Транспортний засіб | Команда |
|---|---|
| Quadrotor | make px4_sitl gazebo-classic |
| Quadrotor with Optical Flow | make px4_sitl gazebo-classic_iris_opt_flow |
| Quadrotor with Depth Camera (forward-facing) | make px4_sitl gazebo-classic_iris_depth_camera |
| Quadrotor with Depth Camera (downward-facing) | make px4_sitl gazebo-classic_iris_downward_depth_camera |
| 3DR Solo (Quadrotor) | make px4_sitl gazebo-classic_solo |
| Typhoon H480 (Hexrotor) (with video streaming) | make px4_sitl gazebo-classic_typhoon_h480 |
| Standard Plane | make px4_sitl gazebo-classic_plane |
| Standard Plane (with catapult launch) | make px4_sitl gazebo-classic_plane_catapult |
| Standard VTOL | make px4_sitl gazebo-classic_standard_vtol |
| Tailsitter VTOL | make px4_sitl gazebo-classic_tailsitter |
| HippoCampus TUHH (UUV: Unmanned Underwater Vehicle) | make px4_sitl gazebo-classic_uuv_hippocampus |
| Boat (USV: Unmanned Surface Vehicle) | make px4_sitl gazebo-classic_boat |
| Cloudship (Airship) | make px4_sitl gazebo-classic_cloudship |
INFO
The Installing Files and Code guide is a useful reference if there are build errors.
Вищенаведені команди запускають єдиний засіб з повним користувацьким інтерфейсом. Other options include:
- Starting PX4 and Gazebo separately so that you can keep Gazebo Classic running and only re-launch PX4 when needed (quicker than restarting both).
- Run the simulation in Headless Mode, which does not start the Gazebo Classic UI (this uses fewer resources and is much faster).
Підйом у небо
The make commands above first build PX4, and then run it along with the Gazebo Classic simulator.
Once PX4 has started it will launch the PX4 shell as shown below.
sh
______  __   __    ___
| ___ \ \ \ / /   /   |
| |_/ /  \ V /   / /| |
|  __/   /   \  / /_| |
| |     / /^\ \ \___  |
\_|     \/   \/     |_/

px4 starting.

INFO  [px4] Calling startup script: /bin/sh etc/init.d-posix/rcS 0
INFO  [param] selected parameter default file eeprom/parameters_10016
[param] Loaded: eeprom/parameters_10016
INFO  [dataman] Unknown restart, data manager file './dataman' size is 11798680 bytes
INFO  [simulator] Waiting for simulator to connect on TCP port 4560
Gazebo multi-robot simulator, version 9.0.0
Copyright (C) 2012 Open Source Robotics Foundation.
Released under the Apache 2 License.
https://gazebosim.org/home
...
INFO  [ecl/EKF] 5188000: commencing GPS fusion
The console will print out status as PX4 loads the airframe-specific initialisation and parameter files, waits for (and connects to) the simulator. Once there is an INFO print that [ecl/EKF] is commencing GPS fusion the vehicle is ready to arm.
INFO
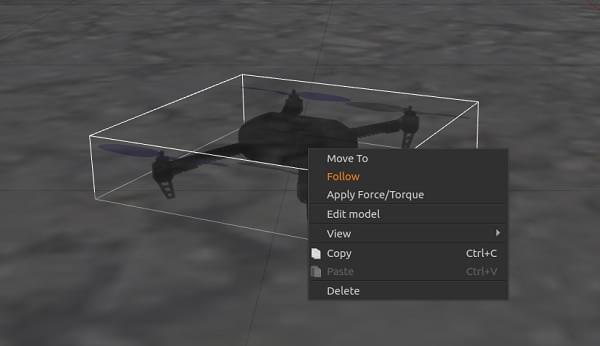
Right-clicking the quadrotor model allows to enable follow mode from the context menu, which is handy to keep it in view.

Ви можете підняти його у повітря надрукувавши:
sh
pxh> commander takeoffВикористання/Налаштування
Options that apply to all simulators are covered in the top level Simulation topic (some of these may be duplicated below).
Імітація відмови датчика/обладнання
Simulate Failsafes explains how to trigger safety failsafes like GPS failure and battery drain.
Режим без інтерфейсу
Gazebo Classic can be run in a headless mode in which the Gazebo Classic UI is not launched. This starts up more quickly and uses less system resources (i.e. it is a more "lightweight" way to run the simulation).
Simply prefix the normal make command with HEADLESS=1 as shown:
sh
HEADLESS=1 make px4_sitl gazebo-classic_planeВстановлення власного місця зльоту
The takeoff location in Gazebo Classic can be set using environment variables. This will override both the default takeoff location, and any value set for the world.
The variables to set are: PX4_HOME_LAT, PX4_HOME_LON, and PX4_HOME_ALT.
Наприклад:
sh
export PX4_HOME_LAT=28.452386
export PX4_HOME_LON=-13.867138
export PX4_HOME_ALT=28.5
make px4_sitl gazebo-classic
Зміна швидкості симуляції
The simulation speed can be increased or decreased with respect to realtime using the environment variable PX4_SIM_SPEED_FACTOR.
To run at double real-time:
sh
PX4_SIM_SPEED_FACTOR=2 make px4_sitl_default gazebo-classicTo run at half real-time:
sh
PX4_SIM_SPEED_FACTOR=0.5 make px4_sitl_default gazebo-classicTo apply a factor to all SITL runs in the current session, use EXPORT:
sh
export PX4_SIM_SPEED_FACTOR=2
make px4_sitl_default gazebo-classic
Change Wind Speed
To simulate wind speed, add this plugin to your world file and set windVelocityMean in m/s (replace SET_YOUR_WIND_SPEED with your desired speed). If needed, adapt the windVelocityMax parameter so that it is greater than windVelocityMean:
xml
  <plugin name='wind_plugin' filename='libgazebo_wind_plugin.so'>
      <frameId>base_link</frameId>
      <robotNamespace/>
      <windVelocityMean>SET_YOUR_WIND_SPEED</windVelocityMean>
      <windVelocityMax>20.0</windVelocityMax>
      <windVelocityVariance>0</windVelocityVariance>
      <windDirectionMean>0 1 0</windDirectionMean>
      <windDirectionVariance>0</windDirectionVariance>
      <windGustStart>0</windGustStart>
      <windGustDuration>0</windGustDuration>
      <windGustVelocityMean>0</windGustVelocityMean>
      <windGustVelocityMax>20.0</windGustVelocityMax>
      <windGustVelocityVariance>0</windGustVelocityVariance>
      <windGustDirectionMean>1 0 0</windGustDirectionMean>
      <windGustDirectionVariance>0</windGustDirectionVariance>
      <windPubTopic>world_wind</windPubTopic>
    </plugin>
Wind direction is passed as a direction vector (standard ENU convention), which will be normalized in the gazebo plugin. Additionally you can state wind velocity variance in (m/s)² and direction variance based on a normal distribution to add some random factor into the simulation. Gust is internally handled in the same way as wind, with the slight difference that you can state start time and duration with the following two parameters windGustStart and windGustDuration.
You can see how this is done in PX4/PX4-SITL_gazebo-classic/worlds/windy.world.
Використання джойстика
Joystick and thumb-joystick support are supported through QGroundControl (setup instructions here).
Improving Distance Sensor Performance
The current default world is PX4-Autopilot/Tools/simulation/gazebo-classic/sitl_gazebo-classic/worlds/iris.world), which uses a heightmap as ground.
This can cause difficulty when using a distance sensor. If there are unexpected results we recommend you change the model in iris.model from uneven_ground to asphalt_plane.
Simulating GPS Noise
Gazebo Classic can simulate GPS noise that is similar to that typically found in real systems (otherwise reported GPS values will be noise-free/perfect). This is useful when working on applications that might be impacted by GPS noise - e.g. precision positioning.
GPS noise is enabled if the target vehicle's SDF file contains a value for the gpsNoise element (i.e. it has the line: <gpsNoise>true</gpsNoise>). It is enabled by default in many vehicle SDF files: solo.sdf, iris.sdf, standard_vtol.sdf, delta_wing.sdf, plane.sdf, typhoon_h480, tailsitter.sdf.
To enable/disable GPS noise:
Build any gazebo target in order to generate SDF files (for all vehicles). Наприклад:
shmake px4_sitl gazebo-classic_irisTIP
The SDF files are not overwritten on subsequent builds.
:::
Open the SDF file for your target vehicle (e.g. ./Tools/simulation/gazebo-classic/sitl_gazebo-classic/models/iris/iris.sdf).
Search for the
gpsNoiseelement:xml<plugin name='gps_plugin' filename='libgazebo_gps_plugin.so'> <robotNamespace/> <gpsNoise>true</gpsNoise> </plugin>- If it is present, GPS is enabled. You can disable it by deleting the line:
<gpsNoise>true</gpsNoise> - If it is not present, GPS is disabled. You can enable it by adding the
gpsNoiseelement to thegps_pluginsection (as shown above).
- If it is present, GPS is enabled. You can disable it by deleting the line:
The next time you build/restart Gazebo Classic it will use the new GPS noise setting.
Loading a Specific World
PX4 supports a number of Worlds, which are stored in PX4-Autopilot/Tools/simulation/gazebo-classic/sitl_gazebo-classic/worlds. By default Gazebo Classic displays a flat featureless plane, as defined in empty.world.
You can load any of the worlds by specifying them as the final option in the PX4 configuration target.
For example, to load the warehouse world, you can append it as shown:
sh
make px4_sitl_default gazebo-classic_plane_cam__warehouseINFO
There are two underscores after the model (plane_cam) indicating that the default debugger is used (none). See Building the Code > PX4 Make Build Targets.
You can also specify the full path to a world to load using the PX4_SITL_WORLD environment variable. This is useful if testing a new world that is not yet included with PX4.
TIP
If the loaded world does not align with the map, you may need to set the world location.
Set World Location
The vehicle gets spawned very close to the origin of the world model at some simulated GPS location.
INFO
The vehicle is not spawned exactly at the Gazebo origin (0,0,0), but using a slight offset, which can highlight a number of common coding issues.
If using a world that recreates a real location (e.g. a particular airport) this can result in a very obvious mismatch between what is displayed in the simulated world, and what is shown on the ground station map. To overcome this problem you can set the location of the world origin to the GPS coordinates where it would be in "real life".
INFO
You can also set a Custom Takeoff Location that does the same thing. However adding the location to the map is easier (and can still be over-ridden by setting a custom location if needed).
The location of the world is defined in the .world file by specifying the location of the origin using the spherical_coordinates tag. The latitude, longitude, elevation must all be specified (for this to be a valid).
An example can be found in the sonoma_raceway.world:
xml
    <spherical_coordinates>
      <surface_model>EARTH_WGS84</surface_model>
      <latitude_deg>38.161479</latitude_deg>
      <longitude_deg>-122.454630</longitude_deg>
      <elevation>488.0</elevation>
    </spherical_coordinates>
You can test this by spawning a rover in the Sonoma Raceway World using the following make command (note that spawning takes longer the first time as the model needs to be downloaded from the model database):
sh
make px4_sitl gazebo-classic_rover__sonoma_racewayThe video below shows that the location of the environment is aligned with the world:
Starting Gazebo and PX4 Separately
For extended development sessions it might be more convenient to start Gazebo Classic and PX4 separately or even from within an IDE.
In addition to the existing cmake targets that run sitl_run.sh with parameters for px4 to load the correct model it creates a launcher targets named px4_<mode> that is a thin wrapper around original sitl px4 app. This thin wrapper simply embeds app arguments like current working directories and the path to the model file.
To start Gazebo Classic and PX4 separately:
Run gazebo classic (or any other sim) server and client viewers via the terminal specifying an
_idevariant:shmake px4_sitl gazebo-classic___ideабо
shmake px4_sitl gazebo-classic_iris_ideIn your IDE select
px4_<mode>target you want to debug (e.g.px4_iris)Start the debug session directly from IDE
This approach significantly reduces the debug cycle time because simulator is always running in background and you only re-run the px4 process which is very light.
Simulated Survey Camera
The Gazebo Classic survey camera simulates a MAVLink camera that captures geotagged JPEG images and sends camera capture information to a connected ground station. The camera also supports video streaming. It can be used to test camera capture, in particular within survey missions.
The camera emits the CAMERA_IMAGE_CAPTURED message every time an image is captured. The captured images are saved to: PX4-Autopilot/build/px4_sitl_default/src/modules/simulation/simulator_mavlink/frames/DSC_n.jpg (where n starts as 00000 and is iterated by one on each capture). To simulate a plane with this camera:
sh
make px4_sitl_default gazebo-classic_plane_camINFO
The camera also supports/responds to the following MAVLink commands: MAV_CMD_REQUEST_CAMERA_CAPTURE_STATUS, MAV_CMD_REQUEST_STORAGE_INFORMATION, MAV_CMD_REQUEST_CAMERA_SETTINGS, MAV_CMD_REQUEST_CAMERA_INFORMATION, MAV_CMD_RESET_CAMERA_SETTINGS, MAV_CMD_STORAGE_FORMAT, MAV_CMD_SET_CAMERA_ZOOM, MAV_CMD_IMAGE_START_CAPTURE, MAV_CMD_IMAGE_STOP_CAPTURE, MAV_CMD_REQUEST_VIDEO_STREAM_INFORMATION, MAV_CMD_REQUEST_VIDEO_STREAM_STATUS, MAV_CMD_SET_CAMERA_MODE.
INFO
The simulated camera is implemented in PX4/PX4-SITL_gazebo-classic/main/src/gazebo_camera_manager_plugin.cpp.
Simulated Depth Camera
The Gazebo Classic depth camera model simulates an Intel® RealSense™ D455 stereo depth camera using the Openni Kinect plugin.
This publishes depth images and camera information on the /camera/depth/image_raw and /camera/depth/camera_info ROS topics respectively.
To use these images, you will need to install ROS or ROS 2. Note the warning at the top of this page about how to "avoid installation conflicts" when installing ROS and Gazebo.
You can simulate a quadrotor with a forward-facing depth camera:
sh
make px4_sitl gazebo-classic_iris_depth_cameraor a quadrotor with a downward-facing depth camera:
sh
make px4_sitl gazebo-classic_iris_downward_depth_cameraSimulated Parachute/Flight Termination
Gazebo Classic can be used to simulate deploying a parachute during Flight Termination (flight termination is triggered by the PWM command that is simulated in Gazebo Classic).
The if750a target has a parachute attached to the vehicle. To simulate the vehicle, run the following command:
sh
make px4_sitl gazebo-classic_if750aTo put the vehicle into flight termination state, you can force it to fail a safety check that has flight termination set as the failsafe action. For example, you could do this by forcing a Geofence violation.
Для додаткової інформації дивіться:
Video Streaming
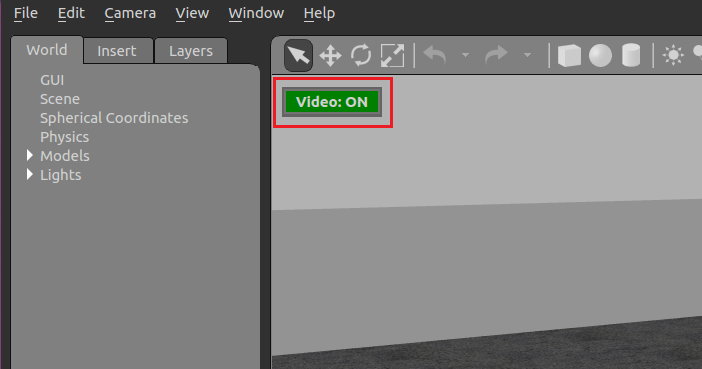
PX4 SITL for Gazebo Classic supports UDP video streaming from a camera sensor attached to a simulated vehicle model. When streaming is enabled, you can connect to this stream from QGroundControl (on UDP port 5600) and view video of the Gazebo Classic environment from the simulated vehicle - just as you would from a real camera. The video is streamed using a gstreamer pipeline and can be enabled/disabled using a button in the Gazebo Classic UI.
The simulated camera sensor is supported/enabled on the following frames:
Вимоги
Gstreamer 1.0 is required for video streaming. The required dependencies should already have been installed when you set up Gazebo Classic (they are included in the standard PX4 installation scripts/instructions for macOS and Ubuntu Linux).
INFO
FYI only, the dependencies include: gstreamer1.0-plugins-base, gstreamer1.0-plugins-good, gstreamer1.0-plugins-bad, gstreamer1.0-plugins-ugly, libgstreamer-plugins-base1.0-dev.
Start/Stop Video Streaming
Video streaming is automatically started when supported by the target vehicle. For example, to start streaming video on the Typhoon H480:
sh
make px4_sitl gazebo-classic_typhoon_h480Streaming can be paused/restarted using the Gazebo UI Video ON/OFF button..

How to View Gazebo Video
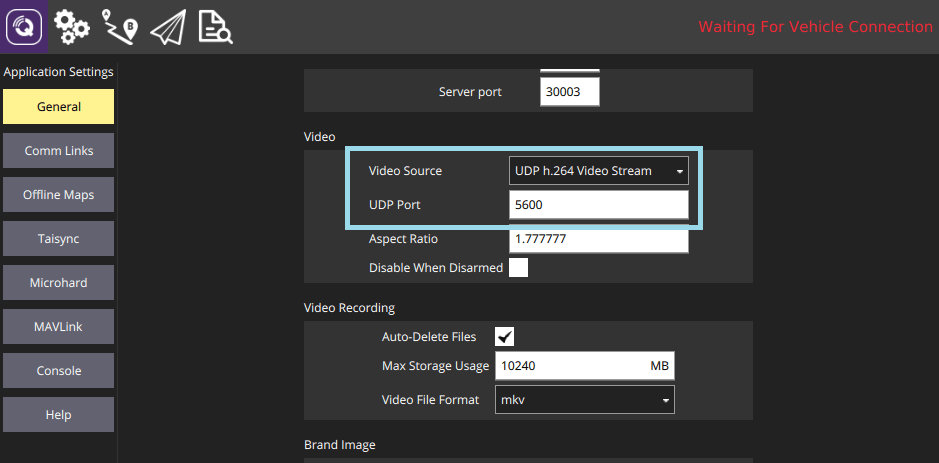
The easiest way to view the SITL/Gazebo Classic camera video stream is in QGroundControl. Simply open Application Settings > General and set Video Source to UDP h.264 Video Stream and UDP Port to 5600:

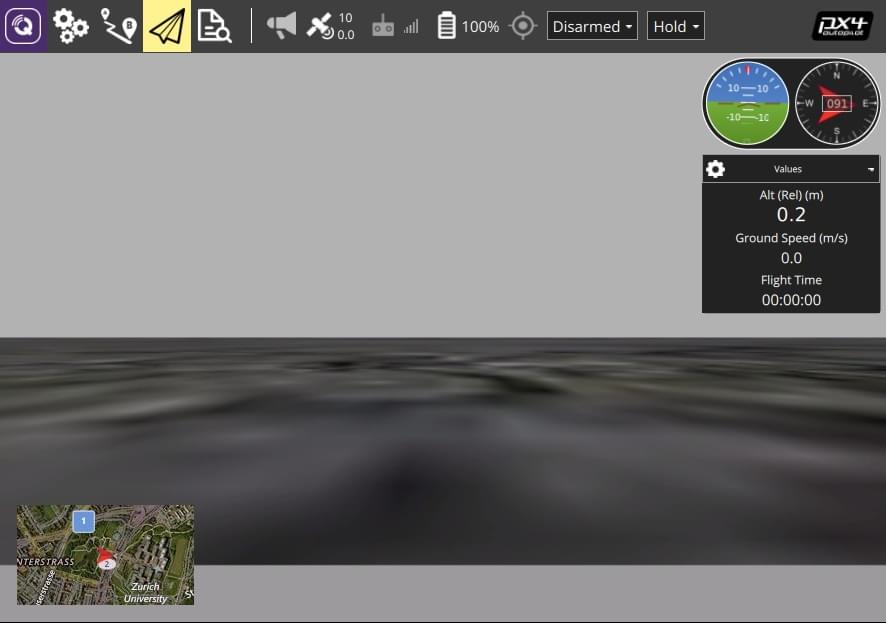
The video from Gazebo Classic should then display in QGroundControl just as it would from a real camera.

INFO
The Typhoon world is not very interesting.
It is also possible to view the video using the Gstreamer Pipeline. Simply enter the following terminal command:
sh
gst-launch-1.0  -v udpsrc port=5600 caps='application/x-rtp, media=(string)video, clock-rate=(int)90000, encoding-name=(string)H264' \
! rtph264depay ! avdec_h264 ! videoconvert ! autovideosink fps-update-interval=1000 sync=false
Докладне ведення журналу
SITL fails silently when there is something wrong with the model. You can enable more verbose logging using VERBOSE_SIM, as shown:
sh
export VERBOSE_SIM=1
make px4_sitl gazebo-classic
або
sh
VERBOSE_SIM=1 make px4_sitl gazebo-classicLockstep
PX4 SITL and Gazebo-Classic have been set up to run in lockstep. What this means is that PX4 and the simulator run at the same speed, and therefore can react appropriately to sensor and actuator messages. Lockstep makes it possible to change the simulation speed, and also to pause it in order to step through code.
Lockstep Sequence
The sequence of steps for lockstep are:
- The simulation sends a sensor message HIL_SENSOR including a timestamp
time_usecto update the sensor state and time of PX4. - PX4 receives this and does one iteration of state estimation, controls, etc. and eventually sends an actuator message HIL_ACTUATOR_CONTROLS.
- The simulation waits until it receives the actuator/motor message, then simulates the physics and calculates the next sensor message to send to PX4 again.
The system starts with a "freewheeling" period where the simulation sends sensor messages including time and therefore runs PX4 until it has initialized and responds with an actuator message.
Disabling Lockstep
The lockstep simulation can be disabled if, for example, SITL is to be used with a simulator that does not support this feature. In this case the simulator and PX4 use the host system time and do not wait on each other.
To disable lockstep in:
- PX4, run
make px4_sitl_default boardconfigand set theBOARD_NOLOCKSTEP"Force disable lockstep" symbol which is located under toolchain. - Gazebo Classic, edit the model SDF file and set
<enable_lockstep>false</enable_lockstep>.
Розширення та персоналізація
To extend or customize the simulation interface, edit the files in the Tools/simulation/gazebo/sitl_gazebo folder. The code is available on the sitl_gazebo repository on GitHub.
INFO
The build system enforces the correct GIT submodules, including the simulator. It will not overwrite changes in files in the directory.
