PX4 Bootloader Flashing onto Betaflight Systems
This page documents how to flash the PX4 bootloader onto boards that are already flashed with Betaflight (e.g. OmnibusF4 SD or Kakute F7).
There are three tools that can be used to flash the PX4 bootloader: Betaflight Configurator, dfu-util command line tool, or the graphical dfuse (Windows only).
INFO
The Betaflight Configurator is easiest, but newer versions may not support non-betaflight bootloader update. You might try it first, but use the other methods if firmware update does not work.
Betaflight Configurator Bootloader Update
INFO
Betaflight Configurator may not support PX4 Bootloader update, as of May 2023. Older versions should work, though the precise versions are not known.
To install the PX4 bootloader using the Betaflight Configurator:
Download or build bootloader firmware for the board you want to flash.
Download the Betaflight Configurator for your platform.
TIP
If using the Chrome web browser, a simple cross-platform alternative is to install the configurator as an extension from here.
Connect the board to your PC and start the Configurator.
Press the Load Firmware [Local] button
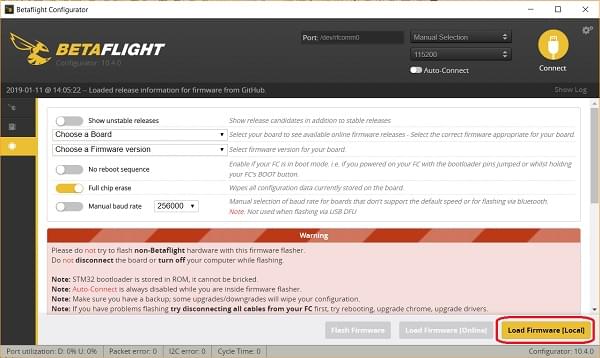
Select the bootloader binary from the file system and then flash the board.
You should now be able to install PX4 firmware on the board.
DFU Bootloader Update
This section explains how to flash the PX4 bootloader using the dfu-util or the graphical dfuse tool (Windows only).
You will first need to download or build bootloader firmware for the board you want to flash (below, this is referred to as <target.bin>).
INFO
All of the methods below are safe as the STM32 MCU cannot be bricked! DFU cannot be overwritten by flashing and will always allow you to install a new firmware, even if flashing fails.
DFU mode
Both tools require the board to be in DFU mode. To enter DFU mode, hold the boot button down while connecting the USB cable to your computer. The button can be released after the board has powered up.
dfu-util
INFO
The Holybro Kakute H7 v2, Holybro Kakute H7 and mini flight controllers may require that you first run an additional command to erase flash parameters (in order to fix problems with parameter saving):
dfu-util -a 0 --dfuse-address 0x08000000:force:mass-erase:leave -D build/<target>/<target>.binThe command may generate an error which can be ignored. Once completed, enter DFU mode again to complete the regular flashing.
To flash the bootloader onto the flight controller:
dfu-util -a 0 --dfuse-address 0x08000000 -D build/<target>/<target>.binReboot the flight controller and it let it boot without holding the boot button.
dfuse
The dfuse manual can be found here: https://www.st.com/resource/en/user_manual/cd00155676.pdf
Use the tool to flash the <target>.bin file.
Bootloader Firmware
The tools above flash pre-built bootloader firmware. Bootloader firmware can be built for most targets using the normal PX4 source code, while other targets can only be build using source in the bootloader repository.
Flight controllers that have bootloader PX4-Autopilot make targets, can build the bootloader from the PX4-Autopilot source. The list of controllers for which this applies can be obtained by running the following make command, and noting the make targets that end in _bootloader
$ make list_config_targets

...
cuav_nora_bootloader
cuav_x7pro_bootloader
cubepilot_cubeorange_bootloader
holybro_durandal-v1_bootloader
holybro_kakuteh7_bootloader
holybro_kakuteh7v2_bootloader
holybro_kakuteh7mini_bootloader
matek_h743-mini_bootloader
matek_h743-slim_bootloader
modalai_fc-v2_bootloader
mro_ctrl-zero-classic_bootloader
mro_ctrl-zero-h7_bootloader
mro_ctrl-zero-h7-oem_bootloader
mro_pixracerpro_bootloader
px4_fmu-v6u_bootloader
px4_fmu-v6x_bootloader
To build for these flight controllers, download and build the PX4-Autopilot source, and then make the target using the following commands:
git clone --recursive https://github.com/PX4/PX4-Autopilot.git
cd PX4-Autopilot
make <target> # For example: holybro_kakuteh7mini_bootloader
For other flight controllers download the PX4/Bootloader repository and build the source code using the appropriate targets:
git clone --recursive  https://github.com/PX4/PX4-Bootloader.git
cd Bootloader
make <target> # For example: omnibusf4sd_bl or kakutef7_bl
Reinstall Betaflight
In order to switch back to Betaflight:
- Backup the PX4 parameters. You can do this by exporting them to an SD card.
- Keep the bootloader button pressed while attaching the USB cable
- Flash Betaflight as usual with the Betaflight-configurator