Building PX4 Software
PX4 firmware can be built from source code on the console or in an IDE, for both simulated and hardware targets.
You need to build PX4 in order to use simulators, or if you want to modify PX4 and create a custom build. If you just want to try out PX4 on real hardware then load the prebuilt binaries using QGroundControl (there is no need to follow these instructions).
INFO
Before following these instructions you must first install the Developer Toolchain for your host operating system and target hardware. If you have any problems after following these steps see the Troubleshooting section below.
Download the PX4 Source Code
The PX4 source code is stored on Github in the PX4/PX4-Autopilot repository.
To get the very latest (main branch) version onto your computer, enter the following command into a terminal:
git clone https://github.com/PX4/PX4-Autopilot.git --recursiveNote that you may already have done this when installing the Developer Toolchain
INFO
This is all you need to do in order to get the latest code. If needed you can also get the source code specific to a particular release. GIT Examples provides a lot more information working with releases and contributing to PX4.
First Build (Using a Simulator)
First we'll build a simulated target using a console environment. This allows us to validate the system setup before moving on to real hardware and an IDE.
Navigate into the PX4-Autopilot directory and start Gazebo SITL using the following command:
make px4_sitl gz_x500This will bring up the PX4 console:

INFO
You may need to start QGroundControl before proceeding, as the default PX4 configuration requires a ground control connection before takeoff. This can be downloaded from here.
The drone can be flown by typing the following command (as shown in the console above):
pxh> commander takeoffThe vehicle will take off and you'll see this in the Gazebo simulator UI:
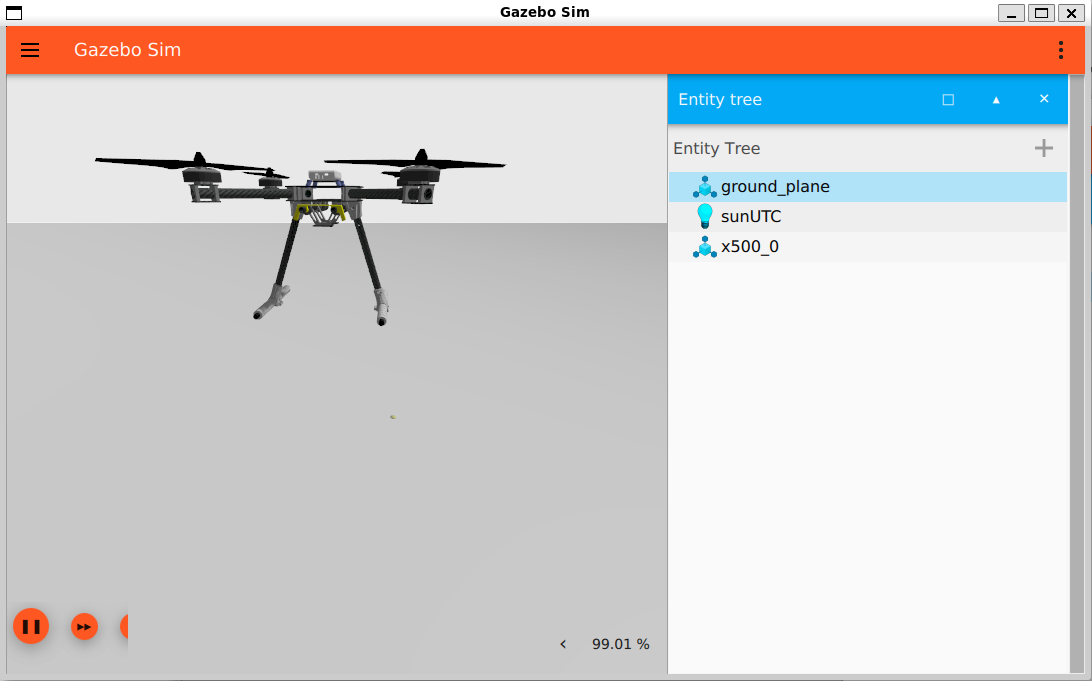
The drone can be landed by typing commander land and the whole simulation can be stopped by doing CTRL+C (or by entering shutdown).
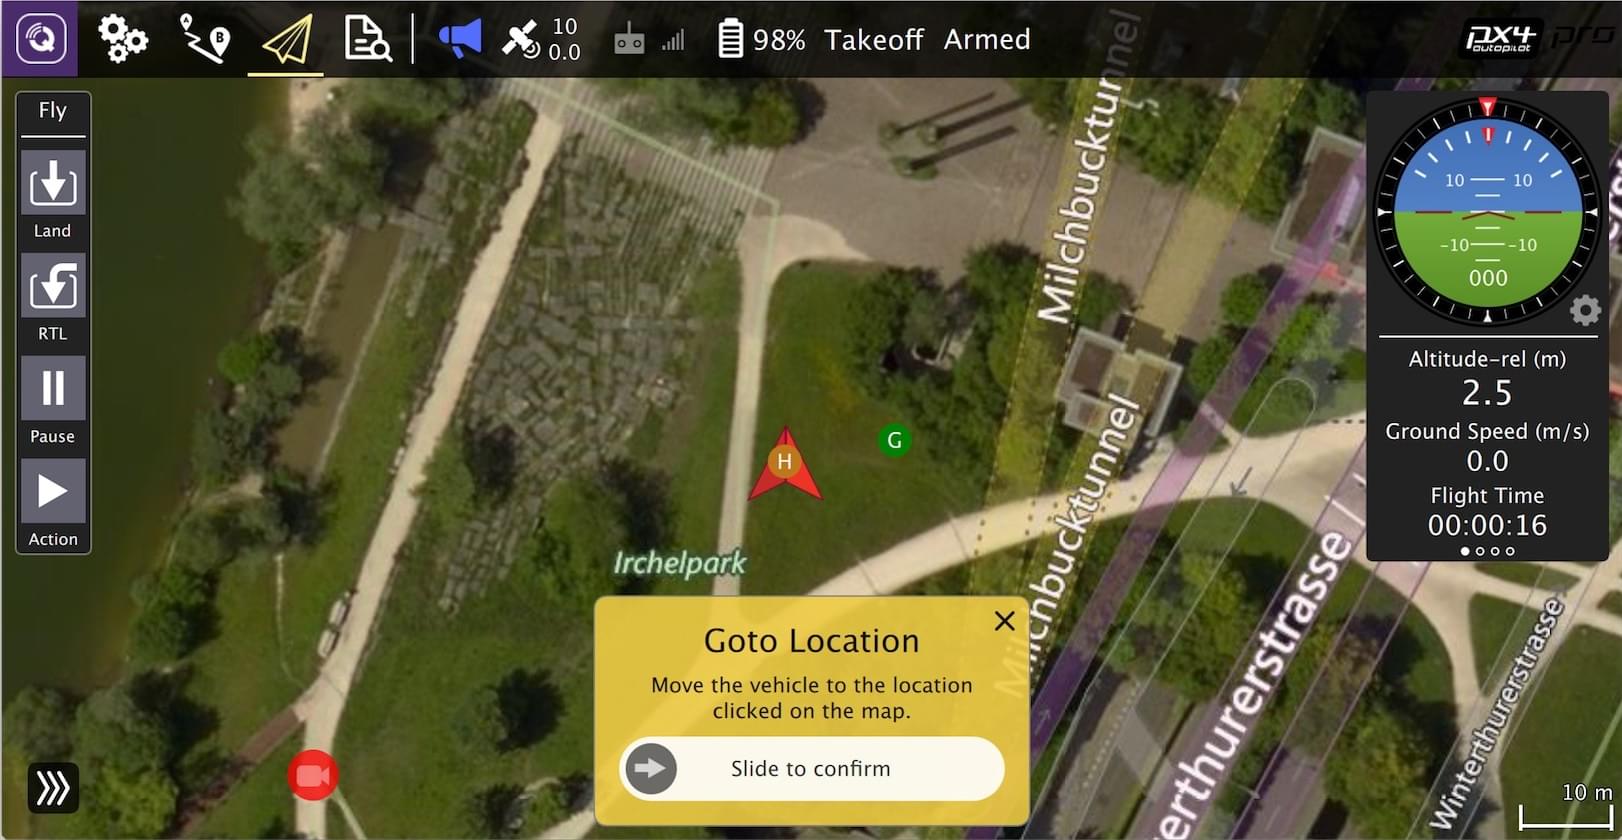
Flying the simulation with the ground control station is closer to the real operation of the vehicle. Click on a location in the map while the vehicle is flying (takeoff flight mode) and enable the slider. This will reposition the vehicle.
NuttX / Pixhawk Based Boards
Building for NuttX
To build for NuttX- or Pixhawk- based boards, navigate into the PX4-Autopilot directory and then call make with the build target for your board.
For example, to build for Pixhawk 4 hardware you could use the following command:
cd PX4-Autopilot
make px4_fmu-v5_default
TIP
You can also build using the px4-dev Docker container without installing the toolchain locally. From the PX4-Autopilot directory:
./Tools/docker_run.sh 'make px4_fmu-v5_default'A successful run will end with similar output to:
-- Build files have been written to: /home/youruser/src/PX4-Autopilot/build/px4_fmu-v4_default
[954/954] Creating /home/youruser/src/PX4-Autopilot/build/px4_fmu-v4_default/px4_fmu-v4_default.px4
The first part of the build target px4_fmu-v4 indicates the target flight controller hardware for the firmware. The suffix, in this case _default, indicates a firmware configuration, such as supporting or omitting particular features.
INFO
The _default suffix is optional. For example, make px4_fmu-v5 and px4_fmu-v5_default result in the same firmware.
The following list shows the build commands for the Pixhawk standard boards:
Holybro Pixhawk 6X-RT (FMUv6X):
make px4_fmu-v6xrt_defaultHolybro Pixhawk 6X (FMUv6X):
make px4_fmu-v6x_defaultHolybro Pixhawk 6C (FMUv6C):
make px4_fmu-v6c_defaultHolybro Pixhawk 6C Mini (FMUv6C):
make px4_fmu-v6c_defaultHolybro Pix32 v6 (FMUv6C):
make px4_fmu-v6c_defaultHolybro Pixhawk 5X (FMUv5X):
make px4_fmu-v5x_defaultPixhawk 4 (FMUv5):
make px4_fmu-v5_defaultPixhawk 4 Mini (FMUv5):
make px4_fmu-v5_defaultCUAV V5+ (FMUv5):
make px4_fmu-v5_default- DiscontinuedCUAV V5 nano (FMUv5):
make px4_fmu-v5_default- DiscontinuedPixracer (FMUv4):
make px4_fmu-v4_defaultPixhawk 3 Pro:
make px4_fmu-v4pro_defaultPixhawk Mini:
make px4_fmu-v3_defaultPixhawk 2 (Cube Black) (FMUv3):
make px4_fmu-v3_defaultmRo Pixhawk (FMUv3):
make px4_fmu-v3_default(supports 2MB Flash)Holybro pix32 (FMUv2):
make px4_fmu-v2_default- DiscontinuedPixfalcon (FMUv2):
make px4_fmu-v2_default- DiscontinuedDropix (FMUv2):
make px4_fmu-v2_default- DiscontinuedPixhawk 1 (FMUv2):
make px4_fmu-v2_default- DiscontinuedWARNING
You must use a supported version of GCC to build this board (e.g. the
gcc-arm-none-eabipackage from the current Ubuntu LTS, which is the same toolchain used by CI) or remove modules from the build. Building with an unsupported GCC may fail, as PX4 is close to the board's 1MB flash limit.Pixhawk 1 with 2 MB flash:
make px4_fmu-v3_default
Build commands for non-Pixhawk NuttX fight controllers (and for all other-boards) are provided in the documentation for the individual flight controller boards.
Uploading Firmware (Flashing the board)
Append upload to the make commands to upload the compiled binary to the autopilot hardware via USB. For example
make px4_fmu-v4_default uploadA successful run will end with this output:
Erase  : [====================] 100.0%
Program: [====================] 100.0%
Verify : [====================] 100.0%
Rebooting.

[100%] Built target upload
TIP
This is not supported when developing on WSL2. See Windows Development Environment (WSL2-Based) > Flash a Control Board.
Other Boards
Build commands for other boards are given the board-specific flight controller pages (usually under a heading Building Firmware).
You can also list all configuration targets using the command:
make list_config_targetsCompiling in a Graphical IDE
VSCode is the officially supported (and recommended) IDE for PX4 development. It is easy to set up and can be used to compile PX4 for both simulation and hardware environments.
Troubleshooting
General Build Errors
Many build problems are caused by either mismatching submodules or an incompletely cleaned-up build environment. Updating the submodules and doing a distclean can fix these kinds of errors:
git submodule update --recursive
make distclean
Flash overflowed by XXX bytes
The region 'flash' overflowed by XXXX bytes error indicates that the firmware is too large for the target hardware platform. This is common for make px4_fmu-v2_default builds, where the flash size is limited to 1MB.
If you're building the vanilla master branch, the most likely cause is using an unsupported version of GCC. In this case, install the gcc-arm-none-eabi package from the current Ubuntu LTS as described in the Developer Toolchain instructions.
If building your own branch, it is possible that you have increased the firmware size over the 1MB limit. In this case you will need to remove any drivers/modules that you don't need from the build.
macOS: Too many open files error
MacOS allows a default maximum of 256 open files in all running processes. The PX4 build system opens a large number of files, so you may exceed this number.
The build toolchain will then report Too many open files for many files, as shown below:
arm-none-eabi-ld: cannot find NuttX/nuttx/fs/libfs.a: Too many open filesThe solution is to increase the maximum allowed number of open files (e.g. to 300). You can do this in the macOS Terminal for each session:
Run this script Tools/mac_set_ulimit.sh, or
Enter this command:
shulimit -S -n 300
macOS Catalina: Problem running cmake
As of macOS Catalina 10.15.1 there may be problems when trying to build the simulator with cmake. If you have build problems on this platform then try run the following command in your terminal:
xcode-select --install
sudo ln -s /Library/Developer/CommandLineTools/SDKs/MacOSX.sdk/usr/include/* /usr/local/include/
Failed to import Python packages
"Failed to import" errors when running the make px4_sitl gz_x500 command indicates that some Python packages are not installed (where expected).
Failed to import jinja2: No module named 'jinja2'
You may need to install it using:
    pip3 install --user jinja2
If you have already installed these dependencies this may be because there is more than one Python version on the computer (e.g. Python 2.7.16 and Python 3.8.3), and the module is not present in the version used by the build toolchain.
You should be able to fix this by installing the dependencies from the repository's requirements file:
pip3 install --user -r Tools/setup/requirements.txtPX4 Make Build Targets
The previous sections showed how you can call make to build a number of different targets, start simulators, use IDEs etc. This section shows how make options are constructed and how to find the available choices.
The full syntax to call make with a particular configuration and initialization file is:
make [VENDOR_][MODEL][_VARIANT] [VIEWER_MODEL_DEBUGGER_WORLD]VENDOR_MODEL_VARIANT: (also known as CONFIGURATION_TARGET)
- VENDOR: The manufacturer of the board:
px4,aerotenna,airmind,atlflight,auav,beaglebone,intel,nxp, etc. The vendor name for Pixhawk series boards ispx4. - MODEL: The board model "model":
sitl,fmu-v2,fmu-v3,fmu-v4,fmu-v5,navio2, etc. - VARIANT: Indicates particular configurations: e.g.
bootloader,cyphal,sih, which add or remove components to/from thedefaultconfiguration. Most commonly this isdefault, and may be omitted.
TIP
You can get a list of all available CONFIGURATION_TARGET options using the command below:
make list_config_targetsVIEWER_MODEL_DEBUGGER_WORLD:
VIEWER: This is the simulator ("viewer") to launch and connect:
gz,gazebo,jmavsim,noneTIP
nonecan be used if you want to launch PX4 and wait for a simulator (jmavsim, Gazebo, Gazebo Classic, or some other simulator). For example,make px4_sitl none_irislaunches PX4 without a simulator (but with the iris airframe).MODEL: The vehicle model to use (e.g.
iris(default),rover,tailsitter, etc), which will be loaded by the simulator. The environment variablePX4_SIM_MODELwill be set to the selected model, which is then used in the startup script to select appropriate parameters.DEBUGGER: Debugger to use:
none(default),ide,gdb,lldb,ddd,valgrind,callgrind. For more information see Simulation Debugging.WORLD: (Gazebo Classic only). Set the world (PX4-Autopilot/Tools/simulation/gazebo-classic/sitl_gazebo-classic/worlds) that is loaded. Default is empty.world. For more information see Gazebo Classic > Loading a Specific World.
TIP
You can get a list of all available VIEWER_MODEL_DEBUGGER_WORLD options using the command below:
make px4_sitl list_vmd_make_targetsINFO
- Most of the values in the
CONFIGURATION_TARGETandVIEWER_MODEL_DEBUGGERhave defaults, and are hence optional. For example,gazebo-classicis equivalent togazebo-classic_irisorgazebo-classic_iris_none. - You can use three underscores if you want to specify a default value between two other settings. For example,
gazebo-classic___gdbis equivalent togazebo-classic_iris_gdb. - You can use a
nonevalue forVIEWER_MODEL_DEBUGGERto start PX4 and wait for a simulator. For example start PX4 usingmake px4_sitl_default noneand jMAVSim using./Tools/simulation/jmavsim/jmavsim_run.sh -l.
The VENDOR_MODEL_VARIANT options map to particular px4board configuration files in the PX4 source tree under the /boards directory. Specifically VENDOR_MODEL_VARIANT maps to a configuration file boards/VENDOR/MODEL/VARIANT.px4board (e.g. px4_fmu-v5_default corresponds to boards/px4/fmu-v5/default.px4board).
Additional make targets are discussed in relevant sections:
bloaty_compare_master: Binary Size Profiling- ...
Firmware Version & Git Tags
The PX4 Firmware Version and Custom Firmware Version are published using the MAVLink AUTOPILOT_VERSION message, and displayed in the QGroundControl Setup > Summary airframe panel:
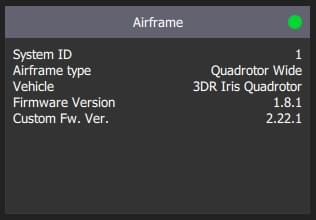
These are extracted at build time from the active git tag for your repo tree. The git tag should be formatted as <PX4-version>-<vendor-version> (e.g. the tag in the image above was set to v1.8.1-2.22.1).
WARNING
If you use a different git tag format, versions information may not be displayed properly.