
Garmin LIDAR-Lite
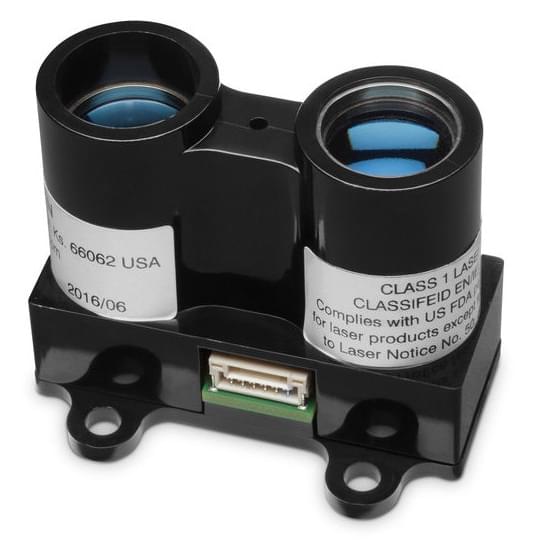
PX4 v1.1The Garmin LIDAR-Lite v3 is a compact laser time-of-flight rangefinder with a range of up to 40 m (PX4 caps this to 35 m or less). It connects to the flight controller using either I2C or PWM.
INFO
The driver for the PWM connection is not included in PX4 firmware by default. See Firmware Support for how to check your board and add it.
Supported Models
| Model | Range | Connection | Notes |
|---|---|---|---|
| LIDAR-Lite v3 | Up to 40 m | I2C, PWM | |
| LIDAR-Lite v3HP | I2C | ||
| LIDAR-Lite v4 LED | I2C | PX4 caps the range to 10 m. | |
| LIDAR-Lite v2 | I2C, PWM | ||
| LIDAR-Lite v1 | I2C, PWM |
The rest of this page describes the LIDAR-Lite v3, unless otherwise stated.
Specifications
The following specifications are for the LIDAR-Lite v3.
- Technology: Laser time-of-flight (905 nm)
- Range: Up to 40 m (70% reflective target)
- Update rate: 270 Hz typical, 650 Hz in fast mode (PX4 samples at up to 100 Hz on I2C, and at 20 Hz on PWM)
- Beam divergence: 8 mrad
- Accuracy: ±2.5 cm typical below 5 m, ±10 cm typical at 5 m and above
- Resolution: ±1 cm
- Interface: I2C (address
0x62), PWM - Input voltage: 5 V DC nominal (4.5–5.5 V)
- Current draw: 105 mA idle, 135 mA in continuous operation
- Dimensions: 20 x 48 x 40 mm
- Weight: 22 g
- Operating temperature: -20 to 60 °C
- Laser class: Class 1
Where to Buy
- LIDAR-Lite v3 (Garmin)
Hardware Setup
Mounting
PX4 assumes that the rangefinder is facing down (the orientation cannot be configured).
Pinouts
The LIDAR-Lite v3 has a 6-pin connector that mates with a JST GH housing (GHR-06V-S, 1.25 mm pitch).
| Pin | Wire colour | Signal | Description |
|---|---|---|---|
| 1 | Red | 5 V DC (+) | Power supply. 5 V DC nominal (4.5–5.5 V). |
| 2 | Orange | Power enable | Internal pull-up. Can be driven low to shut off power to the sensor. |
| 3 | Yellow | Mode control | PWM interface: pull low to trigger a measurement; returns a pulse (10 μs/cm). |
| 4 | Green | I2C SCL | I2C clock |
| 5 | Blue | I2C SDA | I2C data |
| 6 | Black | Ground (-) | Signal and power ground |
Wiring
The LIDAR-Lite v3 can be connected using either I2C or PWM. Older LIDAR-Lite generations (v1 and v2) were reported to have I2C problems, and PWM was recommended for them.
The sensor requires a 5 V DC supply, and draws up to 135 mA in continuous operation. Check that the flight controller port can supply this, or power the sensor from a separate supply that shares a ground with the flight controller.
I2C
Connect the sensor to an external I2C port on the flight controller.
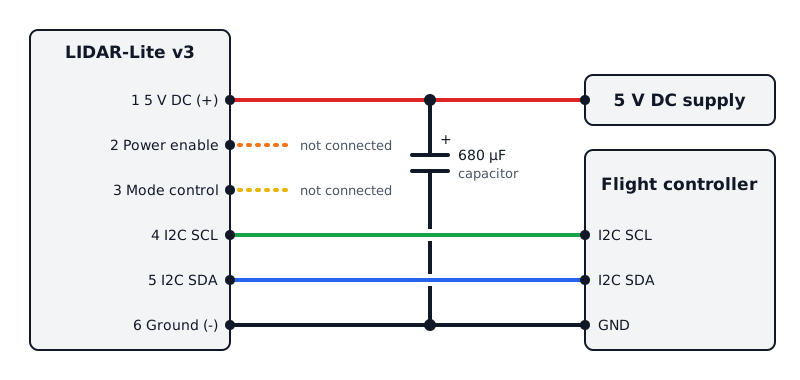
| LIDAR-Lite v3 pin | Wire colour | Connect to |
|---|---|---|
| 1 (5 V DC) | Red | 5 V DC supply |
| 4 (I2C SCL) | Green | Flight controller I2C SCL |
| 5 (I2C SDA) | Blue | Flight controller I2C SDA |
| 6 (Ground) | Black | Flight controller GND |
Pins 2 (power enable) and 3 (mode control) are not connected.
Garmin's standard I2C wiring also requires a 680 μF electrolytic capacitor between the 5 V DC and ground wires (observe the polarity).
The sensor uses the I2C address 0x62.
PWM
INFO
The PWM connection is not as well tested as I2C.
PX4 reads the sensor's PWM output on the flight controller's PWM input pin. On Pixhawk flight controllers this is FMU output 5 (AUX 5, or MAIN 5 on flight controllers that have no AUX port). The pin is fixed.

| LIDAR-Lite v3 pin | Wire colour | Connect to |
|---|---|---|
| 1 (5 V DC) | Red | 5 V DC supply |
| 3 (Mode control) | Yellow | AUX 5 signal pin, and to ground through a resistor (below) |
| 6 (Ground) | Black | Flight controller GND |
Pins 2 (power enable), 4 (I2C SCL) and 5 (I2C SDA) are not connected.
The mode control pin must be connected to ground through a resistor, which makes the sensor measure continuously. The Garmin specification is for a 1 kΩ resistor, but a 470 Ω resistor was found to be needed when tested with PX4 on a Pixhawk.
The driver also uses FMU output 6 (AUX 6), so this output cannot be used for anything else.
Firmware Support
The rangefinder is supported by a different driver for each connection, as described below.
To check your board, look for the keys in its board configuration file, boards/<vendor>/<board>/default.px4board.
If a driver is missing, add its key to the board's default.px4board file, or enable it in boardconfig under Drivers > Distance sensors, and then build and upload the firmware.
The drivers do not start until they are enabled using the parameter in PX4 Configuration.
I2C
The driver is ll40ls, which is built into firmware by either of the following keys:
CONFIG_COMMON_DISTANCE_SENSOR=y: the common set of rangefinder drivers, which includes this one.CONFIG_DRIVERS_DISTANCE_SENSOR_LL40LS=y: this driver on its own.
Most boards set CONFIG_COMMON_DISTANCE_SENSOR, so the I2C driver is present in most firmware.
PWM
The driver is ll40ls_pwm, which is built into firmware by the key CONFIG_DRIVERS_DISTANCE_SENSOR_LL40LS_PWM=y. It is not part of the common set of rangefinder drivers, so it is only present in the firmware for boards that set that key.
The PWM driver also requires the pwm_input driver (CONFIG_DRIVERS_PWM_INPUT=y).
PX4 Configuration
The rangefinder is enabled using the parameter SENS_EN_LL40LS. The value to set depends on the connection, as described below. Reboot the flight controller after changing the parameter.
If the parameter is not available in QGroundControl then the I2C driver is not in the firmware: see Firmware Support.
The configuration that is common to all rangefinders, such as the sensor position offsets used by the estimator, is covered in Rangefinders > Configuration/Setup.
I2C
Set SENS_EN_LL40LS to 2.
The driver detects the hardware version of the connected sensor, and uses this to set the maximum range that PX4 will use:
- LIDAR-Lite v4 LED: 10 m
- Other versions: 25 m or 35 m, depending on the detected hardware version
The minimum range is 5 cm.
PWM
Set SENS_EN_LL40LS to 1.
PX4 uses a range of 5 cm to 25 m for all versions of the sensor.
Testing
You can check that the driver is running using the QGroundControl MAVLink Console. For I2C:
ll40ls statusFor PWM:
ll40ls_pwm statusYou can observe the published measurements with:
listener distance_sensorThe measurements can also be viewed in the DISTANCE_SENSOR message in the QGroundControl MAVLink Inspector. For more information see Rangefinders > Testing.