Auto-tuning (Multicopter)
Auto-tuning automates the process of tuning the PX4 rate and attitude controllers, which are the most important controllers for stable and responsive flight (other tuning is more "optional").
Tuning only needs to be done once, and is recommended unless you're using a vehicle that has already been tuned by the manufacturer (and not modified since).
WARNING
Auto-tuning is performed while flying. The airframe must fly well enough to handle moderate disturbances, and should be closely attended:
- Test that your vehicle is stable enough for autotuning.
- Be ready to abort the autotuning process. You can do this by changing flight modes.
- Verify that the vehicle flies well after tuning.
Pre-tuning Test
The vehicle must be able to fly and adequately stabilize itself before running auto-tune. This test ensures that the vehicle can fly safely in position controlled modes.
To make sure the vehicle is stable enough for auto-tuning:
Perform a normal preflight safety checklist to ensure the flight zone is clear and has enough space.
Take off and
hover at 1m above ground in Altitude mode or Stabilized mode.Use the RC transmitter roll stick to perform the following maneuver, tilting the vehicle just a few degrees: roll left > roll right > center (The whole maneuver should take about 3 seconds). The vehicle should stabilise itself within 2 oscillations.
Repeat the maneuver, tilting with larger amplitudes at each attempt. If the vehicle can stabilise itself within 2 oscillations at ~20 degrees move to the next step.
Repeat the same maneuvers but on the pitch axis. As above, start with small angles and confirm that the vehicle can stabilise itself within 2 oscillations before increasing the tilt.
If the drone can stabilize itself within 2 oscillations it is ready for the auto-tuning procedure.
WARNING
If the drone cannot stabilize itself sufficiently, follow the instructions in the troubleshooting section. These explain the minimal manual tuning to prepare the vehicle for auto-tuning.
Auto-tuning Procedure
The auto-tuning sequence must be performed in a safe flight zone, with enough space. It takes about 40 seconds (between 19 and 68 seconds). For best results, we recommend running the test in calm weather conditions.
The recommended mode for autotuning is
, but any other flight mode can be used. The RC sticks cannot be used during autotuning (moving the sticks will stop the autotune operation).The test steps are:
Perform the pre-tuning test.
Takeoff using RC control
in Altitude mode. Hover the vehicle at a safe distance and at a few meters above ground (between 4 and 20m).Enable autotune.
1. In QGroundControl, open the menu **Vehicle setup > PID Tuning**: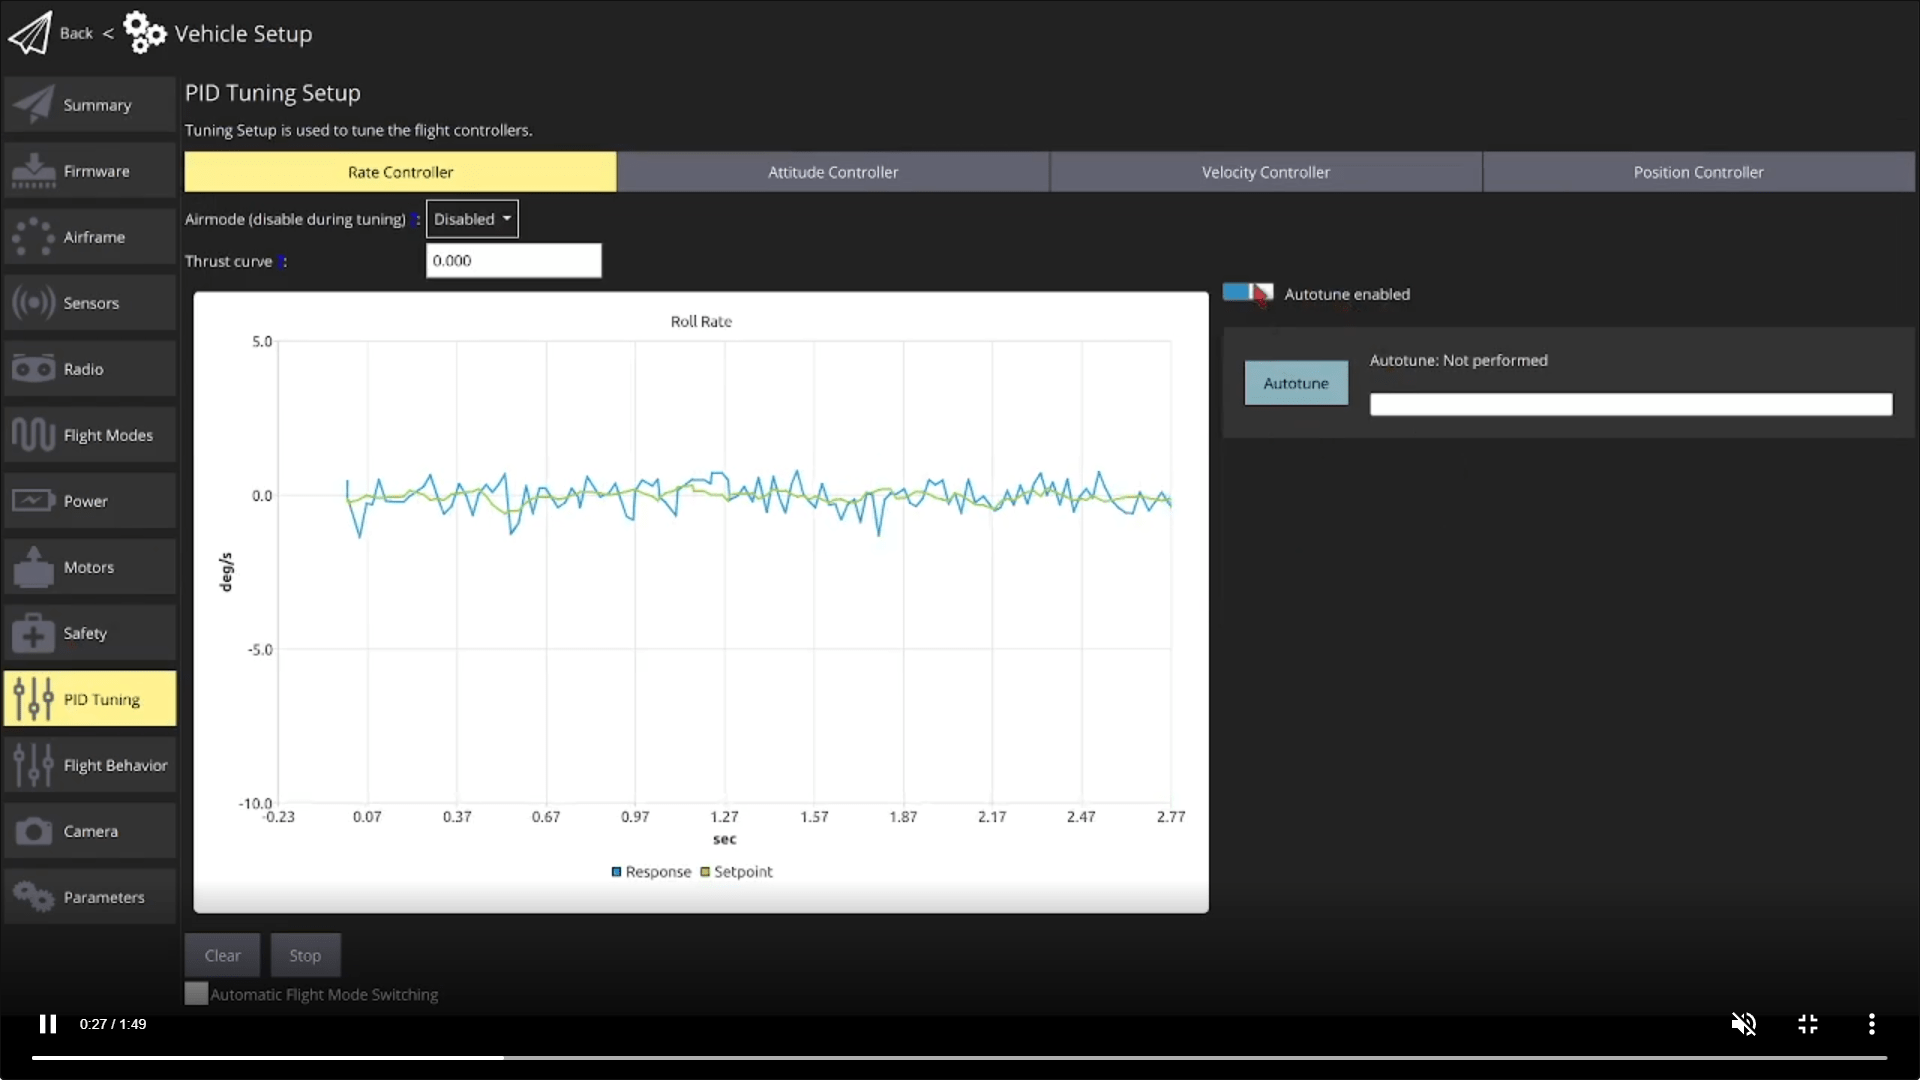 2. Select either the Rate Controller or Attitude Controller tabs. 3. Ensure that the Autotune enabled button is enabled (this will display the Autotune button and remove the manual tuning selectors). 4. Read the warning popup and click on OK to start tuning.
- The drone will first start to perform quick roll motions followed by pitch and yaw motions. The progress is shown in the progress bar, next to the Autotune button.
- Manually land and disarm to apply the new tuning parameters. Takeoff carefully and manually test that the vehicle is stable.
WARNING
If any strong oscillations occur, land immediately and follow the instructions in the Troubleshooting section below.
Additional notes:
- The instructions above tune the vehicle in Altitude mode. You can instead takeoff in Takeoff mode and tune in Position mode if the vehicle is known to be stable in these modes.
- Whether tuning is applied while flying or after landing can be configured using parameters.
Autotuning Large Vehicles
For big multicopter vehicles you may need to increase the desired raise time of the step response MC_AT_RISE_TIME. This requires some trial and error as an appropriate rise time depends on both vehicle size and the rotor response.
Note that if there are slow oscillations in pretuning it may mean that the attitude loop is too fast compared to the rate loop. In this case you should troubleshoot as described in Drone oscillates when performing the pre-tuning test.
Troubleshooting
Drone oscillates when performing the pre-tuning test
Slow oscillations (1 oscillation per second or slower): this often occurs on large platforms and means that the attitude loop is too fast compared to the rate loop:
- Decrease MC_ROLL_P and MC_PITCH_P by steps of 1.0.
Fast oscillations (more than 1 oscillation per second): this is because the gain of the rate loop is too high.
- Decrease
MC_[ROLL|PITCH|YAW]RATE_Kby steps of 0.02
The auto-tuning sequence fails
If the drone was not moving enough during auto-tuning, the system identification algorithm might have issues to find the correct coefficients.
Increase the MC_AT_SYSID_AMP parameter by steps of 1 and trigger the auto-tune again.
The drone oscillates after auto-tuning
Due to effects not included in the mathematical model such as delays, saturation, slew-rate, airframe flexibility, the loop gain can be too high. To fix this, follow the same steps described when the drone oscillates in the pre-tuning test.
I still can't get it to work
Attempt manual tuning using the guides listed in See also below.
Optional Configuration
Apply Tuning when In-Air/Landed
By multicopters land before parameters are applied. This behaviour can be configured using the MC_AT_APPLY parameter:
0: the gains are not applied. This is used for testing purposes if the user wants to inspect results of the auto-tuning algorithm without using them directly.1: apply the gains after disarm (default for multirotors). The operator can then test the new tuning while taking-off carefully.2: apply immediately (default for fixed-wings). The new tuning is applied, disturbances are sent to the controller and the stability is monitored during the next 4 seconds. If the control loop is unstable, the control gains are immediately reverted back to their previous value. If the test passes, the pilot can then use the new tuning.
Developers/SDKs
Autotuning is started using MAV_CMD_DO_AUTOTUNE_ENABLE MAVLink command.
At time of writing the message is resent at regular intervals to poll PX4 for progress: the COMMAND_ACK includes result that the operation is in progress, and also the progress as a percentage. The operation completes when the progress is 100% or the vehicle lands and disarms.
INFO
This is not a MAVLink-compliant implementation of a command protocol long running command. PX4 should stream progress as the protocol does not allow polling.
The feature is not yet supported by MAVSDK.
Background/Detail
PX4 uses PID controllers (rate, attitude, velocity, and position) to calculate the outputs required to move a vehicle from its current estimated state to match a desired setpoint. The controllers must be well tuned in order to get the best performance out of a vehicle. In particular, a poorly tuned rate controller results in less stable flight in all modes, and takes longer to recover from disturbances.
Generally if you use a frame configuration that is similar to your vehicle then the vehicle will be able to fly. However unless the configuration precisely matches your hardware you should tune the rate and attitude controllers. Tuning the velocity and position controllers is less important because they are less affected by vehicle dynamics, and the default tuning configuration for a similar airframe is often sufficient.
Autotuning provides an automatic mechanism to tune the rate and attitude controllers. It can be used to tune fixed-wing and multicopter vehicles, and VTOL vehicles when flying as a multicopter or as a fixed-wing (transition between modes must be manually tuned). In theory it should work for other vehicle types that have a rate controller, but currently only the above types are supported.
Automatic tuning works well for the multicopter and fixed-wing vehicle configurations supported by PX4, provided the frame is not too flexible (see below for more information).
The vehicle must be flying in an altitude-stabilized mode (such as Altitude mode, Hold mode, or Position mode). The flight stack will apply a small disturbance to the vehicle in each axis and then attempt to calculate the new tuning parameters. For fixed-wing vehicles the new tuning is applied in-air by default, after which the vehicle tests the new settings and reverts the tuning if the controllers are not stable. For multicopter, the vehicle lands and applies the new tuning parameters after disarming; the pilot is expected to then take off carefully and test the tuning.
The tuning process takes about 40 seconds (between 19 and 70 seconds). The default behaviour can be configured using parameters.
FAQ
What frames types are supported?
Autotuning is enabled for multicopter, fixed-wing, and hybrid VTOL fixed-wing vehicles.
While it is not yet enabled for other frame types, in theory it an be used with any frame that uses a rate controller.
Does autotuning work for all supported airframes?
The mathematical model used by autotuning to estimate the dynamics of the drone assumes this it is a linear system with no coupling between the axes (SISO), and with a limited complexity (2 poles and 2 zeros). If the real drone is too far from those conditions, the model will not be able to represent the real dynamics of the drone.
In practise, autotuning generally works well for fixed-wing and multicopter, provided the frame is not too flexible.
How long does autotuning take?
Tuning takes 5s-20s per axis (aborted if tuning could not be established in 20s) + 2s pause between each axis + 4s of testing if the new gains are applied in air.
A multicopter must tune all three axes, and by default does not test the new gains in-air. Tuning will therefore take between 19s (5 + 2 + 5 + 2 + 5) and 64s (20x3 + 2x2).
By default a fixed-wing vehicle tunes all three axes and then tests the new gains in-air. The range is therefore between 25s (5 + 2 + 5 + 2 + 5 + 2 + 4) and 70s (20x3 + 3x2 + 4).
Note however that the above settings are defaults. A multicopter can choose to run the tests in air, and a fixed-wing can choose not to. Further, a fixed-wing can choose to tune fewer axes.
Anecdotally, it usually takes around 40s for either vehicle.
See also
- Multicopter PID Tuning Guide (Manual/Simple)
- Multicopter PID Tuning Guide (Advanced/Detailed)
- Parameters > Autotuning (prefixed with
MC_AT_).