Compass Calibration
This process calibrates and configures all magnetometers. QGroundControl will guide you to position the vehicle in a number of set orientations and rotate the vehicle about the specified axis.
INFO
It also auto-detects the compass orientation for external magnetometers (by default). If you have mounted the compass at a non-standard angle you will need to manually set the compass orientation before calibrating.
Overview
You will need to calibrate your compass(es) when you first setup your vehicle, and you may need to recalibrate it if the vehicles is ever exposed to a very strong magnetic field, or if it is used in an area with abnormal magnetic characteristics.
TIP
Indications of a poor compass calibration include multicopter circling during hover, toilet bowling (circling at increasing radius/spiraling-out, usually constant altitude, leading to fly-way), or veering off-path when attempting to fly straight. QGroundControl should also notify the error mag sensors inconsistent.
The process calibrates all compasses and autodetects the orientation of any external compasses. If any external magnetometers are available, it then disables the internal magnetometers (these are primarily needed for automatic rotation detection of external magnetometers).
Types of Calibration
Several types of compass calibration are available:
- Complete: This calibration is required after installing the autopilot on an airframe for the first time or when the configuration of the vehicle has changed significantly. It compensates for hard and soft iron effects by estimating an offset and a scale factor for each axis.
- Partial: This calibration can be performed as a routine when preparing the vehicle for a flight, after changing the payload, or simply when the compass rose seems inaccurate. This type of calibration only estimates the offsets to compensate for a hard-iron effect.
- Large vehicle: This calibration can be performed when the vehicle is too large or heavy to perform a complete calibration. This type of calibration only estimates the offsets to compensate for a hard-iron effect.
Performing the Calibration
Preconditions
Before starting the calibration:
- Choose a location away from large metal objects or magnetic fields.
TIP
Metal is not always obvious! Avoid calibrating on top of an office table (often contain metal bars) or next to a vehicle. Calibration can even be affected if you're standing on a slab of concrete with uneven distribution of re-bar.
- Connect via telemetry radio rather than USB if at all possible. USB can potentially cause significant magnetic interference.
- If using an external compass (or a combined GPS/compass module), make sure it is mounted as far as possible from other electronics in order to reduce magnetic interference, and in a supported orientation.
Complete Calibration
The calibration steps are:
Start QGroundControl and connect the vehicle.
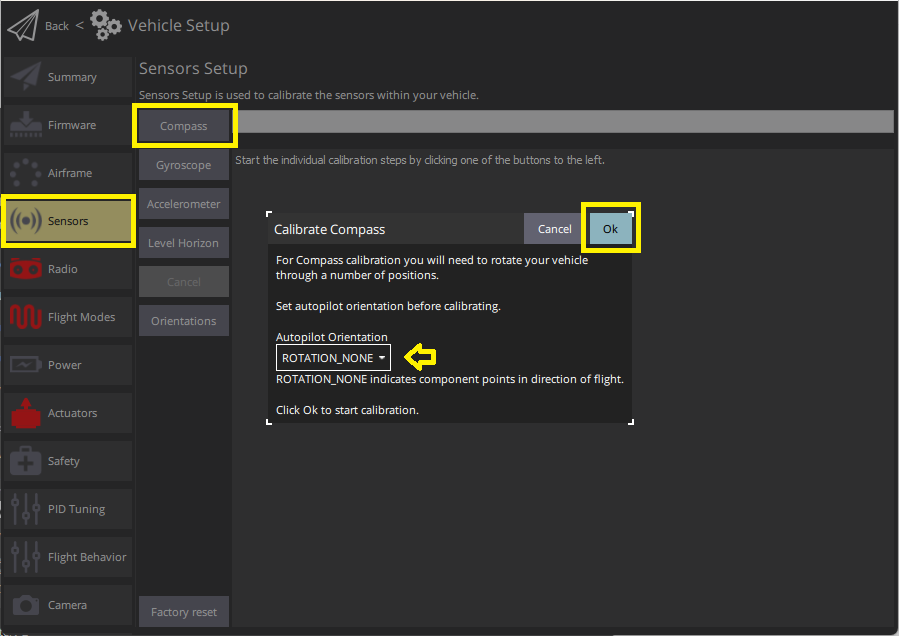
Select "Q" icon > Vehicle Setup > Sensors (sidebar) to open Sensor Setup.
Click the Compass sensor button.
INFO
You should already have set the Autopilot Orientation. If not, you can also set it here.
Click OK to start the calibration.
Place the vehicle in any of the orientations shown in red (incomplete) and hold it still. Once prompted (the orientation-image turns yellow) rotate the vehicle around the specified axis in either/both directions. Once the calibration is complete for the current orientation the associated image on the screen will turn green.
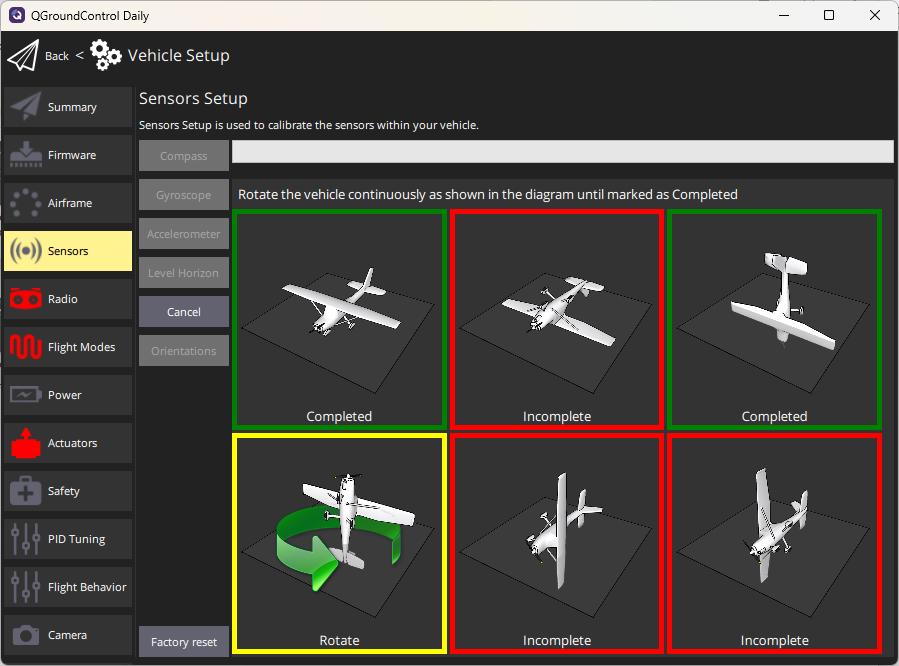
Repeat the calibration process for all vehicle orientations.
Once you've calibrated the vehicle in all the positions QGroundControl will display Calibration complete (all orientation images will be displayed in green and the progress bar will fill completely). You can then proceed to the next sensor.
Partial "Quick" Calibration
This calibration is similar to the well-known figure-8 compass calibration done on a smartphone:
- Hold the vehicle in front of you and randomly perform partial rotations on all its axes. 2-3 oscillations of ~30 degrees in every direction is usually sufficient.
- Wait for the heading estimate to stabilize and verify that the compass rose is pointing to the correct direction (this can take a couple of seconds).
Notes:
- There is no start/stop for this type of calibration (the algorithm runs continuously when the vehicle is disarmed).
- The calibration is immediately applied to the data (no reboot is required) but is saved to the calibration parameters after disarming the vehicle only (the calibration is lost if no arming/disarming sequence is performed between calibration and shutdown).
- The amplitude and the speed of the partial rotations done in step 1 can affect the calibration quality. Following the advice above is usually enough.
Large Vehicle Calibration
PX4 v1.15This calibration process leverages external knowledge of the vehicle's orientation and location, along with a World Magnetic Model (WMM), to calibrate hard-iron biases. It is designed for large or heavy vehicles where full-axis rotation is impractical.
The calibration accepts an optional heading argument (PX4 v1.18), allowing you to specify the vehicle's current true heading. This means you can perform a valid magnetometer calibration while the vehicle is pointed in any direction, not just North.
TIP
The complete calibration is more reliable, and should be used if you can physically rotate the vehicle through all required orientations.
If the large vehicle calibration fails (magnetometer readings are inconsistent, or if yaw is unstable or incorrect) you will need to recalibrate using the complete calibration.
Implementation details
This implementation replaces an earlier version (PX4 v1.15 - PX4 v1.17) that required the vehicle to be facing True North.
The calibration process:
- Computes hard-iron bias offsets by comparing the expected Earth magnetic field vector (based on location and heading from WMM) with the measured field from the magnetometer(s).
- Adjusts magnetometer offset parameters so the heading estimate aligns correctly without requiring full 3-axis rotation.
- The calibration is applied immediately. Offsets persist once parameters are saved (typically on disarm or reboot).
Preconditions
- Obtain a valid GNSS fix (required for World Magnetic Model lookup).
- Choose a location away from large metal objects or magnetic fields.
- If using an external compass, ensure it is mounted as far as possible from other electronics.
Procedure
Ensure GNSS Fix. This is required to look up the expected Earth magnetic field from WMM tables.
Align the vehicle to a known heading. This can be True North (0°), or any other known heading relative to True North.
Open the QGroundControl MAVLink Console and run:
shcommander calibrate mag quick [heading]Parameter Description heading(optional)True heading of the vehicle in degrees (0–359). Defaults to 0° (North) if omitted. Examples:
Vehicle Facing Command North (0°) commander calibrate mag quickEast (90°) commander calibrate mag quick 90South (180°) commander calibrate mag quick 180Southwest (225°) commander calibrate mag quick 225
Notes
- The vehicle doesn't need to be exactly level. Tilt is automatically compensated using the attitude estimate.
- This calibration can also be triggered using the MAVLink command MAV_CMD_FIXED_MAG_CAL_YAW.
Verification
After calibration:
- Check that the heading indicator in QGroundControl is stable.
- Rotate the vehicle to cardinal directions (N/E/S/W) and verify the compass heading matches.
- If using multiple magnetometers, confirm the correct sensor priority is set.
Recalibration
Recalibration is recommended whenever the magnetic environment of the vehicle has changed or when heading behavior appears unreliable.
You can use either complete calibration or mag quick calibration depending on the size of the vehicle and your ability to rotate it through the required orientations. Complete calibration provides the most accurate soft-iron compensation.
Recalibrate the compass when:
- The compass module or its mounting orientation has changed. This includes replacing the GPS or mag unit, rotating the mast, or altering how the module is fixed to the airframe.
- The vehicle has been exposed to a strong magnetic disturbance. Examples include transport or storage near large steel structures, welding operations near the airframe, or operation close to high-current equipment.
- Structural, wiring, or payload changes may have altered the magnetic field around the sensors. New payloads, rerouted wires, additional batteries, or metal fasteners can introduce soft-iron effects that affect heading accuracy.
- The vehicle is operated in a region with significantly different magnetic characteristics. Large changes in latitude, longitude, or magnetic inclination can require re-estimation of offsets.
- QGroundControl reports magnetometer inconsistencies. For example, if you see the error
mag sensors inconsistent. - Heading behavior does not match the vehicle’s observed orientation. Symptoms include drifting yaw, sudden heading jumps when attempting to fly straight, and toilet bowling
- QGroundControl sends the error
mag sensors inconsistent. This indicates that multiple magnetometers are reporting different headings.
Additional Calibration/Configuration
The processes above will autodetect, set default rotations, calibrate, and prioritise, all available magnetometers. If external magnetometers are available, internal magnetometers are disabled.
Further compass configuration should generally not be required.
Enable/Disable a Compass
While no further configuration should be required, developers who wish to disable/enable compasses for any reason, such as testing, can do so using the compass parameters. These are prefixed with CALMAGx (where x=0-3):
- CAL_MAGn_ROT can be used to determine which compasses are internal. A compass is internal if
CAL_MAGn_ROT==1. - CAL_MAGx_PRIO sets the relative compass priority and can be used to disable a compass.
Debugging
Raw comparison data for magnetometers (in fact, for all sensors) can be logged by setting SDLOG_MODE=1 and SDLOG_PROFILE=64. See Logging for more information.
Further Information
- Peripherals > GPS & Compass
- Basic Assembly (setup guides for each flight controller)
- Compass Power Compensation (Advanced Configuration)
- QGroundControl User Guide > Sensors
- PX4 Setup Video - @2m38s (Youtube)