Raspberry Pi Companion with Pixhawk
This topic describes how to setup a Raspberry Pi ("RPi") companion running ROS 2 on Linux Ubuntu OS, connecting to a Pixhawk flight controller using a serial connection between the Pixhawk TELEM2 port and the RPi's TX/RX pins.
These instructions should be readily extensible to other RPi and flight controller configurations.
INFO
Other common ways to connect RPi and Pixhawk are:
- Ethernet connection between RPi and Pixhawk. Pixhawk controllers based on FMUv5x, FMUv6x and later may have an inbuilt Ethernet port. See PX4 Ethernet > Supported Controllers.
- Serial connection to the RPi USB port. This is simple and reliable, but requires an additional FTDI Chip USB-to-serial adapter board. This option is covered in Pixhawk Companion > Serial Port Setup.
布线
Serial connection
First wire up the serial connection between the RPi and PX4 that is to be used for offboard control.
This setup connects the Pixhawk TELEM2 port, which is generally recommended for offboard control. It is initially configured in PX4 to use with MAVLink, which we will change later when setting up ROS 2. Pixhawk ports can be located anywhere on the flight controller, but are almost always well labeled, and should be obvious on your particular flight controller.
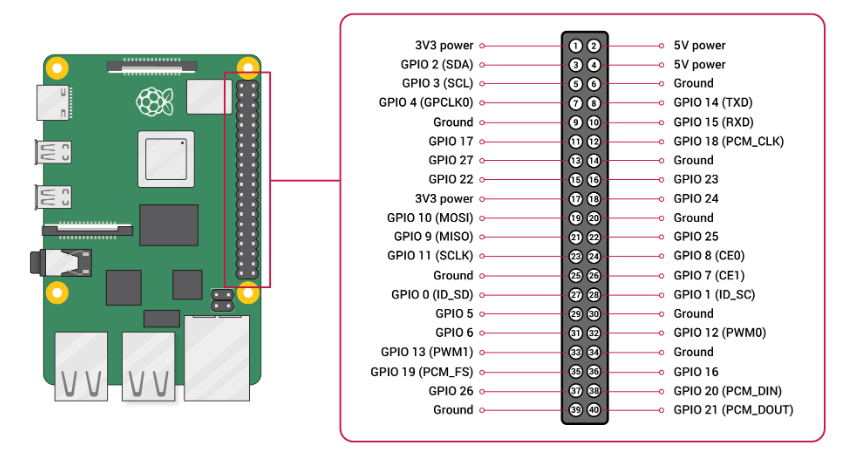
Connect the Pixhawk TELEM2 TX/RX/GND pins to the complementary RXD/TXD/Ground pins on the RPi GPIO board:
| PX4 TELEM2 Pin | RPi GPIO Pin |
|---|---|
| UART5_TX (2) | RXD (GPIO 15 - pin 10) |
| UART5_RX (3) | TXD (GPIO 14 - pin 8) |
| GND (6) | Ground (pin 6) |
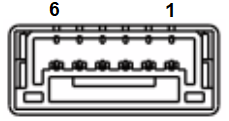
The diagram shows Pixhawk TELEM2 port pins on the left and RPi GPIO board pins on the right. The pins on the TELEM2 port are normally numbered right-to-left as shown.
TELEM2 | RPi GPIO |
|---|---|
 |  |
INFO
Almost all recent Pixhawk boards, such as the Pixhawk-6C, use the same connectors and pin numbers for corresponding ports, as defined in the Pixhawk Connector Standard. You can check the specific board documentation to confirm the pin layout.
The standard TELEM2 pin assignments are shown below.
| Pins | 信号 | Voltage |
|---|---|---|
| 1 (Red) | VCC | +5V |
| 2 (Black) | UART5_TX (out) | +3.3V |
| 3 (Black) | UART5_RX (in) | +3.3V |
| 4 (Black) | UART5_CTS (in) | +3.3V |
| 5 (Black) | UART5_RTS (out) | +3.3V |
| 6 (Black) | GND | GND |
TELEM1/Telemetry Radio
The Pixhawk TELEM1 port is preconfigured for connecting to a GCS via MAVLink over a telemetry radio.
You can plug an appropriate radio into the Pixhawk TELEM1 port and in most cases it should just work. Generally the other radio needs to be connected to the ground station USB port. If you have any issues, check the radio documentation.
Power Supply
Pixhawk boards usually require a reliable 5V DC supply, which is commonly supplied from LiPO batteries via a Power Module and/or Power Distribution board to a port labeled POWER (or similar).
The instructions for your flight controller will normally explain the recommended setup. 例如:
Pixhawk controllers can supply power to a small number of low-power peripherals, such as GPS modules and low-range telemetry radios. The RPi companion computer, servos, high power radios, and other peripherals require a separate power supply, which is usually from a battery elimination circuit (BEC) wired to the same or another battery. Some power modules have a separate BEC included.
WARNING
Overloading your Pixhawk is a good way to destroy it.
INFO
During PX4 setup and configuration the USB connection with your ground station laptop is sufficient to power the Pixhawk board, and your companion computer might be powered from a desktop charger.
PX4 Setup
These instructions work on PX4 v1.14 and later.
If you need to update the firmware then connect the Pixhawk to your laptop/desktop via the USB port and use QGroundControl to update the firmware as described Firmware > Install Stable PX4. If you want the latest developer version then update the firmware to the "main" as described in Firmware > Installing PX4 Master, Beta or Custom Firmware.
INFO
You can alternatively setup a development environment, build and upload the firmware manually.
Ubuntu Setup on RPi
The following steps show how to install and setup Ubuntu 22.04 on the RPi. Note that ROS 2 versions target particular Ubuntu versions. We're using Ubuntu 22.04 to match ROS 2 "Humble", so if you're working with ROS 2 "Foxy" you would instead install Ubuntu 20.04.
First install Ubuntu onto the RPi:
- Prepare a Ubuntu 22.04 bootable Ubuntu Desktop SD card by following the official tutorial: How to install Ubuntu Desktop on Raspberry Pi 4
- Connect the mouse, keyboard, monitor and connect the RPi to a 5V Power Supply (external source/charger).
- Insert the SD card into the RPi and turn on the RPi to boot from the SD card.
- Follow the on-screen instructions to install Ubuntu.
Enter the following commands (in sequence) a terminal to configure Ubuntu for RPi:
Install
raspi-config:shsudo apt update sudo apt upgrade sudo apt-get install raspi-configOpen
raspi-config:shsudo raspi-configGo to the Interface Option and then click Serial Port.
- Select No to disable serial login shell.
- Select Yes to enable the serial interface.
- Click Finish and restart the RPi.
Open the firmware boot configuration file in the
nanoeditor on RPi:shsudo nano /boot/firmware/config.txtAppend the following text to the end of the file (after the last line):
shenable_uart=1 dtoverlay=disable-btThen save the file and restart the RPi.
- In
nanoyou can save the file using the following sequence of keyboard shortcuts: ctrl+x, ctrl+y, Enter.
- In
Check that the serial port is available. In this case we use the following terminal commands to list the serial devices:
shcd / ls /dev/ttyAMA0The result of the command should include the RX/TX connection
/dev/ttyAMA0(note that this serial port is also available as/dev/serial0).
The RPi is now setup to work with RPi and communicate using the /dev/ttyAMA0 serial port. Note that we'll install more software in the following sections to work with MAVLink and ROS 2.
MAVLink Communication
MAVLink is the default and stable communication interface for working with PX4. MAVLink applications running on the companion computer can connect to the /dev/ttyAMA0 serial port you just set up on the RPi and should automatically (by default) connect to TELEM 2 on the Pixhawk.
PX4 recommends MAVSDK for writing MAVLink companion computer applications, as it provides simple APIs for using many common MAVLink services in many different programming languages. You can also write applications using the libraries provided by MAVLink, such as Pymavlink, but then you are more likely to have to provide your own implementations of some microservices.
For this tutorial we're not going to go into MAVLink control in any detail (it is well covered in the respective SDKs). However we will install and use a simple developer MAVLink GCS called mavproxy. This will allow us to verify the MAVLink connection, and therefore that our physical connection has been set up properly. A very similar connection pattern would be used for MAVSDK and other MAVLink applications.
First check the Pixhawk TELEM 2 configuration:
Connect the Pixhawk with the laptop using a USB cable.
Open QGroundControl (the vehicle should connect).
Check/change the following parameters in QGroundControl:
iniMAV_1_CONFIG = TELEM2 UXRCE_DDS_CFG = 0 (Disabled) SER_TEL2_BAUD = 57600Note that the parameters may already be set appropriately. For information about how serial ports and MAVLink configuration work see Serial Port Configuration and MAVLink Peripherals.
Then install setup MAVProxy on the RPi using the following terminal commands:
Install MAVProxy:
shsudo apt install python3-pip sudo pip3 install mavproxy sudo apt remove modemmanagerRun MAVProxy, setting the port to connect to
/dev/ttyAMA0and the baud rate to match the PX4:shsudo mavproxy.py --master=/dev/serial0 --baudrate 57600INFO
Note that above we used
/dev/serial0, but we could equally well have used/dev/ttyAMA0. If we were connecting via USB then we would instead set the port as/dev/ttyACM0:shsudo chmod a+rw /dev/ttyACM0 sudo mavproxy.py --master=/dev/ttyACM0 --baudrate 57600
:::
MAVProxy on RPi should now connect to the Pixhawk, via RX/TX pins. You should be able to see this in the RPi terminal.
We have now verified that our connection is wired up properly. In the next section we'll set up the both Pixhawk and RPi to use uXRCE-DDS and ROS2 instead of MAVLink.
ROS 2 and uXRCE-DDS
The ROS 2 Guide and uXRCE-DDS pages cover the options for setting up the uXRCE-DDS and ROS, focussing on ROS 2 "Foxy". This tutorial uses ROS 2 "Humble" and covers the specific setup for working with RPi. It is worth reading both!
Pixhawk/PX4 Setup
Next we set up ROS 2 instead of MAVLink on TELEM2. We do this by changing parameters in QGroundControl, which can be connected via USB, or using a telemetry radio connected to TELEM1.
The configuration steps are:
Connect the Pixhawk with the laptop using a USB cable and open QGroundControl (if not currently connected).
Check/change the following parameters in QGroundControl:
iniMAV_1_CONFIG = 0 (Disabled) UXRCE_DDS_CFG = 102 (TELEM2) SER_TEL2_BAUD = 921600MAV_1_CONFIG=0 and UXRCE_DDS_CFG=102 disable MAVLink on TELEM2 and enable the uXRCE-DDS client on TELEM2, respectively. The
SER_TEL2_BAUDrate sets the comms link data rate.
You could similarly configure a connection toTELEM1using eitherMAV_1_CONFIGorMAV_0_CONFIG.INFO
You will need to reboot the flight controller to apply any changes to these parameters.
:::
Check that the uxrce_dds_client module is now running. YOu can do this by running the following command in the QGroundControl MAVLink Console:
shuxrce_dds_client status
INFO
If the client module is not running you can start it manually in the MAVLink console:
uxrce_dds_client start -t serial -d /dev/ttyS3 -b 921600Note that /dev/ttyS3 is the PX4 port for TELEM2 on the Holybro Pixhawk 6c. For other flight controllers check the serial port mapping section in their overview page.
ROS Setup on RPi
The steps to setup ROS 2 and the Micro XRCE-DDS Agent on the RPi are:
Install ROS 2 Humble by following the official tutorial.
Install the git using the RPi terminal:
shsudo apt install gitInstall the uXRCE_DDS agent:
shgit clone https://github.com/eProsima/Micro-XRCE-DDS-Agent.git cd Micro-XRCE-DDS-Agent mkdir build cd build cmake .. make sudo make install sudo ldconfig /usr/local/lib/See uXRCE-DDS > Micro XRCE-DDS Agent Installation for alternative ways of installing the agent.
Start the agent in the RPi terminal:
shsudo MicroXRCEAgent serial --dev /dev/serial0 -b 921600Note how we use the serial port set up earlier and the same baud rate as for PX4.
Now that both the agent and client are running, you should see activity on both the MAVLink console and the RPi terminal. You can view the available topics using the following command on the RPi:
source /opt/ros/humble/setup.bash
ros2 topic list
That's it. Once you have the connection working, see the ROS 2 Guide for more information about working with PX4 and ROS 2.