BeagleBone Blue
WARNING
PX4 does not manufacture this (or any) autopilot. Contact the manufacturer for hardware support or compliance issues.
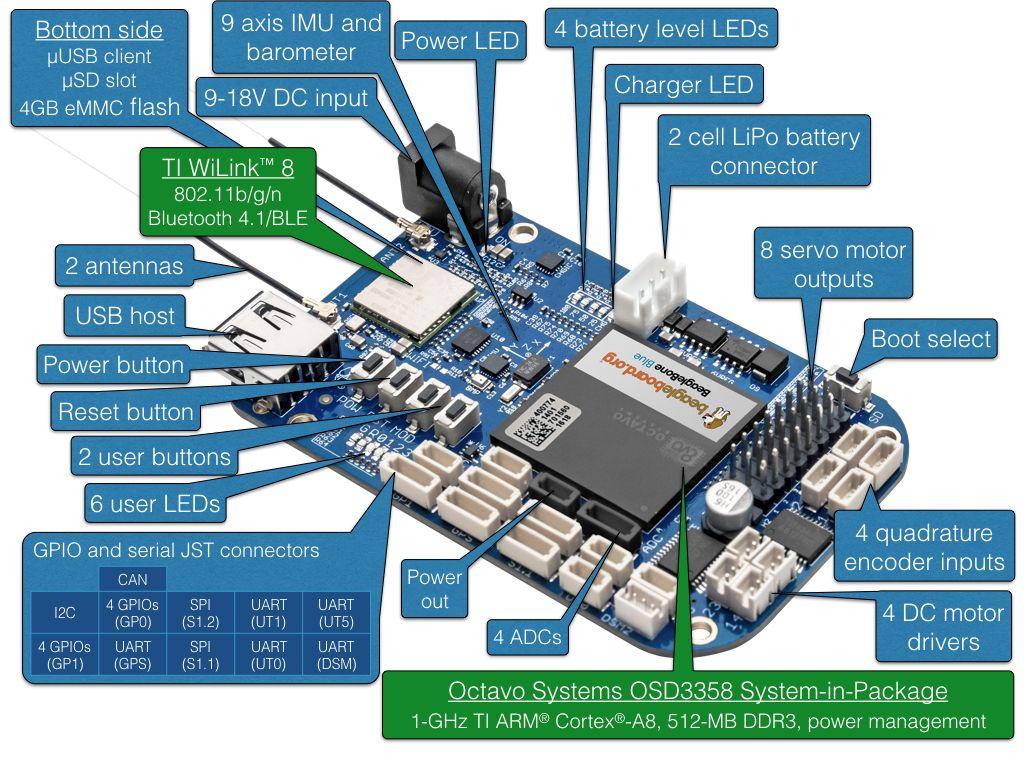
BeagleBone Blue is an all-in-one Linux-based computer. Although it is optimized for robotics, this compact and inexpensive board has all necessary sensors and peripherals needed by a flight controller. This topic shows how to set up the board to run PX4 with librobotcontrol robotics package.
操作系统映像
BeagleBone Blue images can be found here:
- Latest stable OS image.
- Test OS images (updated frequently).
Information about flashing OS images can be found on this page. Other useful information can be found in the FAQ.
TIP
Optionally you can update to a realtime kernel, and if you do, re-check if librobotcontrol works properly with the realtime kernel.
The latest OS images at time of updating this document is AM3358 Debian 10.3 2020-04-06 4GB SD IoT.
Cross Compiler Build (Recommend)
The recommended way to build PX4 for BeagleBone Blue is to compile on a development computer and upload the PX4 executable binary directly to the BeagleBone Blue.
TIP
This approach is recommended over native build due to speed of deployment and ease of use.
INFO
The PX4 build requires librobotcontrol which is automatically included in the build (but it can be installed and tested independently if required).
Beaglebone Blue WIFI Setup
For easy access to your board, you can connect it to your home network via wifi.
The steps are (execute on the board):
sudo su
connmanctl
connmanctl>scan wifi
connmanctl>services
#(at this point you should see your network SSID appear.)
connmanctl>agent on
connmanctl>connect <SSID>
	Enter Passphrase
connmanctl>quit
INFO
The format of the <SSID> above is normally the text 'wifi' followed by a string of other characters. After entering the command you will be prompted to enter the wifi password.
SSH root Login on Beaglebone
Root login can be enabled on the board with:
sudo su
echo "PermitRootLogin yes" >>  /etc/ssh/sshd_config && systemctl restart sshd
交叉编译器设置
First set up rsync (this is used to transfer files from the development computer to the target board over a network - WiFi or Ethernet). For rsync over SSH with key authentication, follow the steps here (on the development machine):
Generate an SSH key if you have not previously done so:
shssh-keygen -t rsa- ENTER //no passphrase
- ENTER
- ENTER
Define the BeagleBone Blue board as
beaglebonein /etc/hosts and copy the public SSH key to the board for password-less SSH access:shssh-copy-id debian@beagleboneAlternatively you can use the beaglebone's IP directly:
shssh-copy-id debian@<IP>When prompted if you trust: yes
Enter root password
Cross Compile Setup
- Toolchain download
First install the toolchain into /opt/bbblue_toolchain/gcc-arm-linux-gnueabihf. Here is an example of using soft link to select which version of the toolchain you want to use:
shmkdir -p /opt/bbblue_toolchain/gcc-arm-linux-gnueabihf chmod -R 777 /opt/bbblue_toolchain cd /opt/bbblue_toolchain/gcc-arm-linux-gnueabihfThe ARM Cross Compiler for BeagleBone Blue can be found at Linaro Toolchain Binaries site.
TIP
GCC in the toolchain should be compatible with kernel in BeagleBone Blue. General rule of thumb is to choose a toolchain where version of GCC is not higher than version of GCC which comes with the OS image on BeagleBone Blue.
- Toolchain download
:::
     Download and unpack [gcc-linaro-13.0.0-2022.06-x86_64_arm-linux-gnueabihf.tar.xz](https://snapshots.linaro.org/gnu-toolchain/13.0-2022.06-1/arm-linux-gnueabihf/gcc-linaro-13.0.0-2022.06-x86_64_arm-linux-gnueabihf.tar.xz) to the bbblue_toolchain folder.

     Different ARM Cross Compiler versions for _BeagleBone Blue_ can be found at [Linaro Toolchain Binaries site](https://www.linaro.org/downloads/).

     ```sh
     wget https://snapshots.linaro.org/gnu-toolchain/13.0-2022.06-1/arm-linux-gnueabihf/gcc-linaro-13.0.0-2022.06-x86_64_arm-linux-gnueabihf.tar.xz
     tar -xf gcc-linaro-13.0.0-2022.06-x86_64_arm-linux-gnueabihf.tar.xz
     ```

     ::: tip
     The GCC version of the toolchain should be compatible with kernel in _BeagleBone Blue_.
:::
     As a general rule of thumb is to choose a toolchain where the version of GCC is not higher than the version of GCC which comes with the OS image on _BeagleBone Blue_.

  2. Add it to the PATH in ~/.profile as shown below

     ```sh
     export PATH=$PATH:/opt/bbblue_toolchain/gcc-arm-linux-gnueabihf/gcc-linaro-13.0.0-2022.06-x86_64_arm-linux-gnueabihf/bin
     ```

     ::: info
     Logout and Login to apply the change, or execute the same line on your current shell.
:::
  3. Setup other dependencies by downloading the PX4 source code and then running the setup scripts:

     ````sh
     git clone https://github.com/PX4/PX4-Autopilot.git --recursive
     ols
     ```

     You may have to edit the upload target to match with your setup:

     ```sh
     nano PX4-Autopilot/boards/beaglebone/blue/cmake/upload.cmake

     # in row 37 change debian@beaglebone.lan TO root@beaglebone (or root@<IP>)
     ````

     See the [Development Environment Setup](../dev_setup/dev_env_linux_ubuntu.md) instructions for additional information.
交叉编译和上传
Compile and Upload
make beaglebone_blue_default uploadINFO
Without upload, files stored local in build folder.
To test the uploaded files, run the following commands on the BeagleBone Blue board:
cd /home/debian/px4
sudo ./bin/px4 -s px4.config
INFO
Currently librobotcontrol requires root access.
Native Builds (optional)
You can also natively build PX4 builds directly on the BeagleBone Blue.
After acquiring the pre-built library,
- Select the librobotcontrol installation directory, and set it in the
LIBROBOTCONTROL_INSTALL_DIRenvironment variable so that other unwanted headers will not be included - Install robotcontrol.h and rc/* into
$LIBROBOTCONTROL_INSTALL_DIR/include - Install pre-built native (ARM) version of librobotcontrol.* into
$LIBROBOTCONTROL_INSTALL_DIR/lib
Run the following commands on the BeagleBone Blue (i.e. via SSH):
安装依赖项
shsudo apt-get update sudo apt-get install cmake python3-empy=3.3.4-2将 PX4 固件直接克隆到 BeagleBone Blue 上。
Continue with the standard build system installation.
Changes in config
All changes can be made in the px4.config file directly on beaglebone. For example, you can change the WIFI to wlan.
INFO
If you want to change permanently, you have to change PX4-Autopilot/posix-configs/bbblue/px4.config on the Build Machine before build.
引导期间自动启动
Here is an example [/etc/rc.local]:
#!/bin/sh -e
#
# rc.local
#
# This script is executed at the end of each multiuser runlevel.
# Make sure that the script will "exit 0" on success or any other
# value on error.
#
# In order to enable or disable this script just change the execution
# bits.
#
# By default this script does nothing.

# wait for services to start up
/bin/sleep 25

cd /home/debian/px4

/home/debian/px4/bin/px4 -d -s /home/debian/px4/px4.config > /home/debian/px4/PX4.log &

exit 0
Below is a systemd service example [/lib/systemd/system/px4-quad-copter.service]:
[Unit]
Description=PX4 Quadcopter Service
After=networking.service network-online.target
StartLimitIntervalSec=0
Conflicts=px4-fixed-wing.service

[Service]
WorkingDirectory=/home/debian/px4
User=root
ExecStart=/home/debian/px4/bin/px4 -d -s /home/debian/px4/px4.config

Restart=on-failure
RestartSec=1

[Install]
WantedBy=multi-user.target
其它选项
动力伺服导轨
When PX4 starts, it automatically applies power to servos.
特殊功能
BeagleBone Blue has some unique features such as multiple choices of WiFi interfaces and power sources. Refer to comments in /home/debian/px4/px4.config for usage of these features.
SBUS 信号转换器
SBUS signal from receiver (e.g., FrSky X8R) is an inverted signal. UARTs on BeagleBone Blue can only work with non-inverted 3.3V level signal. This tutorial contains a SBUS signal inverter circuit.
典型连接
For a quadcopter with GPS and an SBUS receiver, here are typical connections:
- 将电机 1,2,3 和 4 的电调连接到伺服输出的通道 1,2,3和4 分别在 BeagleBone Blue 上。 如果您的电调连接器包含电源输出引脚,将其移除,不要将其连接到伺服通道的电源输出引脚在 BeagleBone Blue 上。
- Connect the above mentioned converted SBUS signal to the dsm2 port if you have the matching connector for dsm2, otherwise connect it to any other available UART port and change the corresponding port in /home/debian/px4/px4.config accordingly.
- 将 GPS 模块的信号连接到 BeagleBone Blue 上的 GPS 端口。 Note that the signal pins of the GPS port on the BeagleBone Blue are only 3.3V tolerant, so choose your GPS module accordingly.