Windows Development Environment (WSL2-Based)
The following instructions explain how to set up a PX4 development environment on Windows 10 or 11, running on Ubuntu Linux within WSL2.
PX4 빌드에 사용되어 집니다.
TIP
This setup is supported by the PX4 dev team. The environment should in theory be able to build any target that can be built on Ubuntu. The list above are those targets that are regularly tested.
개요
The Windows Subsystem for Linux (WSL2) allows users to install and run the Ubuntu Development Environment on Windows, almost as though we were running it on a Linux computer.
With this environment developers can:
- Build any simulator or hardware target supported by Ubuntu Development Environment in the WSL Shell. (Ubuntu is the best supported and tested PX4 development platform).
- Update firmware on a real vehicle using the command line.
- Debug code in Visual Studio Code running on Windows.
- Monitor a simulation using QGroundControl for Linux running in WSL. QGC for Linux connects automatically to the simulation.
QGroundControl for Windows is additionally required if you need to:
- Update firmware using the QGC UI.
- Monitor a real vehicle. Note that you can also use it to monitor a simulation, but you must manually connect to the simulation running in WSL.
TIP
Connecting to an USB device from within WSL is not natively supported, but can be enabled via USBIPD-WIN.
From PX4 v1.18, you can upload PX4 firmware over USB from the WSL command line using the upload target (this uses the Windows Python interpreter on WSL to access the flight controller through the Windows COM port).
INFO
The approach is similar to installing PX4 in your own virtual machine, as described in Windows VM-Hosted Toolchain. The benefit of WSL2 is that its virtual machine is deeply integrated into Windows, system-managed, and performance optimised.
설치
Install WSL2
To install WSL2 with Ubuntu on a new installation of Windows 10 or 11:
Make sure your computer your computer's virtualization feature is enabled in the BIOS. It's usually referred as "Virtualization Technology", "Intel VT-x" or "AMD-V" respectively
Open cmd.exe as administrator. This can be done by pressing the start key, typing
cmd, right-clicking on the Command prompt entry and selecting Run as administrator.Execute the following commands to install WSL2 and a particular Ubuntu version:
Default version (Ubuntu 22.04):
shwsl --installUbuntu 22.04 (Gazebo Simulation)
shwsl --install -d Ubuntu-22.04Ubuntu 24.04 (Gazebo Simulation)
shwsl --install -d Ubuntu-24.04
INFO
You can also Ubuntu 24.04 or Ubuntu 22.04 from Microsoft Store, which allows you to delete the application using the normal Windows Add/Remove settings.
:::
- WSL will prompt you for a user name and password for the Ubuntu installation. Record these credentials as you will need them later on!
The command prompt is now a terminal within the newly installed Ubuntu environment.
Opening a WSL Shell
All operations to install and build PX4 must be done within a WSL Shell (you can use the same shell that was used to install WSL2 or open a new one).
If you're using Windows Terminal you can open a shell into an installed WSL environment as shown, and exit it by closing the tab.

To open a WSL shell using a command prompt:
Open a command prompt:
- Press the Windows Start key.
- Type
cmdand press Enter to open the prompt.
To start WSL and access the WSL shell, execute the command:
shwsl -d <distribution_name>예:
shwsl -d Ubuntushwsl -d Ubuntu-24.04If you only have one version of Ubuntu, you can just use
wsl.
Enter the following commands to first close the WSL shell, and then shut down WSL:
exit
wsl -d <distribution_name> --shutdown
Alternatively, after entering exit you can just close the prompt.
Install PX4 Toolchain
Next we download the PX4 source code within the WSL2 environment, and use the normal Ubuntu installer script to set up the developer environment. This will install the toolchain for Gazebo Classic simulation and Pixhawk/NuttX hardware.
To install the development toolchain:
Open a WSL2 Shell (if it is still open you can use the same one that was used to install WSL2).
Execute the command
cd ~to switch to the home folder of WSL for the next steps.WARNING
This is important! If you work from a location outside of the WSL file system you'll run into issues such as very slow execution and access right/permission errors.
:::
Download the PX4 source code using
git(which is already installed in WSL2):shgit clone https://github.com/PX4/PX4-Autopilot.git --recursiveINFO
The environment setup scripts in the source usually work for recent PX4 releases. If working with an older version of PX4 you may need to get the source code specific to your release.
:::
Run the ubuntu.sh installer script and acknowledge any prompts as the script progresses:
shbash ./PX4-Autopilot/Tools/setup/ubuntu.shINFO
This installs tools to build PX4 for Pixhawk and either Gazebo or Gazebo Classic targets:
- You can use the
--no-nuttxand--no-sim-toolsoptions to omit the NuttX and/or simulation tools. - Other Linux build targets are untested (you can try these by entering the appropriate commands in Ubuntu Development Environment into the WSL shell).
- You can use the
:::
Restart the "WSL computer" after the script completes (exit the shell, shutdown WSL, and restart WSL):
shexit wsl --shutdown wslSwitch to the PX4 repository in the WSL home folder:
shcd ~/PX4-AutopilotBuild the PX4 SITL target and test your environment:
shmake px4_sitl
For more build options see Building PX4 Software.
Visual Studio Code Integration
VS Code running on Windows is well integrated with WSL.
To set up the integration:
Download and install Visual Studio Code (VS Code) on Windows,
Open VS Code.
Install the extension called Remote - WSL (marketplace)
In the WSL shell, switch to the PX4 folder:
shcd ~/PX4-AutopilotIn the WSL shell, start VS Code:
shcode .This will open the IDE fully integrated with the WSL shell.
Make sure you always open the PX4 repository in the Remote WSL mode.
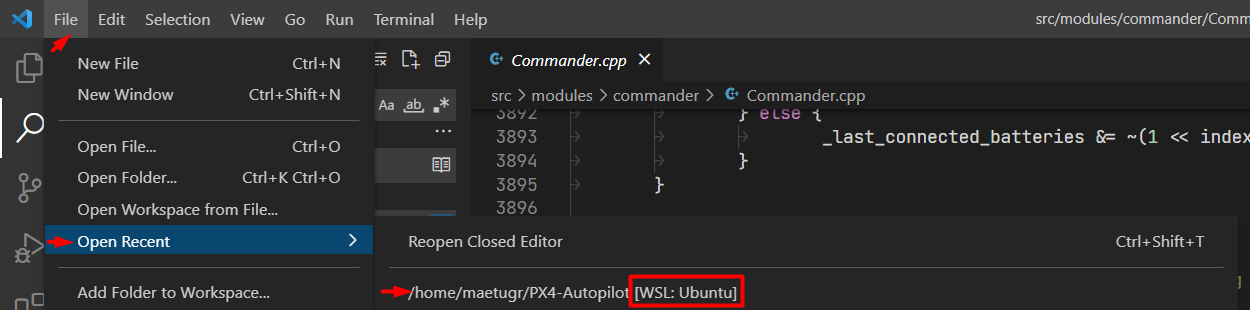
Next time you want to develop WSL2 you can very easily open it again in Remote WSL mode by selecting Open Recent (as shown below). This will start WSL for you.
Note however that the IP address of the WSL virtual machine will have changed, so you won't be able to monitor simulation from QGC for Windows (you can still monitor using QGC for Linux)
QGroundControl
You can run QGroundControl in either WSL or Windows to connect to the running simulation. If you want to flash a flight control board using the QGroundControl GUI, you must use QGroundControl for Windows.
QGroundControl in WSL
The easiest way to set up and use QGroundControl is to download the Linux version into your WSL.
You can do this from within the WSL shell.
In a web browser, navigate to the QGC Ubuntu download section
Right-click on the QGroundControl.AppImage link, and select "Copy link address". This will be something like _https://d176td9ibe4jno.cloudfront.net/builds/master/QGroundControl.AppImage_
Open a WSL shell and enter the following commands to download the appimage and make it executable (replace the AppImage URL where indicated):
shcd ~ wget <the_copied_AppImage_URL> chmod +x QGroundControl.AppImageRun QGroundControl:
sh./QGroundControl.AppImage
QGroundControl will launch and automatically connect to a running simulation and allow you to monitor and control your vehicle(s).
You will not be able to use it to install PX4 firmware because WSL does not allow access to serial devices.
QGroundControl on Windows
Install QGroundControl on Windows if you want to be able to update hardware with firmware created within PX4.
These steps describe how you can connect to the simulation running in the WSL:
Check the IP address of the WSL virtual machine by running the command
ip addr | grep eth0:sh$ ip addr | grep eth0 6: eth0: <BROADCAST,MULTICAST,UP,LOWER_UP> mtu 1500 qdisc mq state UP group default qlen 1000 inet 172.18.46.131/20 brd 172.18.47.255 scope global eth0Copy the first part of the
eth0interfaceinetaddress to the clipboard. In this case:172.18.46.131.In QGC go to Q > Application Settings > Comm Links
Add a UDP Link called "WSL" to port
18570of the IP address copied above.Save it and connect to it.
INFO
You will have to update the WSL comm link in QGC every time WSL restarts (because it gets a dynamic IP address).
Flash a Flight Control Board
Custom PX4 firmware built in WSL can be uploaded directly from the WSL command line using the upload target.
INFO
WSL2 does not natively offer direct access to serial/USB devices like Pixhawk flight controllers connected to your computer. The PX4 upload target works around this by using the Windows Python interpreter from WSL to access the flight controller through the Windows COM port.
To flash your custom binary from WSL:
Connect the flight controller to your computer with a USB cable.
Open a WSL shell, switch to the PX4 repository, and specify
uploadafter your make target:shcd ~/PX4-Autopilot make px4_fmu-v5 uploadTIP
This builds
px4_fmu-v5. Use the correctmaketarget for your board.
:::
You can also flash a custom binary built in WSL using QGroundControl for Windows:
Detach the USB cable of your Pixhawk board from the computer if it was connected.
Open QGC and navigate to Q > Vehicle Setup > Firmware.
Plug your Pixhawk board via USB
Once connected select "PX4 Flight Stack", check Advanced settings and choose Custom firmware file ... from the drop down below.
Continue and select the firmware binary you just built in WSL.
In the open dialog look for the "Linux" location with the penguin icon in the left pane. It's usually all the way at the bottom. Choose the file in the path:
Ubuntu\home\{your WSL user name}\PX4-Autopilot\build\{your build target}\{your build target}.px4INFO
You can add the folder to the favourites to access it quickly next time.
:::
- Start the flashing.
For more information see Installing PX4 Main, Beta or Custom Firmware (Loading Firmware).
문제 해결
If you have any problems with your setup, check the current Microsoft WSL installation documentation.
We also recommend that you have the latest Windows GPU drivers installed and also install a recent version of kisak mesa in your Ubuntu environment so that most OpenGL features get emulated:
sudo add-apt-repository ppa:kisak/kisak-mesa
sudo apt update
sudo apt upgrade
QGroundControl not connecting to PX4 SITL
- The connection between PX4 SITL on WSL2 and QGroundControl on Windows requires broadcasting or streaming to a specific address to be enabled. Streaming to a specific address should be enabled by default, but is something to check if a connection can't be established.
- Network traffic might be blocked by firewall or antivirus on you system.