Pixhawk 배선 개요
WARNING
PX4 does not manufacture this (or any) autopilot. Contact the manufacturer for hardware support or compliance issues.
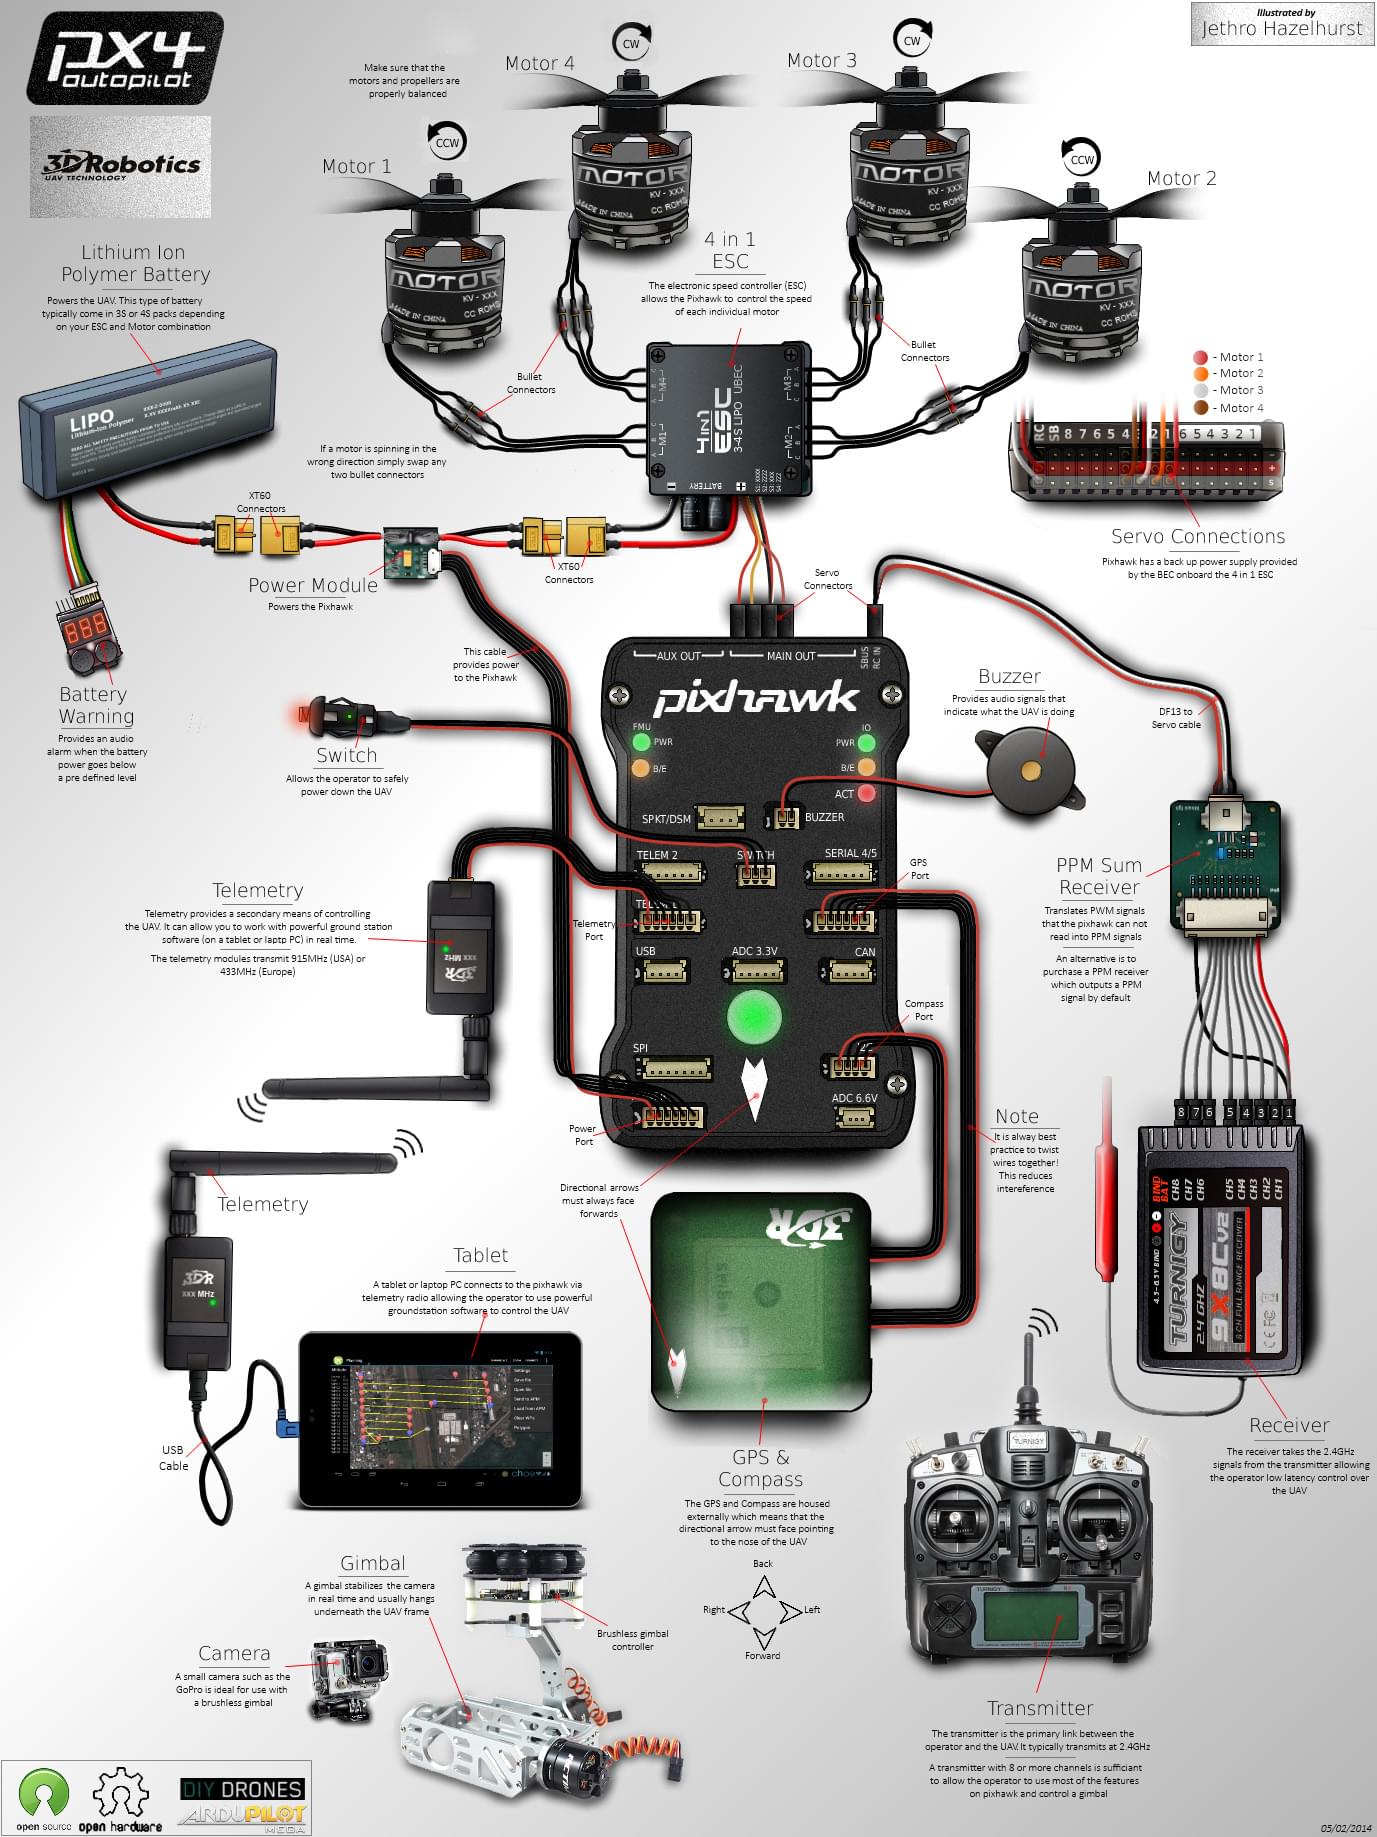
This quick start guide shows how to power the 3DR Pixhawk flight controller and connect its most important peripherals.
![]()
INFO
The 3DR Pixhawk is no longer available from 3DR. Other flight controllers based on the Pixhawk FMUv2 architecture are available from other companies (these share the same connections, outputs, functions, etc. and are wired in a similar way).
배선 개요
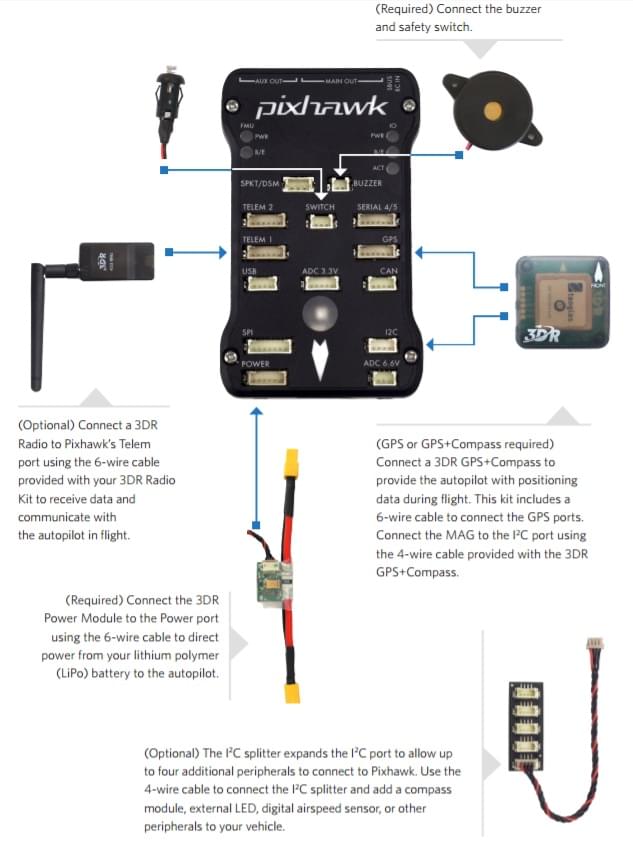
아래 이미지는 표준 Pixhawk 연결을 나타냅니다 (모터 및 서보 출력 제외). 다음 섹션에서 각 장치에 대해 자세히 설명합니다.
INFO
More detailed wiring information is shown below.
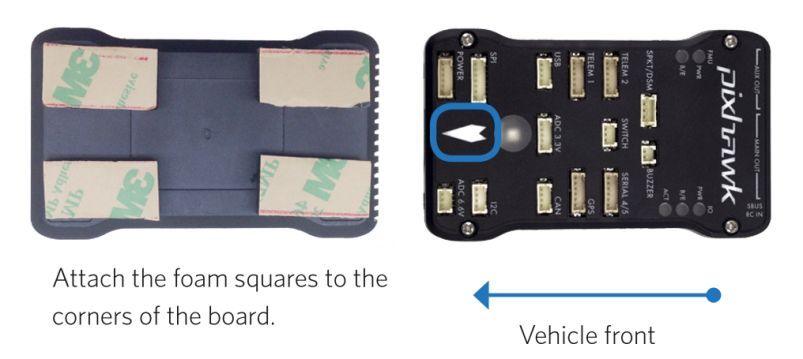
콘트롤러 장착 및 장착 방향
The Pixhawk should be mounted on the frame using vibration-damping foam pads (included in the kit). 차량의 무게 중심에 최대한 가까운 위치에 장착하여야하며, 화살표가 차량의 전방과 상향을 향하도록 합니다.
INFO
If the controller cannot be mounted in the recommended/default orientation (e.g. due to space constraints) you will need to configure the autopilot software with the orientation that you actually used: Flight Controller Orientation.
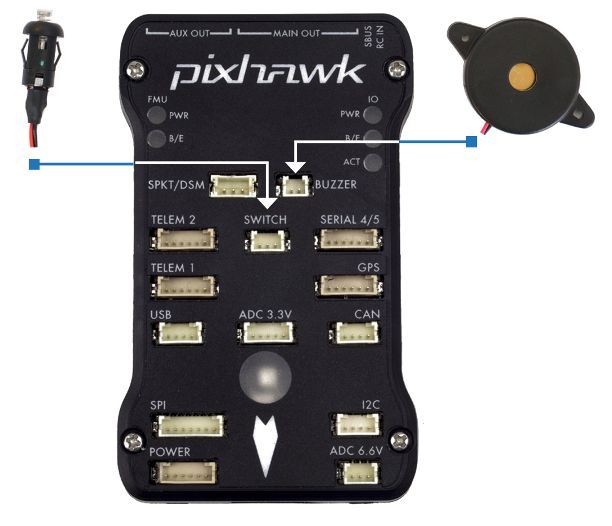
부저와 안전 스위치
포함된 부저와 안전 스위치를 아래의 그림과 같이 연결하십시오 (필수).
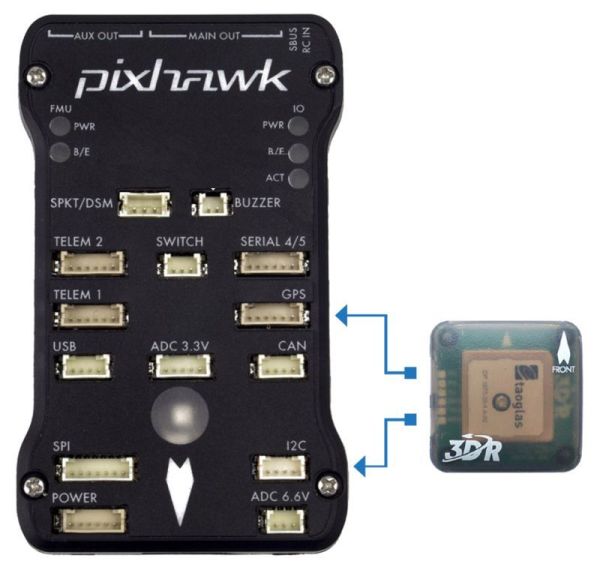
GPS와 나침반
키트에 제공된 6선 케이블을 사용하여 GPS (필수)를 GPS 포트에 연결합니다. 다른 방법으로는, 4선 케이블을 사용하여 I2C 포트에 나침반을 연결합니다 (Pixhawk에는 필요한 경우 사용할 수있는 내부 나침반이 있음).
INFO
The diagram shows a combined GPS and Compass. GPS/나침반은 차량 전방 표식를 사용하여 가능하면 전자 장치들에서 멀리 떨어진 프레임에 장착하는 것이 좋습니다. 나침반은 다른 전자 장치와 떨어지면 간섭이 줄어듦니다.
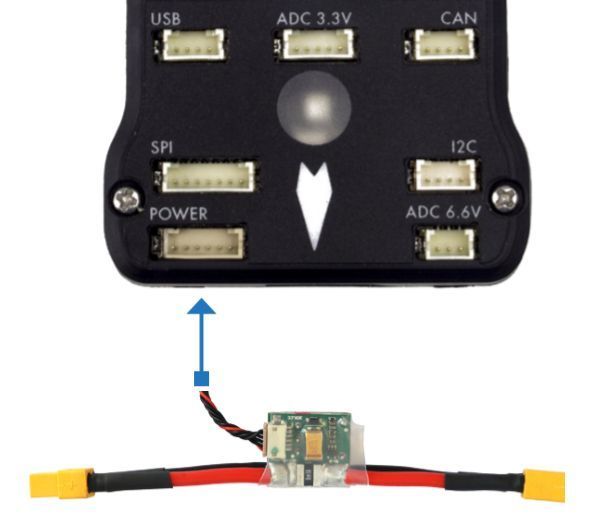
전원
Connect the output of a Power module (PM) to the POWER port using a 6-wire cable as shown. 전원 모듈의 입력은 LiPo 배터리에 연결하여 배전판을 통하여 메인 출력은 차량 ESC/모터에 전원을 공급합니다.
전원 모듈은 비행 콘트롤러에 전원을 공급하고 모듈을 통해 공급되는 아날로그 전류 및 전압에 대한 정보를 전송합니다 (비행 콘트롤러 및 모터에 대한 전원 포함).
WARNING
The power module supplies the flight controller itself, but cannot power servos and other hardware connected to the controller's output ports (rail). For copter this does not matter because the motors are separately powered.
비행기 및 VTOL의 경우 방향타, 엘레 본 등의 서보를 구동하기 위하여 출력 레일에 별도의 전원을 공급하여야 합니다. Often the main pusher/puller motor uses an ESC with an integrated BEC that can be connected to the Pixhawk output rail. BEC가 없으면, Pixhawk 포트에 연결하기 위해 5V BEC를 장찫하여야합니다. 전원이 없으면 서보가 작동하지 않습니다.
무선 조종
A remote control (RC) radio system is required if you want to manually control your vehicle (PX4 does not require a radio system for autonomous flight modes).
You will need to select a compatible transmitter/receiver and then bind them so that they communicate (read the instructions that come with your specific transmitter/receiver).
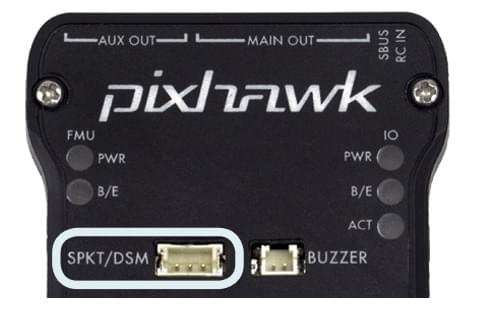
아래 지침은 여러 종류의 수신기를 Pixhawk에 연결한는 방법을 설명합니다.
Spektrum and DSM receivers connect to the SPKT/DSM input.
PPM-SUM and S.BUS receivers connect to the RC ground, power and signal pins as shown.
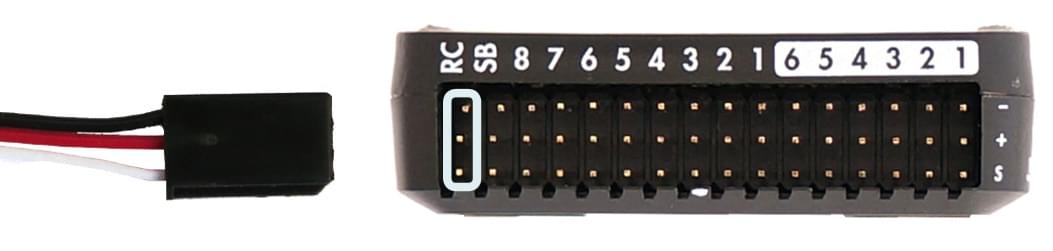
PPM and PWM receivers that have an individual wire for each channel must connect to the RC port via a PPM encoder like this one (PPM-Sum receivers use a single signal wire for all channels).
For more information about selecting a radio system, receiver compatibility, and binding your transmitter/receiver pair, see: Remote Control Transmitters & Receivers.
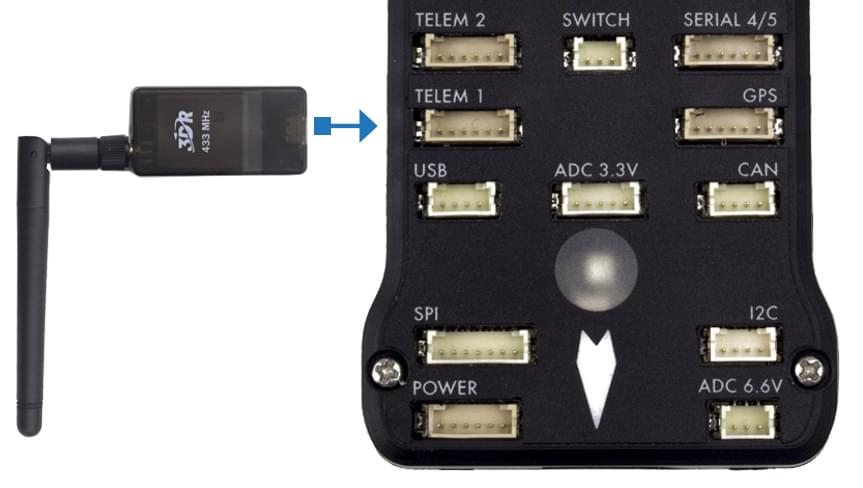
무선 텔레메트리(선택 사항)
무선 텔레메트리는 지상국 프로그램에서 비행 차량의 통신/제어에 사용합니다(예 : UAV를 특정 위치로 지시하거나 새 임무를 업로드 할 수 있음). 아래 그림과 같이 하나의 RC 수신기를 차량에 연결하여야 합니다. 다른 RC 송신기는 지상국 컴퓨터 또는 모바일 장치에 USB를 통하여 연결합니다.
모터
The mappings between MAIN/AUX output ports and motor/servos for all supported air and ground frames are listed in the Airframe Reference.
WARNING
The mapping is not consistent across frames (e.g. you can't rely on the throttle being on the same output for all plane frames). 가지고 있는 기체의 프레임에 대해 올바르게 모터를 제대로 연결하였는지 다시 한 번 확인하십시오.
TIP
If your frame is not listed in the reference then use a "generic" airframe of the correct type.
INFO
The output rail must be separately powered, as discussed in the Power section above.
기타 주변 장치
The wiring and configuration of other components is covered within the topics for individual peripherals.
설정
General configuration information is covered in: Autopilot Configuration.
QuadPlane specific configuration is covered here: QuadPlane VTOL Configuration
자세한 배선 정보 (헬기)