PX4 ROS 2 Control Interface
PX4 v1.15 ExperimentalWARNING
실험 At the time of writing, parts of the PX4 ROS 2 Control Interface are experimental, and hence subject to change:
- The architecture and core interfaces for defining modes in ROS 2 modes are largely stable, and are tested in CI. The library offers significant benefits over using offboard mode in its current state.
- Only a few setpoint types have settled (the others are still under development). You may need to use internal PX4 topics which may not remain backwards-compatible over time.
- The API is not fully documented.
The PX4 ROS 2 Interface Library is a C++ library (with Python bindings) that simplifies controlling PX4 from ROS 2.
Developers use the library to create and dynamically register modes written using ROS 2. These modes are dynamically registered with PX4, and appear to be part of PX4 to a ground station or other external system. They can even replace the default modes in PX4 with enhanced ROS 2 versions, falling back to the original version if the ROS2 mode fails.
The library also provides classes for sending different types of setpoints, ranging from high-level navigation tasks all the way down to direct actuator controls. These classes abstract the internal setpoints used by PX4, and that can therefore be used to provide a consistent ROS 2 interface for future PX4 and ROS releases.
PX4 ROS 2 modes are easier to implement and maintain than PX4 internal modes, and provide more resources for developers in terms of processing power and pre-existing libraries. Unless the mode is safety-critical, requires strict timing or very high update rates, or your vehicle doesn't have a companion computer, you should consider using PX4 ROS 2 modes in preference to PX4 internal modes.
TIP
If you want to use Python, check out the examples in the repository. Not all classes have Python bindings yet — the supported bindings are here. You are welcome to add and contribute missing classes.
개요
This diagram provides a conceptual overview of how the control interface modes and mode executors interact with PX4.

The following sections define and explain the terms used in the diagram.
Definitions
Mode
A mode defined using the interface library has the following properties:
- A mode is a component that can send setpoints to the vehicle in order to control its motion (such as velocity or direct actuator commands).
- A mode selects a setpoint type and sends it while it is active. It can switch between multiple setpoint types.
- A mode can't activate other modes, and must be activated by the user (through RC/GCS), the flight controller in a failsafe situation, a mode executor, or some other external system.
- Has a name displayed by the GCS.
- Can configure its mode requirements (for example that it requires a valid position estimate).
- A mode can perform different tasks, such as flying to a target, lowering a winch, releasing a payload and then fly back.
- A mode can replace a mode defined in PX4.
Mode Executor
A mode executor is an optional component for scheduling modes. For example, the mode executor for a custom payload delivery or survey mode might first trigger a take-off, then switch to the custom mode, and when that completes trigger an RTL.
Specifically, it has the following properties:
- A mode executor is an optional component one level higher than a mode. It is a state machine that can activate modes, and wait for their completion.
- It can only do so while it is in charge. For that, an executor has exactly one owned mode (and a mode can be owned by at most one executor). This mode serves as activation for the executor: when the user selects the mode, the owning executor gets activated and can select any mode. It stays in charge until the user switches modes (by RC or from a GCS), or a failsafe triggers a mode switch. Should the failsafe clear, the executor gets reactivated.
- This allows multiple executors to coexist.
- Executors cannot activate other executors.
- Within the library, a mode executor is always implemented in combination with a custom mode.
INFO
- These definitions guarantee that a user can take away control from a custom mode or executor at any point in time by commanding a mode switch through RC or a GCS.
- A mode executor is transparent to the user. It gets indirectly selected and activated through the owning mode, and thus the mode should be named accordingly.
Configuration Overrides
Both modes and executors can define configuration overrides, allowing customisation of certain behaviors while the mode or executor is active.
These are currently implemented:
- Disabling auto-disarm. This permits landing and then taking off again (e.g. to release a payload).
- Ability to defer non-essential failsafes. This allows an executor to run an action without being interrupted by non-critical failsafe. For example, ignoring a low-battery failsafe so that a winch operation can complete.
Comparison to Offboard Control
The above concepts provide a number of advantages over traditional offboard control:
- Multiple nodes or applications can coexist and even run at the same time. But only one node can control the vehicle at a given time, and this node is well defined.
- Modes have a distinct name and be displayed/selected in the GCS.
- Modes are integrated with the failsafe state machine and arming checks.
- The setpoint types that can be sent are well defined.
- ROS 2 modes can replace flight controller internal modes (such as Return mode).
Installation and First Test
The following steps are required to get started:
Make sure you have a working ROS 2 setup, with
px4_msgsin the ROS 2 workspace.Clone the repository into the workspace:
shcd $ros_workspace/src git clone --recursive https://github.com/Auterion/px4-ros2-interface-libINFO
To ensure compatibility, use the latest main branches for PX4, px4_msgs and the library. See also here.
:::
Build the workspace:
shcd .. colcon build source install/setup.bashIn a different shell, start PX4 SITL:
shcd $px4-autopilot make px4_sitl gazebo-classic(here we use Gazebo-Classic, but you can use any model or simulator)
Run the micro XRCE agent in a new shell (you can keep it running afterward):
shMicroXRCEAgent udp4 -p 8888Start QGroundControl.
INFO
Use QGroundControl Daily, which supports dynamically updating the list of modes.
:::
Back in the ROS 2 terminal, run one of the example modes:
shros2 run example_mode_manual_cpp example_mode_manualYou should get an output like this showing 'My Manual Mode' mode being registered:
sh[DEBUG] [example_mode_manual]: Checking message compatibility... [DEBUG] [example_mode_manual]: Subscriber found, continuing [DEBUG] [example_mode_manual]: Publisher found, continuing [DEBUG] [example_mode_manual]: Registering 'My Manual Mode' (arming check: 1, mode: 1, mode executor: 0) [DEBUG] [example_mode_manual]: Subscriber found, continuing [DEBUG] [example_mode_manual]: Publisher found, continuing [DEBUG] [example_mode_manual]: Got RegisterExtComponentReply [DEBUG] [example_mode_manual]: Arming check request (id=1, only printed once)On the PX4 shell, you can check that PX4 registered the new mode:
shcommander statusThe output should contain:
plainINFO [commander] Disarmed INFO [commander] navigation mode: Position INFO [commander] user intended navigation mode: Position INFO [commander] in failsafe: no INFO [commander] External Mode 1: nav_state: 23, name: My Manual ModeAt this point you should be able to see the mode in QGroundControl as well:
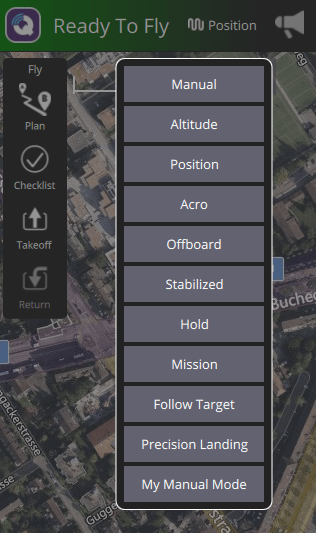
Select the mode, make sure you have a manual control source (physical or virtual joystick), and arm the vehicle. The mode will then activate, and it should print the following output:
sh[DEBUG] [example_mode_manual]: Mode 'My Manual Mode' activatedNow you are ready to create your own mode.
How to use the Library
The following sections describe specific functionality provided by this library. In addition, any other PX4 topic can be subscribed or published.
Mode Class Definition
This section steps through an example of how to create a class for a custom mode.
For a complete application, check out the examples in the Auterion/px4-ros2-interface-lib repository, such as examples/cpp/modes/manual.
class MyMode : public px4_ros2::ModeBase // [1]
{
public:
  explicit MyMode(rclcpp::Node & node)
  : ModeBase(node, Settings{"My Mode"}) // [2]
  {
    // [3]
    _manual_control_input = std::make_shared<px4_ros2::ManualControlInput>(*this);
    _rates_setpoint = std::make_shared<px4_ros2::RatesSetpointType>(*this);
  }

  void onActivate() override
  {
    // Called whenever our mode gets selected
  }

  void onDeactivate() override
  {
    // Called when our mode gets deactivated
  }

  void updateSetpoint(const rclcpp::Duration & dt) override
  {
    // [4]
    const Eigen::Vector3f thrust_sp{0.F, 0.F, -_manual_control_input->throttle()};
    const Eigen::Vector3f rates_sp{
      _manual_control_input->roll() * 150.F * M_PI / 180.F,
      -_manual_control_input->pitch() * 150.F * M_PI / 180.F,
      _manual_control_input->yaw() * 100.F * M_PI / 180.F
    };
    _rates_setpoint->update(rates_sp, thrust_sp);
  }

private:
  std::shared_ptr<px4_ros2::ManualControlInput> _manual_control_input;
  std::shared_ptr<px4_ros2::RatesSetpointType> _rates_setpoint;
};[1]: First we create a class that inherits frompx4_ros2::ModeBase.[2]: In the constructor, we pass the mode name. This also allows us to configure some other things, like replacing a flight controller internal mode.[3]: This is where we create all objects that we want to use later on. This can be RC input, setpoint type(s), or telemetry.*thisis passed as aContextto each object, which associates the object with the mode.[4]: Whenever the mode is active, this method gets called regularly (the update rate depends on the setpoint type). Here is where we can do our work and generate a new setpoint.
After creating an instance of that mode, mode->doRegister() must be called which does the actual registration with the flight controller and returns false if it fails. In case a mode executor is used, doRegister() must be called on the mode executor, instead of for the mode.
Mode Executor Class Definition
This section steps through an example of how to create a mode executor class.
class MyModeExecutor : public px4_ros2::ModeExecutorBase // [1]
{
public:
MyModeExecutor(px4_ros2::ModeBase & owned_mode) // [2]
: ModeExecutorBase(px4_ros2::ModeExecutorBase::Settings{}, owned_mode),
_node(owned_mode.node())
{ }
enum class State // [3]
{
Reset,
TakingOff,
MyMode,
RTL,
WaitUntilDisarmed,
};
void onActivate() override
{
runState(State::TakingOff, px4_ros2::Result::Success); // [4]
}
void onDeactivate(DeactivateReason reason) override { }
void runState(State state, px4_ros2::Result previous_result)
{
if (previous_result != px4_ros2::Result::Success) {
RCLCPP_ERROR(_node.get_logger(), "State %i: previous state failed: %s", (int)state,
resultToString(previous_result));
return;
}
switch (state) { // [5]
case State::Reset:
break;
[1]: First we create a class that inherits frompx4_ros2::ModeExecutorBase.[2]: The constructor takes our custom mode that is associated with the executor and passes it to the constructor ofModeExecutorBase.[3]: We define an enum for the states we want to run through.[4]:onActivategets called when the executor becomes active. At this point we can start to run through our states. How you do this is up to you, in this example a methodrunStateis used to execute the next state.[5]: On switching to a state we call an asynchronous method fromModeExecutorBaseto start the desired mode:run,takeoff,rtl, and so on. These methods are passed a function that is called on completion; the callback provides aResultargument that tells you whether the operation succeeded or not. The callback runs the next state on success.[6]: We use thescheduleMode()method to start the executor's "owned mode", following the same pattern as the other state handlers.
Setpoint Types
A mode can choose its setpoint type(s) it wants to use to control the vehicle. The used types also define the compatibility with different vehicle types.
The following sections provide a list of supported setpoint types:
- MulticopterGotoSetpointType: MC only Smooth position and (optionally) heading control
- FwLateralLongitudinalSetpointType: FW only PX4 v1.17 Direct control of lateral and longitudinal fixed wing dynamics
- DirectActuatorsSetpointType: Direct control of motors and flight surface servo setpoints
- Rover Setpoints: PX4 v1.17 Direct access to rover control setpoints (Position, Speed, Attitude, Rate, Throttle and Steering).
TIP
The other setpoint types are currently experimental, and can be found in: px4_ros2/control/setpoint_types/experimental.
You can add your own setpoint types by adding a class that inherits from px4_ros2::SetpointBase, sets the configuration flags according to what the setpoint requires, and then publishes any topic containing a setpoint.
Go-to Setpoint (MulticopterGotoSetpointType)
MC onlyMulticopter onlyINFO
This setpoint type is currently only supported for multicopters.
Smoothly control position and (optionally) heading setpoints with the px4_ros2::MulticopterGotoSetpointType setpoint type. The setpoint type is streamed to FMU based position and heading smoothers formulated with time-optimal, maximum-jerk trajectories, with velocity and acceleration constraints.
There is also a px4_ros2::MulticopterGotoGlobalSetpointType class that allows to send setpoints in global coordinates.
The most trivial use is simply inputting a 3D position into the update method:
const Eigen::Vector3f target_position_m{-10.F, 0.F, 3.F};
_goto_setpoint->update(target_position_m);
In this case, heading will remain uncontrolled. To additionally control heading, specify it as the second input argument:
const Eigen::Vector3f target_position_m{-10.F, 0.F, 3.F};
const float heading_rad = 3.14F;
_goto_setpoint->update(
  target_position_m,
  heading_rad);
An additional feature of the go-to setpoint is dynamic control on the underlying smoothers' speed limits (i.e. maximum horizontal and vertical translational velocities as well as heading rate). If, as above, left unspecified, the smoothers will default to the vehicle's default maximums (typically set to the physical limitations). The smoothers will only decrease speed limits, never increase.
_goto_setpoint->update(
  target_position_m,
  heading_rad,
  max_horizontal_velocity_m_s,
  max_vertical_velocity_m_s,
  max_heading_rate_rad_s);
All arguments in the update method except the position are templated as std::optional<float>, meaning that if one desires constraining the heading rate, but not the translating velocities, this is possible using a std::nullopt:
_goto_setpoint->update(
  target_position_m,
  heading_rad,
  std::nullopt,
  std::nullopt,
  max_heading_rate_rad_s);
Fixed-Wing Lateral and Longitudinal Setpoint (FwLateralLongitudinalSetpointType)
Fixed wing only PX4 v1.17INFO
This setpoint type is supported for fixed-wing vehicles and for VTOLs in fixed-wing mode.
Use the px4_ros2::FwLateralLongitudinalSetpointType to directly control the lateral and longitudinal dynamics of a fixed-wing vehicle — that is, side-to-side motion (turning/banking) and forward/vertical motion (speeding up and climbing/descending), respectively. This setpoint is streamed to the PX4 FwLateralLongitudinalControl module, which decouples lateral and longitudinal inputs while ensuring that vehicle limits are respected.
To control the vehicle, at least one lateral and one longitudinal setpoint must be provided:
- Of the longitudinal inputs: either
altitudeorheight_ratemust be finite to control vertical motion. If both are set toNAN, the vehicle will maintain its current altitude. - Of the lateral inputs: at least one of
course,airspeed_direction, orlateral_accelerationmust be finite.
For a detailed description of the controllable parameters, please refer to message definitions (FixedWingLateralSetpoint and FixedWingLongitudinalSetpoint).
기본 사용법
This type has a number of update methods, each allowing you to specify an increasing number of setpoints.
The simplest method is updateWithAltitude(), which allows you to specify a course and altitude target setpoint:
const float altitude_msl = 500.F;
const float course = 0.F; // due North
_fw_lateral_longitudinal_setpoint->updateWithAltitude(altitude_msl, course);
PX4 uses the setpoints to compute the roll angle, pitch angle and throttle setpoints that are sent to lower level controllers. Note that the commanded flight is expected to be relatively gentle/unaggressive when using this method. This is done as follows:
Lateral control output:
course setpoint (set by user) → airspeed direction (heading) setpoint → lateral acceleration setpoint → roll angle setpoint.
Longitudinal control output:
altitude setpoint (set by user) → height rate setpoint → pitch angle setpoint and throttle settings.
The updateWithHeightRate() method allows you to set a target course and height_rate (this is useful if the speed of ascent or descent matters, or needs to be dynamically controlled):
const float height_rate = 2.F;
const float course = 0.F; // due North
_fw_lateral_longitudinal_setpoint->updateWithHeightRate(height_rate, course);
The updateWithAltitude() and updateWithHeightRate() methods allow you to additionally control the equivalent airspeed or lateral acceleration by specifying them as the third and fourth arguments, respectively:
const float altitude_msl = 500.F;
const float course = 0.F; // due North
const float equivalent_aspd = 15.F; // m/s
const float lateral_acceleration = 2.F; // FRD, used as feedforward

_fw_lateral_longitudinal_setpoint->updateWithAltitude(altitude_msl,
  course,
  equivalent_aspd,
  lateral_acceleration);
The equivalent airspeed and lateral acceleration arguments are defined as std::optional<float>, so you can omit any of them by passing std::nullopt.
TIP
If both lateral acceleration and course setpoints are provided, the lateral acceleration setpoint will be used as feedforward.
Full Control Using the Setpoint Struct
For full flexibility, you can create and pass a FwLateralLongitudinalSetpoint struct. Each field is templated with std::optional<float>.
TIP
If both course and airspeed direction are set: airspeed direction takes precedence, course is not controlled. Lateral acceleration is treated as feedforward if either course or airspeed direction are also finite. If both altitude and height rate are set: height rate takes precedence, altitude is not controlled.
px4_ros2::FwLateralLongitudinalSetpoint setpoint_s;

setpoint_s.withCourse(0.F);
// setpoint_s.withAirspeedDirection(0.2F); // uncontrolled
setpoint_s.withLateralAcceleration(2.F); // feedforward
//setpoint_s.withAltitude(500.F); // uncontrolled
setpoint_s.withHeightRate(2.F);
setpoint_s.withEquivalentAirspeed(15.F);

_fw_lateral_longitudinal_setpoint->update(setpoint_s);
The diagram below illustrates the interaction between the FwLateralLongitudinalSetpointType and PX4 when all inputs are set.

Advanced Configuration (Optional)
You can also pass a FwControlConfiguration struct along with the setpoint to override default controller settings and constraints such as pitch limits, throttle limits, and target sink/climb rates. This is intended for advanced users:
px4_ros2::FwLateralLongitudinalSetpoint setpoint_s;

setpoint_s.withAirspeedDirection(0.F);
setpoint_s.withLateralAcceleration(2.F); // feedforward
setpoint_s.withAltitude(500.F);
setpoint_s.withEquivalentAirspeed(15.F);

px4_ros2::FwControlConfiguration config_s;

config_s.withTargetClimbRate(3.F);
config_s.withMaxAcceleration(5.F);
config_s.withThrottleLimits(0.4F, 0.6F);

_fw_lateral_longitudinal_setpoint->update(setpoint_s, config_s);
All configuration fields are defined as std::optional<float>. Unset values will default to the PX4 configuration. See LateralControlConfiguration and FixedWingLongitudinalConfiguration for more information on configuration options.
INFO
For safety, PX4 automatically limits configuration values to stay within the vehicle’s constraints. For example, throttle overrides are clamped to remain between FW_THR_MIN and FW_THR_MAX.
Direct Actuator Control Setpoint (DirectActuatorsSetpointType)
Actuators can be directly controlled using the px4_ros2::DirectActuatorsSetpointType setpoint type. Motors and servos can be set independently. Be aware that the assignment is vehicle and setup-specific. For example to control a quadrotor, you need to set the first 4 motors according to its output configuration.
INFO
If you want to control an actuator that does not control the vehicle's motion, but for example a payload servo, see below.
Rover Setpoints
PX4 v1.17 ExperimentalThe rover modules use a hierarchical structure to propagate setpoints:

INFO
The "highest" setpoint that is provided will be used within the PX4 rover modules to generate the setpoints that are below it (Overriding them!). With this hierarchy there are clear rules for providing a valid control input:
- Provide a position setpoint, or
- One of the setpoints on the "left" (speed or throttle) and one of the setpoints on the "right" (attitude, rate or steering). All combinations of "left" and "right" setpoints are valid.
For ease of use we expose these valid combinations as new SetpointTypes.
The RoverSetpointTypes exposed through the control interface are combinations of these setpoints that lead to a valid control input:
| SetpointType | Position | Speed | Throttle | Attitude | 주파수 | Steering | Control Flags |
|---|---|---|---|---|---|---|---|
| RoverPosition | ✓ | (✓) | (✓) | (✓) | (✓) | (✓) | Position, Velocity, Attitude, Rate, Control Allocation |
| RoverSpeedAttitude | ✓ | (✓) | ✓ | (✓) | (✓) | Velocity, Attitude, Rate, Control Allocation | |
| RoverSpeedRate | ✓ | (✓) | ✓ | (✓) | Velocity, Rate, Control Allocation | ||
| RoverSpeedSteering | ✓ | (✓) | ✓ | Velocity, Control Allocation | |||
| RoverThrottleAttitude | ✓ | ✓ | (✓) | (✓) | Attitude, Rate, Control Allocation | ||
| RoverThrottleRate | ✓ | ✓ | (✓) | Rate, Control Allocation | |||
| RoverThrottleSteering | ✓ | ✓ | Control Allocation |
✓ are the setpoints we publish, and (✓) are generated internally by the PX4 rover modules according to the hierarchy above.
An example for a rover specific drive mode using the RoverSpeedAttitudeSetpointType is provided here.
Controlling a VTOL
PX4 v1.17 ExperimentalTo control a VTOL in an external flight mode, ensure you're returning the correct setpoint type based on the current flight configuration:
- Multicopter mode: use a setpoint type that is compatible with multicopter control. For example: either the
MulticopterGotoSetpointTypeor theTrajectorySetpointType. - Fixed-wing mode: Use the
FwLateralLongitudinalSetpointType.
As long as the VTOL remains in either multicopter or fixed-wing mode throughout the external mode, no additional handling is required.
If you would like to command a VTOL transition in your external mode, you need to use the VTOL API. The VTOL API provides the functionality to command a transition and query the current state of the vehicle.
Use this API with caution! Commanding transitions externally makes the user partially responsible for ensuring smooth and safe behavior, unlike onboard transitions (e.g. via RC switch) where PX4 handles the full process:
Ensure that both the
TrajectorySetpointTypeand theFwLateralLongitudinalSetpointTypeare available to your mode.Create an instance of
px4_ros2::VTOLin the constructor of your mode.To command a transition, you can use the
toMulticopter()ortoFixedwing()methods on your VTOL object to set the desired state.During transition, send the following combination of setpoints:
cpp// Assuming the instance of the px4_ros2::VTOL object is called vtol // Send TrajectorySetpointType as follows: Eigen::Vector3f acceleration_sp = vtol.computeAccelerationSetpointDuringTransition(); Eigen::Vector3f velocity_sp{NAN, NAN, 0.f}; _trajectory_setpoint->update(velocity_sp, acceleration_sp); // Send FwLateralLongitudinalSetpointType with lateral input to realign vehicle as desired float course_sp = 0.F; // North _fw_lateral_longitudinal_setpoint->updateWithAltitude(NAN, course_sp)This will ensure that the transition is handled properly within PX4. You can optionally pass a deceleration setpoint to
computeAccelerationSetpointDuringTransition()to be used during back-transitions.
To check the current state of the vehicle, use the getCurrentState() method on your px4_ros2::VTOL object.
See this external flight mode implementation for a practical example on how to use this API.
Controlling an Independent Actuator/Servo
If you want to control an independent actuator (a servo), follow these steps:
- Configure the output.
- Create an instance of px4_ros2::PeripheralActuatorControls in the constructor of your mode.
- Call the
set()method to control the actuator(s). This can be done independently of any active setpoints.
텔레메트리
You can access PX4 telemetry topics directly via the following classes:
- OdometryGlobalPosition: Global position
- OdometryLocalPosition: Local position, velocity, acceleration, and heading
- OdometryAttitude: Vehicle attitude
- OdometryAirspeed: Airspeed
For example, you can query the vehicle's current position estimate as follows:
std::shared_ptr<px4_ros2::OdometryLocalPosition> _vehicle_local_position;
...

// Get vehicle's last local position
_vehicle_local_position->positionNed();

// Check last horizontal position is valid
_vehicle_local_position->positionXYValid();
INFO
These topics provide a wrapper around the internal PX4 topics, allowing the library to maintain compatibility if the internal topics change. Check px4_ros2/odometry for new topics, and of course you can use any ROS 2 topic published from PX4.
Failsafes and Mode Requirements
Each mode has a set of requirement flags. These are generally automatically set, depending on which objects are used within the context of a mode. For example when adding manual control input with the code below the requirement flag for manual control gets set:
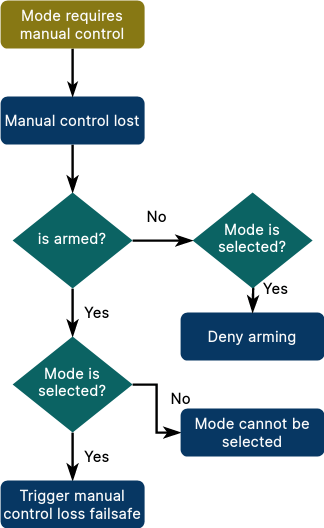
_manual_control_input = std::make_shared<px4_ros2::ManualControlInput>(*this);Specifically, setting a flag has the following consequences in PX4, if the condition is not met:
- arming is not allowed, while the mode is selected
- when already armed, the mode cannot be selected
- when armed and the mode is selected, the relevant failsafe is triggered (e.g. RC loss for the manual control requirement). Check the safety page for how to configure failsafe behavior. A failsafe is also triggered when the mode crashes or becomes unresponsive while it is selected.
This is the corresponding flow diagram for the manual control flag:
It is possible to manually update any mode requirement after the mode is registered. For example to add home position as requirement:
modeRequirements().home_position = true;The full list of flags can be found in requirement_flags.hpp.
Deferring Failsafes
A mode or mode executor can temporarily defer non-essential failsafes by calling the method deferFailsafesSync(). To get notified when a failsafe would be triggered, override the method void onFailsafeDeferred().
Check the integration test for an example.
Assigning a Mode to an RC Switch or Joystick Action
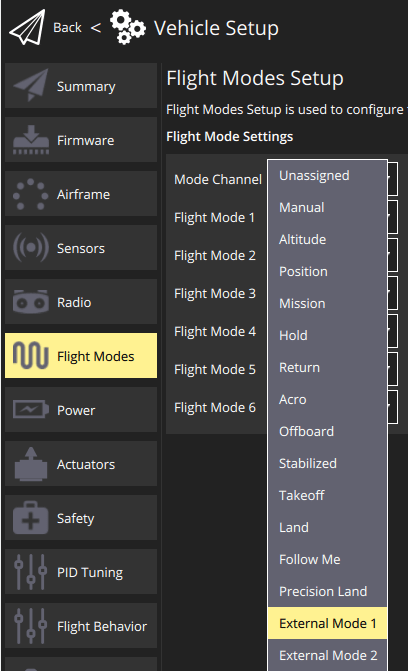
External modes can be assigned to RC switches or joystick actions. When assigning a mode to an RC switch, you need to know the index (because the parameter metadata does not contain the dynamic mode name). Use commander status while the mode is running to get that information.
예:
INFO [commander] External Mode 1: nav_state: 23, name: My Manual Modemeans you would select External Mode 1 in QGC:
INFO
PX4 ensures a given mode is always assigned to the same index by storing a hash of the mode name. This makes it independent of startup ordering in case of multiple external modes.
Replacing an Internal Mode
An external mode can replace an existing internal mode, such as Return mode (RTL). By doing so, whenever RTL gets selected (through the user or a failsafe situation), the external mode is used instead of the internal one. The internal one is only used as a fallback when the external one becomes unresponsive or crashes.
The replacement mode can be set in the settings of the ModeBase constructor:
Settings{kName, false, ModeBase::kModeIDRtl}