Інструкція з налаштування мультикоптера PID (Manual/Basic)
This tutorial explains how to manually tune the PID loops on PX4 for all multicopter setups (Quads, Hexa, Octo etc).
TIP
Autotune is recommended for most users, as it is far faster, easier and provides good tuning for most frames. Рекомендується ручна настройка для кадрів, де автоналаштування не працює, або де важлива дотюнінг.
Generally if you're using an appropriate supported frame configuration, the default tuning should allow you to fly the vehicle safely. Tuning is recommended for all new vehicle setups to get the very best performance, because relatively small hardware and assembly changes can affect the gains required tuning gains for optimal flight. Наприклад, різні ESC або двигуни змінюють оптимальні налаштування коефіцієнтів настройки.
Введення
PX4 uses Proportional, Iintegral, Derivative (PID) controllers (these are the most widespread control technique).
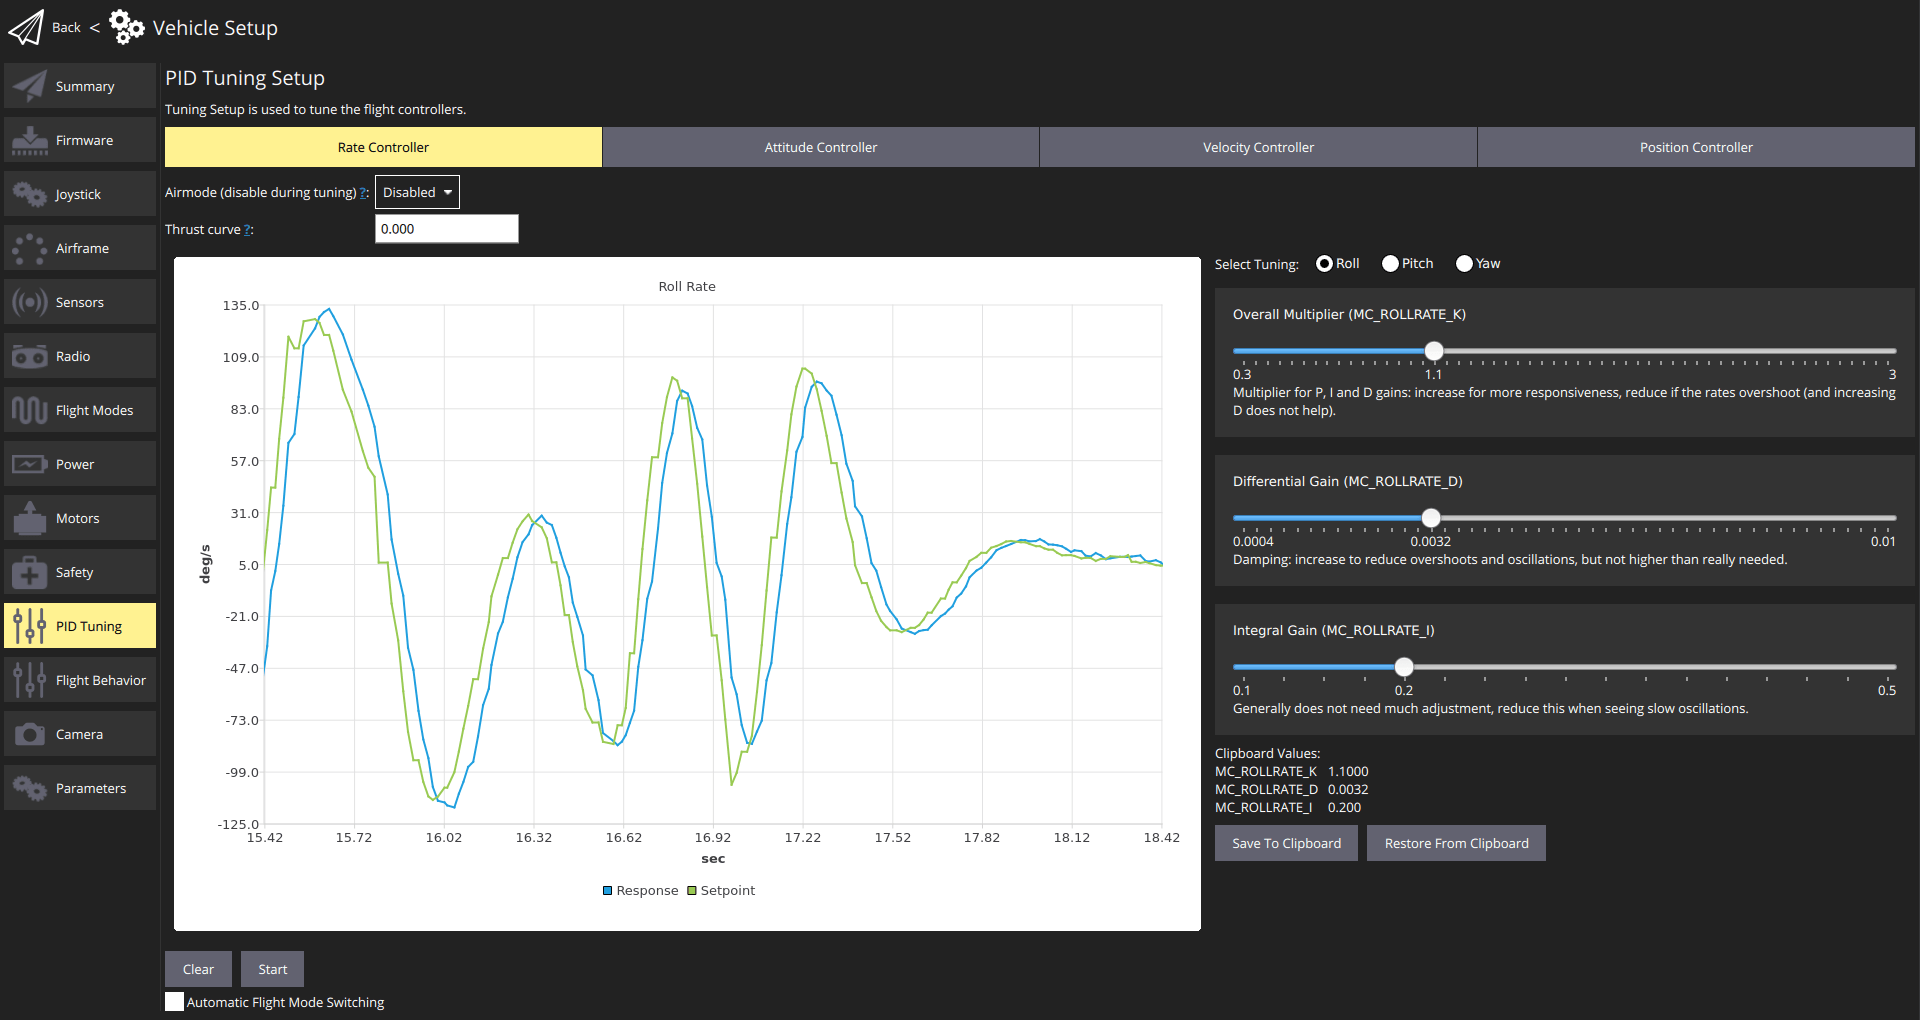
The QGroundControl PID Tuning setup provides real-time plots of the vehicle setpoint and response curves. The goal of tuning is to set the P/I/D values such that the Response curve matches the Setpoint curve as closely as possible (i.e. a fast response without overshoots).
Контролери рівні, що означає, що контролер більш високого рівня передає свої результати контролеру нижчого рівня. The lowest-level controller is the rate controller, followed by the attitude controller, and finally the velocity & position controller. Налаштування PID потрібно виконати в тому ж порядку, починаючи з регулятора швидкості, оскільки воно вплине на всі інші регулятори.
The testing procedure for each controller (rate, attitude, velocity/position) and axis (yaw, roll, pitch) is always the same: create a fast setpoint change by moving the sticks very rapidly and observe the response. Потім налаштуйте слайдери (як обговорено нижче), щоб покращити відстеження реакції на задане значення.
TIP
- Налаштування регулятора швидкості є найважливішим, і якщо воно налаштовано добре, інші регулятори часто не потребують жодних або лише незначних корекцій
- Зазвичай для кочення і тангажу можна використовувати ті ж самі коефіцієнти налаштування.
- використовуйте режим Acro/Stabilized/Altitude для налаштування контролера швидкості
- Use Position mode to tune the Velocity Controller and the Position Controller. Make sure to switch to the Simple position control mode so you can generate step inputs.

Передумови
You have selected the closest matching default frame configuration for your vehicle. This should give you a vehicle that already flies.
You should have done an ESC calibration.
If using PWM outputs their minimum values should be set correctly in the Actuator Configuration. These need to be set low, but such that the motors never stop when the vehicle is armed.
This can be tested in Acro mode or in Stabilized mode:
- Remove propellers
- Arm the vehicle and lower the throttle to the minimum
- Tilt the vehicle to all directions, about 60 degrees
- Check that no motors turn off
Use a high-rate telemetry link such as WiFi if at all possible (a typical low-range telemetry radio is not fast enough for real-time feedback and plots). This is particularly important for the rate controller.
Disable MC_AIRMODE before tuning a vehicle (there is an options for this in the PID tuning screen).
WARNING
Poorly tuned vehicles are likely to be unstable, and easy to crash. Make sure to have assigned a Kill switch.
Tuning Procedure
The tuning procedure is:
Arm the vehicle, takeoff, and hover (typically in Position mode).
Open QGroundControl Vehicle Setup > PID Tuning
Select the Rate Controller tab.
Confirm that the airmode selector is set to Disabled
Set the Thrust curve value to: 0.3 (PWM, power-based controllers) or 1 (RPM-based ESCs)
INFO
For PWM, power-based and (some) UAVCAN speed controllers, the control signal to thrust relationship may not be linear. As a result, the optimal tuning at hover thrust may not be ideal when the vehicle is operating at higher thrust.
The thrust curve value can be used to compensate for this non-linearity:
- For PWM controllers, 0.3 is a good default (which may benefit from further tuning).
- For RPM-based controllers, use 1 (no further tuning is required as these have a quadratic thrust curve).
For more information see the detailed PID tuning guide.
:::
Set the Select Tuning radio button to: Roll.
(Optionally) Select the Automatic Flight Mode Switching checkbox. This will automatically switch from Position mode to Stabilised mode when you press the Start button
For rate controller tuning switch to Acro mode, Stabilized mode or Altitude mode (unless automatic switching is enabled).
Select the Start button in order to start tracking the setpoint and response curves.
Rapidly move the roll stick full range and observe the step response on the plots.
TIP
Stop tracking to enable easier inspection of the plots. This happens automatically when you zoom/pan. Use the Start button to restart the plots, and Clear to reset them.
:::
Modify the three PID values using the sliders (for roll rate-tuning these affect
MC_ROLLRATE_K,MC_ROLLRATE_I,MC_ROLLRATE_D) and observe the step response again. The values are saved to the vehicle as soon as the sliders are moved.INFO
The goal is for the Response curve to match the Setpoint curve as closely as possible (i.e. a fast response without overshoots).
:::
The PID values can be adjusted as follows:

- P (пропорційне) або К підсилення:
  - збільште це для більшої реакції
  - зменшити, якщо відповідь перевищує і / або коливається (до певної міри збільшення значення D також допомагає).
- D (похідне) надходження:
  - це можна збільшити, щоб заглушити перевищення та коливання
  - збільшуйте це лише настільки, наскільки це потрібно, оскільки це підсилює шум (і може призвести до нагрітих моторів)
- I (інтегральний) коефіцієнт отримання:
  - використовується для зменшення поміченої похибки стану рівноваги
  - якщо значення занадто низьке, відповідь може ніколи не досягти заданої точки (наприклад, у вітрових умовах)
  - якщо занадто високий, можуть виникнути повільні коливання
- Повторіть процес налаштування вище для крена та курсу:
- Use Select Tuning radio button to select the axis to tune
- Перемістіть відповідні палички (тобто паличку крена для крена, паличку риштування для риштування).
- Для налаштування крену почніть з тих самих значень, що й для крену.
TIP
Use the Save to Clipboard and Reset from Clipboard buttons to copy the roll settings for initial pitch settings.
:::
Повторіть процес налаштування контролера нахилу для всіх осей.
Повторіть процес налаштування контролерів швидкості та позицій (на всіх осях).
Використовуйте режим позиції при налаштуванні цих контролерів
Select the Simple position control option in the Position control mode ... selector (this allows direct control for the generation of step inputs)
Готово! Пам'ятайте увімкнути повітряний режим перед виходом з налаштувань.